

When grilling salmon, finding the perfect side dishes is key to creating a memorable meal. Picture the delightful pairing of smoky salmon with a fresh Lemon Herb Quinoa Salad. This combination is truly a harmony of flavors on your plate. Are you wondering what other sides complement grilled salmon perfectly? Let’s explore these delicious possibilities together.
Lemon Herb Quinoa Salad
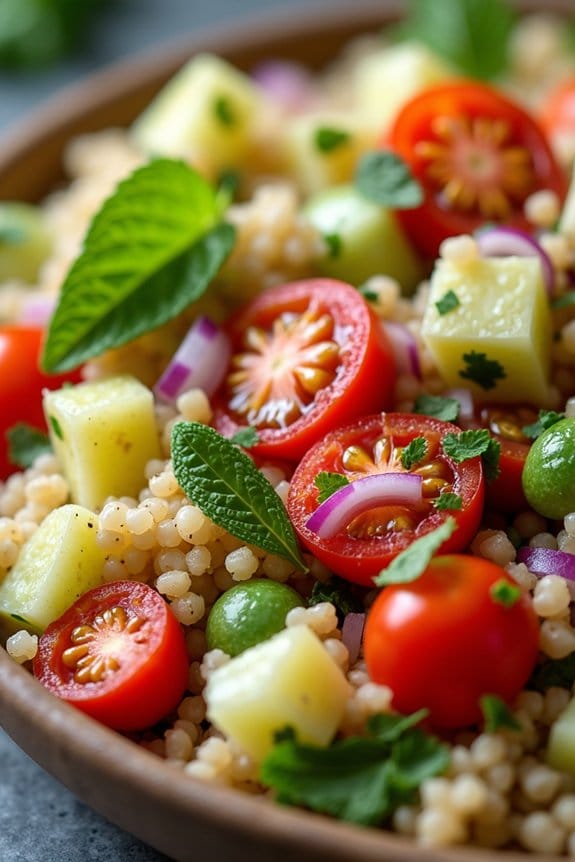
When it comes to crafting a perfect meal, pairing your grilled salmon with a revitalizing and flavorful side dish is essential. Enter the Lemon Herb Quinoa Salad, a vibrant and nutritious accompaniment that complements the rich taste of salmon beautifully. This salad combines the nutty flavor of quinoa with the zesty brightness of lemon and the aromatic notes of fresh herbs, resulting in a delightful medley of textures and flavors. Not only is this dish delicious, but it’s also packed with nutrients, making it a healthy choice for any meal.
The Lemon Herb Quinoa Salad is versatile and easy to prepare, making it an ideal side dish for any occasion. It can be served warm or chilled, depending on your preference, and it holds up well for meal prep, allowing you to enjoy it over several days. This recipe serves 4-6 people, making it perfect for a family dinner or a small gathering with friends. Whether you’re looking to impress your guests or simply want to enjoy a wholesome meal, this salad is sure to become a favorite in your culinary repertoire.
Ingredients (Serves 4-6):
- 1 cup quinoa
- 2 cups water
- 1/4 cup extra virgin olive oil
- 1/4 cup freshly squeezed lemon juice
- 2 cloves garlic, minced
- 1 teaspoon salt
- 1/2 teaspoon black pepper
- 1 cup cherry tomatoes, halved
- 1 cucumber, diced
- 1/4 cup red onion, finely chopped
- 1/4 cup fresh parsley, chopped
- 1/4 cup fresh mint, chopped
Instructions:
- Cook the Quinoa: Rinse the quinoa under cold water using a fine-mesh sieve. In a medium saucepan, combine the quinoa and water. Bring to a boil over medium-high heat. Once boiling, reduce the heat to low, cover, and simmer for about 15 minutes or until the quinoa is tender and has absorbed all the water. Remove from heat and let it stand, covered, for 5 minutes. Fluff the quinoa with a fork and set aside to cool.
- Prepare the Dressing: In a small bowl, whisk together the olive oil, lemon juice, minced garlic, salt, and black pepper until well combined. This dressing will add a punch of flavor to your salad.
- Combine the Ingredients: In a large mixing bowl, combine the cooked quinoa, cherry tomatoes, cucumber, red onion, parsley, and mint. Pour the dressing over the salad ingredients and toss gently to combine, ensuring the dressing evenly coats all components of the salad.
- Serve: Transfer the salad to a serving bowl or platter. You can serve it immediately for a warm salad or refrigerate it for at least 30 minutes to serve chilled. Either way, the flavors will meld beautifully.
Extra Tips:
For an added burst of flavor, consider adding a sprinkle of feta cheese or toasted almonds to the salad just before serving. If you prefer a bit of spice, a pinch of red pepper flakes can enhance the dish. Be sure to taste and adjust the seasoning as needed, adding more lemon juice or salt to suit your palate.
Also, this salad can be kept in an airtight container in the refrigerator for up to 3 days, making it a convenient option for meal prepping. Enjoy your Lemon Herb Quinoa Salad as a revitalizing side to your grilled salmon or as a light lunch on its own!
Garlic Parmesan Roasted Asparagus

When planning a delightful meal featuring grilled salmon, it’s crucial to pair it with a side dish that complements its rich, savory flavors. Garlic Parmesan Roasted Asparagus is an excellent choice, balancing the salmon’s buttery texture with the crispness and earthiness of asparagus. The addition of garlic and Parmesan cheese introduces a savory depth that enhances the overall dining experience, making it perfect for both casual dinners and more formal gatherings.
This dish isn’t only delicious but also remarkably simple to prepare. The asparagus is roasted to perfection, maintaining a slight crunch while absorbing the flavors of garlic and cheese. It’s a quick side dish that requires minimal ingredients, yet it delivers maximum flavor, making it the perfect accompaniment to grilled salmon. The following recipe serves 4-6 people, allowing everyone at your table to enjoy this delectable combination.
Ingredients (serving size: 4-6 people):
- 2 pounds of fresh asparagus, trimmed
- 3 tablespoons olive oil
- 4 cloves of garlic, minced
- 1 cup grated Parmesan cheese
- Salt and freshly ground black pepper, to taste
- 1 lemon, cut into wedges
Cooking Instructions:
- Preheat your oven to 400°F (200°C). This temperature guarantees that the asparagus roasts evenly and develops a nice, crispy texture.
- Prepare the asparagus: Rinse the asparagus under cold water and pat dry with a paper towel. Trim the tough ends by snapping them off or cutting with a knife, making sure only the tender parts remain.
- Season the asparagus: Place the asparagus spears on a large baking sheet. Drizzle with olive oil and sprinkle with minced garlic, salt, and black pepper. Toss the asparagus with your hands to make sure they’re evenly coated with the oil and seasonings.
- Roast the asparagus: Spread the asparagus out in a single layer on the baking sheet. Place in the preheated oven and roast for about 15-20 minutes, or until the asparagus is tender and slightly crispy on the edges.
- Add Parmesan cheese: Remove the baking sheet from the oven. Sprinkle the grated Parmesan cheese over the asparagus, ensuring an even distribution. Return the baking sheet to the oven for an additional 5 minutes, or until the cheese is melted and slightly golden.
- Serve: Transfer the roasted asparagus to a serving platter. Garnish with lemon wedges on the side, allowing guests to squeeze fresh lemon juice over the dish for an added burst of flavor.
Extra Tips:
For an even bolder flavor, consider adding a pinch of red pepper flakes or a drizzle of balsamic glaze over the finished dish.
When selecting asparagus, choose spears that are firm and bright green in color, as these will have the best texture and flavor.
If you prefer a smokier taste, try grilling the asparagus instead of roasting it. Simply follow the same seasoning steps and grill over medium heat for about 8-10 minutes, turning occasionally.
Creamy Dill Cucumber Salad
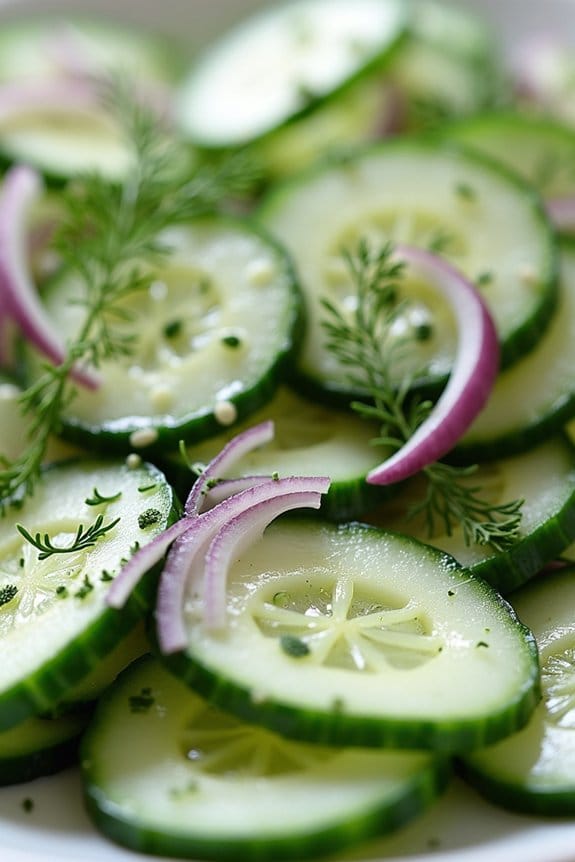
Creamy Dill Cucumber Salad is a revitalizing and tangy side dish that perfectly complements grilled salmon. This salad combines the coolness of cucumbers with the aromatic flavor of fresh dill, all enveloped in a creamy dressing. It’s an effortless yet elegant dish that adds a burst of vitality to your meal. The creamy dill dressing not only enhances the cucumbers but also pairs wonderfully with the rich, savory flavors of grilled salmon.
This cucumber salad is perfect for warmer months when cucumbers are at their peak vitality. The key to success with this dish is using fresh ingredients, particularly the dill, which adds a distinctive flavor profile. The creaminess is balanced by the crisp texture of the cucumbers, making it a delightful contrast for every bite. Ideal for serving 4-6 people, this side dish is quick to prepare and can be made ahead of time, making it a stress-free addition to any meal.
Ingredients for Creamy Dill Cucumber Salad (Serves 4-6):
- 3 large cucumbers, thinly sliced
- 1 cup sour cream
- 1 tablespoon white vinegar
- 1 tablespoon lemon juice
- 2 tablespoons fresh dill, chopped
- 1 tablespoon sugar
- Salt and pepper to taste
- 1/4 cup red onion, thinly sliced
Cooking Instructions:
- Prepare the Cucumbers: Start by washing the cucumbers thoroughly. Peel them if desired, although leaving the skin on adds a nice texture. Thinly slice the cucumbers and place them in a large mixing bowl.
- Make the Dressing: In a separate bowl, combine the sour cream, white vinegar, lemon juice, chopped dill, sugar, salt, and pepper. Mix these ingredients together until the dressing is smooth and the sugar is completely dissolved.
- Combine Ingredients: Add the thinly sliced red onion to the bowl with the cucumbers. Pour the creamy dill dressing over the cucumbers and onions. Gently toss everything together until the cucumbers and onions are evenly coated with the dressing.
- Chill the Salad: Cover the bowl with plastic wrap or a lid and refrigerate for at least 30 minutes to allow the flavors to meld together. This chilling time also helps the cucumbers absorb the creamy dressing, enhancing their flavor.
- Serve: Before serving, give the salad a gentle toss to redistribute the dressing. Taste and adjust seasoning if necessary. Serve cold as a revitalizing side dish alongside grilled salmon.
Extra Tips:
For the best flavor, use fresh dill rather than dried, as it imparts a more vibrant taste to the salad. If your cucumbers have a lot of seeds, consider removing them to prevent the salad from becoming too watery. Additionally, you can add a pinch of garlic powder to the dressing for an extra layer of flavor. This salad can be made a few hours ahead of time and stored in the refrigerator, but it’s best to consume it on the same day to maintain its crispness.
Honey Glazed Carrots
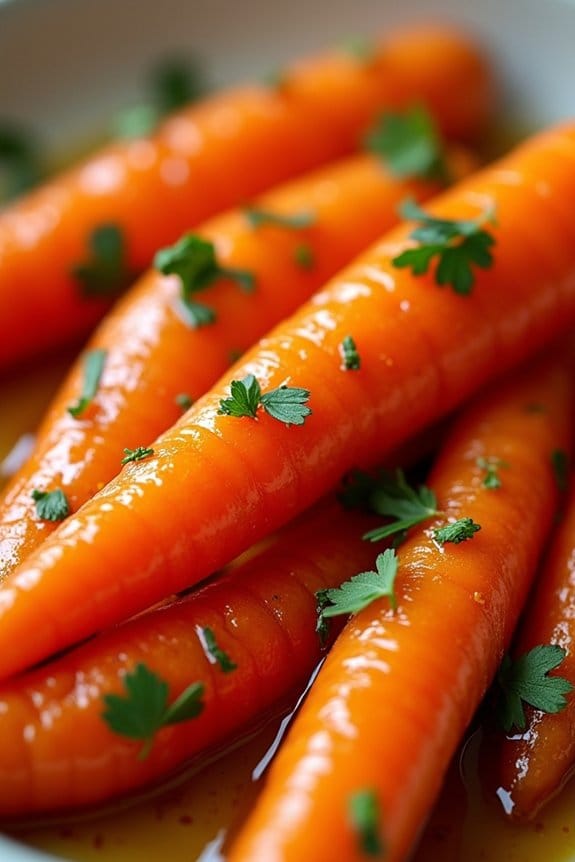
Grilled salmon is a delicious and healthy main course, but pairing it with the right side dish can elevate your dining experience to the next level. One such complementary side is honey glazed carrots. These sweet and savory carrots aren’t only easy to prepare but also add a vibrant splash of color to your plate. The natural sweetness of the honey enhances the earthy flavor of the carrots, making them the perfect accompaniment to the rich, savory taste of grilled salmon.
Creating honey glazed carrots is a straightforward process that yields a delightful dish with minimal effort. This recipe is designed to serve 4-6 people, making it an ideal choice for a family meal or a small dinner gathering. The key to this dish lies in the balance of flavors; the honey should be just enough to enhance the carrots without overpowering their natural taste.
Let’s plunge into the ingredients and cooking instructions to prepare this delectable side dish.
Ingredients (Serves 4-6):
- 2 pounds of carrots, peeled and cut into 2-inch pieces
- 3 tablespoons of honey
- 2 tablespoons of unsalted butter
- 1 tablespoon of olive oil
- 1 teaspoon of salt
- ½ teaspoon of black pepper
- 1 tablespoon of fresh lemon juice
- 2 tablespoons of chopped fresh parsley (optional, for garnish)
Cooking Instructions:
- Prepare the Carrots:
- Begin by peeling the carrots and cutting them into 2-inch long pieces. Uniform size guarantees even cooking.
- Blanch the Carrots:
- In a large pot, bring water to a boil. Add the carrots and blanch them for about 4-5 minutes until they start to soften. Drain and set aside.
- Prepare the Glaze:
- In a large skillet over medium heat, melt the butter with the olive oil. Once melted, add the honey, stirring continuously until well mixed.
- Cook the Carrots:
- Add the blanched carrots to the skillet, season with salt and black pepper, and toss them in the honey-butter mixture making certain they’re fully coated.
- Glaze the Carrots:
- Continue to cook the carrots for another 5-7 minutes, stirring occasionally, until they’re tender and the glaze has thickened, lightly caramelizing the carrots.
- Finish with Lemon Juice:
- Just before serving, stir in the fresh lemon juice to add a touch of brightness to the dish.
- Garnish and Serve:
- Transfer the glazed carrots to a serving dish. Garnish with chopped fresh parsley if desired, and serve immediately alongside your grilled salmon.
Extra Tips:
When preparing honey glazed carrots, it’s important to monitor the heat. Too high a temperature can cause the honey to burn, resulting in a bitter taste. Keep the heat at medium and stir frequently to guarantee even cooking.
If the glaze becomes too thick, you can add a tablespoon of water to loosen it before serving. Additionally, using fresh lemon juice adds a invigorating zing that balances the sweetness of the honey, so don’t skip this step. Enjoy these delightful carrots as a perfect complement to your grilled salmon.
Mediterranean Couscous
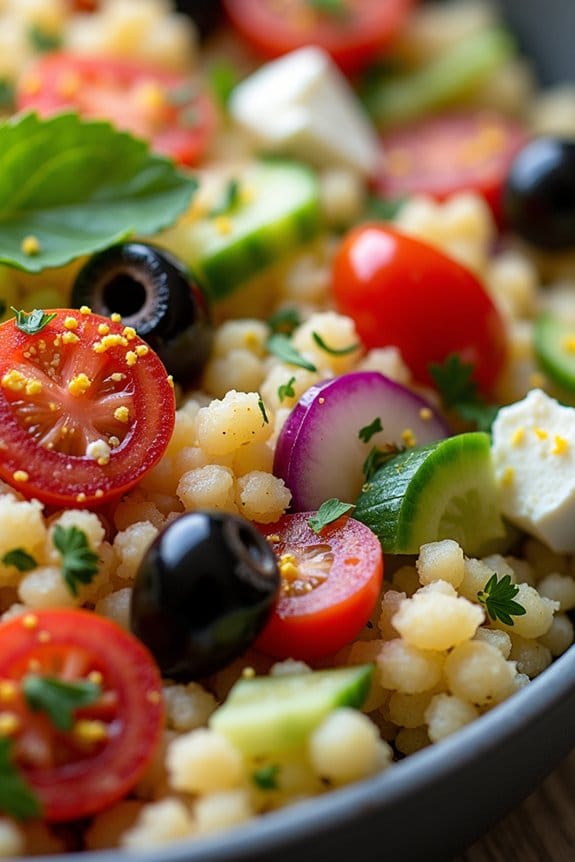
Mediterranean Couscous is a delightful and flavorful side dish that perfectly complements grilled salmon. This dish is a harmonious blend of fluffy couscous, fresh vegetables, and aromatic herbs, creating a vibrant and satisfying accompaniment. The Mediterranean flavors are enhanced with a hint of lemon and a drizzle of olive oil, making it a revitalizing and light addition to your meal.
Whether you’re hosting a dinner party or preparing a weeknight dinner, this couscous dish promises to be a crowd-pleaser.
The beauty of Mediterranean Couscous lies in its simplicity and versatility. It can be easily customized with your favorite vegetables or herbs, allowing you to tailor it to your taste preferences. The couscous itself cooks quickly, absorbing the delicious flavors of the added ingredients, while maintaining its light and fluffy texture.
This dish not only adds a pop of color to your plate but also brings a nutritious balance to your meal, making it a perfect choice for health-conscious diners.
Ingredients (Serves 4-6):
- 1 1/2 cups couscous
- 2 cups vegetable broth
- 1/4 cup olive oil
- 1 lemon (zested and juiced)
- 1 cup cherry tomatoes, halved
- 1 cucumber, diced
- 1/2 red onion, finely chopped
- 1/4 cup Kalamata olives, pitted and sliced
- 1/4 cup feta cheese, crumbled
- 1/4 cup fresh parsley, chopped
- Salt and pepper to taste
Instructions:
- Prepare the Couscous: In a medium-sized saucepan, bring the vegetable broth to a boil. Once boiling, remove the pan from heat and stir in the couscous. Cover the pan with a lid and let it sit for about 5 minutes, allowing the couscous to absorb the broth.
- Fluff the Couscous: After 5 minutes, remove the lid and fluff the couscous with a fork to break up any clumps. Transfer the couscous to a large mixing bowl to cool slightly.
- Make the Dressing: In a small bowl, whisk together the olive oil, lemon zest, lemon juice, salt, and pepper until well combined. This dressing will give the couscous a zesty and fresh flavor.
- Combine Ingredients: Add the cherry tomatoes, cucumber, red onion, Kalamata olives, feta cheese, and parsley to the couscous. Pour the dressing over the top and gently toss everything together until the couscous is well coated and the ingredients are evenly distributed.
- Season and Serve: Taste the couscous and adjust the seasoning with more salt and pepper if needed. Serve the Mediterranean Couscous at room temperature or slightly chilled alongside grilled salmon.
Extra Tips:
For an added layer of flavor, try roasting the cherry tomatoes before adding them to the couscous. This can enhance their sweetness and provide a richer taste.
If you prefer a nutty crunch, consider adding toasted pine nuts or slivered almonds. Additionally, this dish can be made ahead of time and stored in the refrigerator for up to two days, making it a convenient option for meal prepping or entertaining.
Grilled Corn on the Cob

Grilled salmon is a delicious and healthy main dish that pairs perfectly with a side of grilled corn on the cob. The natural sweetness of the corn and its slight smokiness from the grill complement the rich flavors of the salmon, creating a delightful balance of tastes and textures.
This combination isn’t only visually appealing but also packed with nutrients, making it a great choice for a summer barbecue or a family dinner.
The simplicity of grilling corn on the cob allows its natural sweetness to shine, and when seasoned with just a few ingredients, it becomes a standout side dish. The recipe is designed to serve 4-6 people, making it perfect for small gatherings or as part of a larger feast.
With its quick preparation and cooking time, you can have a delicious meal on the table in no time, allowing you to enjoy more time with your guests.
Ingredients for Grilled Salmon and Grilled Corn on the Cob (Serves 4-6):
- 4 salmon fillets (about 6 oz each)
- 6 ears of corn, husked
- 2 tablespoons olive oil
- 2 tablespoons butter, melted
- 1 teaspoon salt
- 1 teaspoon black pepper
- 1 teaspoon paprika
- 1 tablespoon fresh parsley, chopped
- Lemon wedges (for serving)
Cooking Instructions:
- Prepare the Grill: Preheat your grill to medium-high heat. Make sure the grates are clean and lightly oiled to prevent sticking.
- Season the Salmon: Pat the salmon fillets dry with paper towels. Brush each fillet with olive oil and season with salt, black pepper, and paprika on both sides. Set aside.
- Prepare the Corn: In a small bowl, mix the melted butter with a pinch of salt and pepper. Brush the ears of corn with this butter mixture, ensuring they’re evenly coated.
- Grill the Corn: Place the corn directly on the grill grates. Grill, turning occasionally, for about 10-15 minutes or until the corn is tender and has charred spots. Remove from the grill and set aside.
- Grill the Salmon: Place the salmon fillets on the grill skin-side down. Grill for about 4-5 minutes per side, or until the salmon is cooked through and has nice grill marks. The salmon should flake easily with a fork.
- Serve: Transfer the grilled salmon and corn to a serving platter. Sprinkle the corn with chopped parsley for a fresh touch. Serve immediately with lemon wedges on the side for squeezing over the salmon.
Extra Tips:
When grilling corn, you can also leave some of the husks on for a more rustic presentation and to protect the corn from drying out.
Soaking the corn in water for 15-30 minutes before grilling can also help prevent the husks from burning. For added flavor, consider adding a sprinkle of chili powder or grated Parmesan cheese to the corn after grilling.
As for the salmon, make sure not to overcook it; it’s best when slightly pink in the center. Enjoy your meal with a rejuvenating salad or a glass of chilled white wine for a complete dining experience.
Avocado and Tomato Salsa
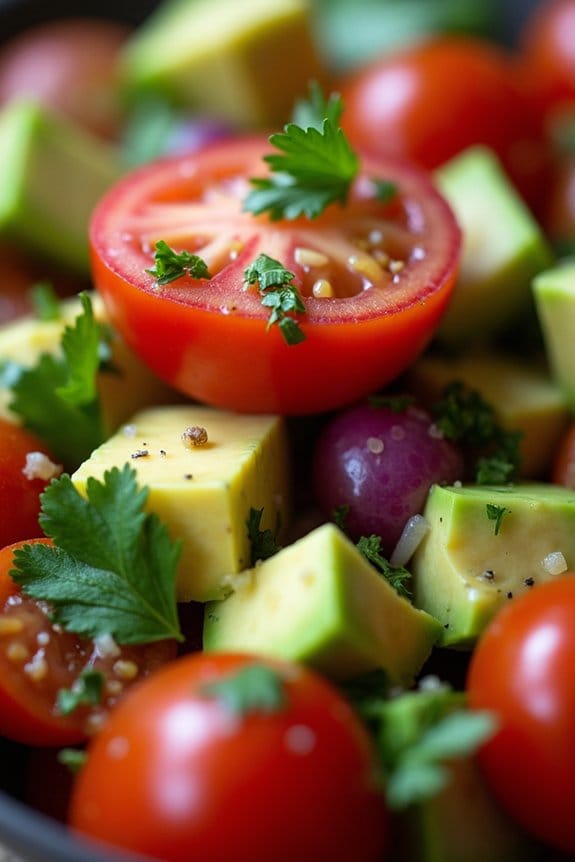
Grilled salmon is a delectable and healthy option for any meal, and pairing it with a fresh Avocado and Tomato Salsa elevates it to a new level of deliciousness. This vibrant and flavorful side dish isn’t only easy to prepare but also brings a revitalizing contrast to the rich taste of grilled salmon. The creamy texture of avocado, the juicy burst of tomatoes, and the zesty notes from lime and cilantro create a salsa that complements the salmon beautifully.
The Avocado and Tomato Salsa is a versatile dish that can be served alongside grilled salmon or even as a topping, adding both color and flavor to your plate. This side dish is perfect for a light summer meal or any time you wish to bring a bit of brightness to your dining table. Not only does it enhance the flavor profile of the salmon, but it also adds nutritional value, making your meal even healthier.
Ingredients for Avocado and Tomato Salsa (serving size: 4-6 people):
- 2 ripe avocados, diced
- 2 cups cherry tomatoes, halved
- 1/4 cup red onion, finely chopped
- 1/4 cup fresh cilantro, chopped
- 1 jalapeño, seeded and finely chopped (optional)
- 2 tablespoons lime juice
- 1 teaspoon olive oil
- Salt and pepper to taste
Cooking Instructions:
- Prepare the Avocados: Begin by slicing the avocados in half and removing the pit. Carefully scoop out the flesh and dice it into bite-sized pieces. Place the diced avocado in a large mixing bowl.
- Add the Tomatoes: Wash the cherry tomatoes thoroughly, then cut them in half. Add the halved tomatoes to the bowl with the avocado.
- Chop the Onion and Cilantro: Finely chop the red onion and cilantro. Add both to the mixing bowl. The cilantro will add a fresh, herbaceous flavor while the red onion provides a subtle sharpness.
- Incorporate Jalapeño: If you prefer a bit of heat, finely chop a jalapeño pepper, removing the seeds to reduce the spiciness. Add it to the salsa mixture.
- Mix in Lime Juice and Olive Oil: Drizzle the lime juice and olive oil over the other ingredients in the bowl. The lime juice not only adds acidity but also helps to prevent the avocado from browning.
- Season the Salsa: Add salt and pepper to taste, ensuring that the flavors are well-balanced. Gently toss all the ingredients together until everything is evenly mixed.
- Chill Before Serving: For the best flavor, let the salsa sit in the refrigerator for about 15-30 minutes before serving. This allows the flavors to meld together.
Extra Tips:
When preparing the Avocado and Tomato Salsa, choose ripe avocados that yield slightly to gentle pressure for the best creamy texture. If you don’t like the heat of jalapeños, feel free to omit them or replace them with a milder pepper.
Additionally, when storing any leftover salsa, cover it tightly with plastic wrap to minimize contact with air, which will help prevent the avocado from browning too quickly. This salsa is best enjoyed fresh, so try to prepare it just before serving for greatest taste and presentation.
Sautéed Spinach With Pine Nuts
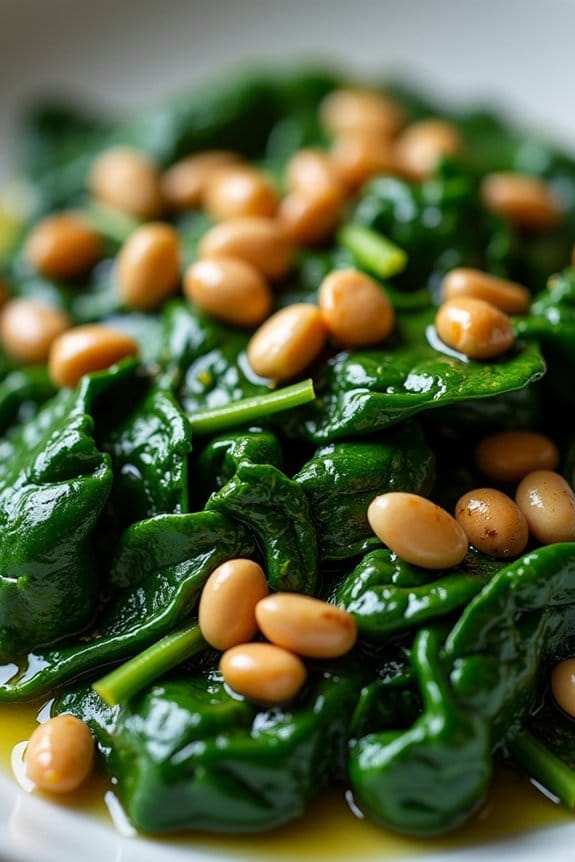
Sautéed spinach with pine nuts is a delightful and nutritious side dish that pairs beautifully with grilled salmon. The combination of tender spinach leaves and the nutty crunch of pine nuts creates a textural contrast that complements the rich flavor of the salmon. This dish is quick to prepare, making it an ideal choice for a healthy weeknight dinner or a sophisticated weekend meal.
The sautéed spinach is infused with garlic and a hint of lemon juice, adding freshness and zest to the dish. Pine nuts, lightly toasted, contribute a buttery flavor that elevates the overall taste. This recipe serves 4-6 people and can be easily adjusted to suit your taste preferences or dietary needs.
Ingredients:
- 2 tablespoons olive oil
- 3 cloves garlic, minced
- 2 pounds fresh spinach, washed and trimmed
- 1/4 cup pine nuts
- Juice of 1 lemon
- Salt and pepper to taste
Cooking Instructions:
- Prepare the Pine Nuts: In a dry skillet over medium heat, toast the pine nuts until they’re golden brown and fragrant, about 3-4 minutes. Stir frequently to prevent burning. Once toasted, remove the pine nuts from the skillet and set them aside.
- Heat the Olive Oil: In the same skillet, add the olive oil and heat over medium heat. Once the oil is hot, add the minced garlic and sauté for about 30 seconds until it becomes fragrant but not browned.
- Cook the Spinach: Add the spinach to the skillet in batches if necessary, allowing it to wilt down before adding more. Toss the spinach continuously to guarantee it cooks evenly. This should take about 3-5 minutes.
- Season and Serve: Once the spinach is wilted, add the toasted pine nuts, lemon juice, salt, and pepper. Toss everything together to combine and serve immediately.
Extra Tips:
When cooking spinach, remember that it wilts quickly and reduces considerably in volume, so be sure to start with plenty.
If you prefer a more intense garlic flavor, consider adding an extra clove or two.
To enhance the nuttiness, you can also lightly toast the pine nuts in a bit of butter instead of dry toasting them.
Finally, be careful not to overcook the spinach to retain its vibrant green color and nutritional benefits.
Roasted Sweet Potato Wedges
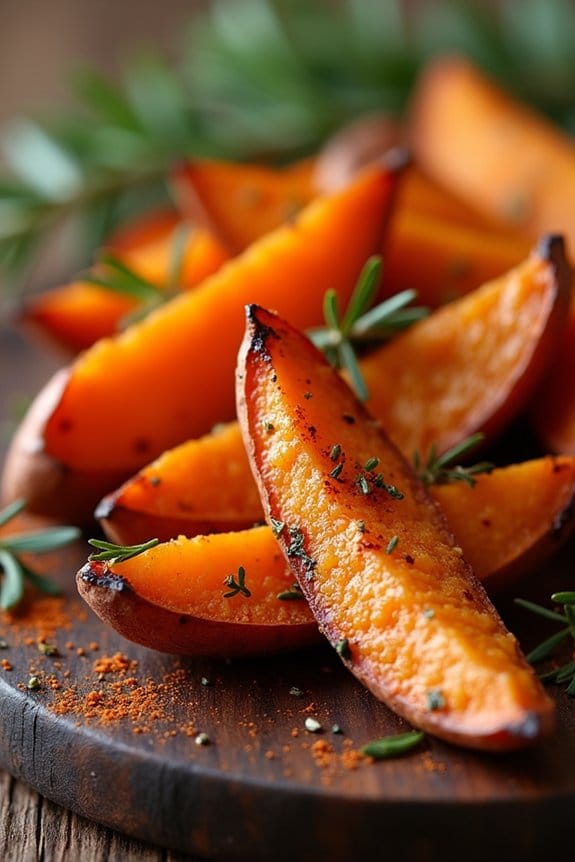
Roasted Sweet Potato Wedges are the perfect side dish to complement the delicate flavors of grilled salmon. The natural sweetness of the sweet potatoes is enhanced by roasting, creating a satisfying caramelized exterior while maintaining a soft and tender interior. This dish isn’t only delicious but also packed with nutrients, making it a healthy addition to your meal.
When preparing Roasted Sweet Potato Wedges, the key is to cut the sweet potatoes into uniform wedges to guarantee even cooking. A blend of simple spices adds depth to their flavor without overwhelming the palate, making them a versatile side that pairs beautifully with the rich taste of salmon. This recipe serves 4-6 people, making it ideal for family gatherings or dinner parties.
Ingredients:
- 4 large sweet potatoes
- 3 tablespoons olive oil
- 1 teaspoon salt
- 1/2 teaspoon black pepper
- 1 teaspoon paprika
- 1/2 teaspoon garlic powder
- 1/2 teaspoon onion powder
- 1 tablespoon fresh rosemary, chopped (optional)
Instructions:
- Preheat the Oven: Preheat your oven to 425°F (220°C). This temperature is perfect for roasting, guaranteeing a crispy exterior while the inside remains soft.
- Prepare the Sweet Potatoes: Wash and peel the sweet potatoes. Cut them into even wedges, about 1 inch thick, to guarantee they cook evenly.
- Season the Wedges: In a large bowl, combine the sweet potato wedges with olive oil, salt, black pepper, paprika, garlic powder, onion powder, and rosemary. Toss until the wedges are evenly coated with the seasoning mixture.
- Arrange on a Baking Sheet: Spread the seasoned wedges in a single layer on a large baking sheet. Make sure they aren’t overcrowded to allow for proper roasting and crisping.
- Roast the Wedges: Place the baking sheet in the preheated oven and roast for 25-30 minutes, flipping halfway through to guarantee they brown evenly on both sides. The wedges should be golden brown and tender when pierced with a fork.
- Serve: Remove from the oven and let them cool slightly before serving. These wedges are best enjoyed hot, straight from the oven.
Extra Tips:
For an extra flavor boost, consider adding a sprinkle of fresh herbs like thyme or parsley after roasting. If you prefer a spicier kick, a dash of cayenne pepper can be added to the seasoning mix.
Additionally, if you’re short on time, you can parboil the sweet potato wedges for about 5 minutes before roasting to speed up the cooking process. Remember to keep an eye on the wedges as they roast, as oven temperatures can vary and affect cooking times.
Zucchini Noodles With Pesto
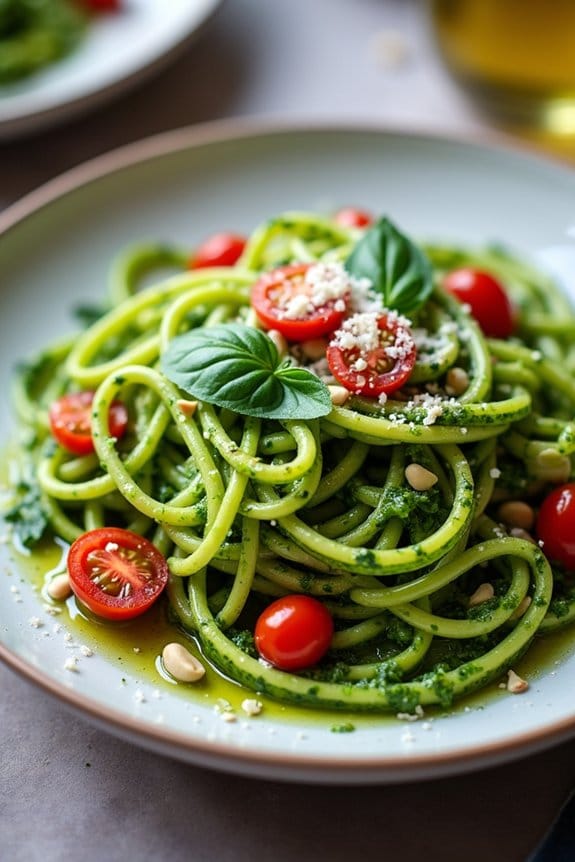
The beauty of Zucchini Noodles With Pesto lies in its simplicity and versatility. You can make pesto from scratch for an authentic touch or use a high-quality store-bought version for convenience. The dish isn’t only nutritious but also visually appealing, with its bright green hues and aromatic basil fragrance. It can be enjoyed warm or cold, making it a great option for any season.
Whether you’re following a low-carb diet or just looking for a delicious way to enjoy your veggies, this dish is sure to captivate.
Ingredients (serving size: 4-6 people):
- 4 medium zucchinis
- 1 cup fresh basil leaves
- 1/4 cup pine nuts
- 2 cloves garlic
- 1/2 cup grated Parmesan cheese
- 1/2 cup extra virgin olive oil
- Salt and pepper to taste
- 1 tablespoon lemon juice
- Optional: cherry tomatoes and pine nuts for garnish
Cooking Instructions:
- Prepare the Zucchini Noodles: Begin by washing and drying the zucchinis. Use a spiralizer to create long, thin noodles from the zucchinis. If you don’t have a spiralizer, a julienne peeler or mandoline can also be used to create similar noodle-like strips.
- Make the Pesto: In a food processor, combine the basil leaves, pine nuts, garlic, Parmesan cheese, salt, and pepper. Pulse until the ingredients are coarsely chopped. With the processor running, slowly add the olive oil in a steady stream until the mixture is smooth and emulsified. Adjust seasoning with additional salt, pepper, and lemon juice to taste.
- Combine the Zoodles and Pesto: In a large mixing bowl, toss the zucchini noodles with the prepared pesto until the noodles are well coated. You can use tongs or your hands to ascertain even distribution of the pesto.
- Cook the Zoodles (Optional): If you prefer your zucchini noodles warm, heat a large skillet over medium heat. Add the zoodles and toss them gently for 2-3 minutes, just until they’re warmed through. Be careful not to overcook them, as they can become mushy.
- Serve and Garnish: Transfer the pesto-coated zucchini noodles to a serving platter. If desired, garnish with halved cherry tomatoes and a sprinkle of pine nuts for added flavor and texture. Serve immediately alongside grilled salmon.
Extra Tips:
When making zucchini noodles, it’s important to choose firm and fresh zucchinis to guarantee the best texture. If your zucchini noodles release too much water after cooking, you can pat them dry with a paper towel to remove excess moisture.
When making pesto, feel free to experiment with different nuts like walnuts or almonds if you don’t have pine nuts on hand. For additional flavor, you can also add a pinch of red pepper flakes to the pesto.
Finally, if you’re pressed for time, you can prepare the pesto ahead of time and store it in the refrigerator for up to a week, allowing you to whip up this side dish even faster.
Wild Rice Pilaf
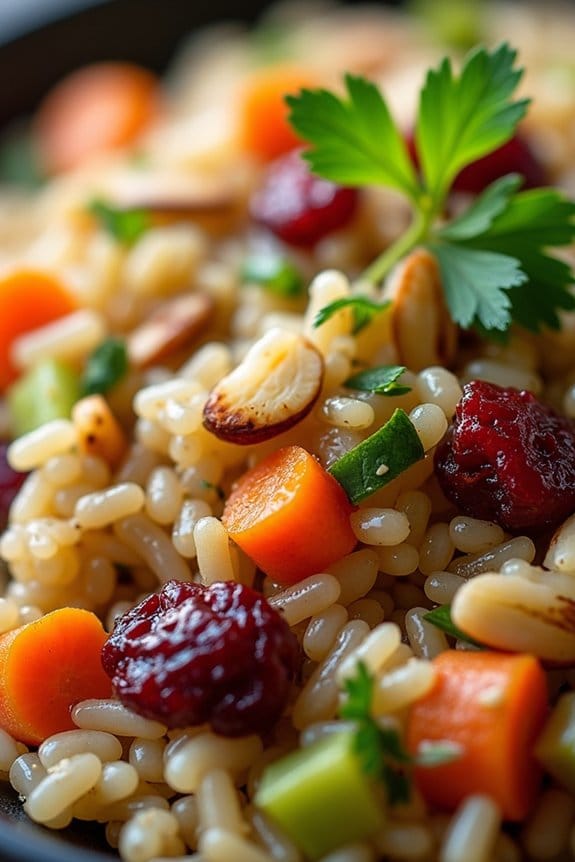
The preparation of wild rice pilaf involves cooking wild rice with a medley of vegetables and seasonings that elevate the dish to a new level. By using ingredients like garlic, onions, and fresh herbs, you can create a flavorful base that complements the natural taste of the wild rice. The addition of broth instead of water for cooking the rice adds depth and richness to the dish. This recipe serves 4-6 people, making it ideal for a family dinner or a small gathering with friends.
Ingredients (Serves 4-6):
- 1 cup wild rice
- 2 tablespoons olive oil
- 1 medium onion, finely chopped
- 2 cloves garlic, minced
- 1 carrot, diced
- 1 celery stalk, diced
- 2 1/2 cups vegetable or chicken broth
- 1/4 cup slivered almonds
- 1/4 cup dried cranberries
- 1 tablespoon fresh parsley, chopped
- Salt and pepper to taste
Cooking Instructions:
- Rinse the Rice: Start by rinsing the wild rice under cold water in a fine mesh strainer. This helps to remove any debris and excess starch, leading to a fluffier pilaf.
- Sauté the Vegetables: In a large saucepan, heat the olive oil over medium heat. Add the chopped onion, garlic, carrot, and celery. Sauté for about 5 minutes, or until the vegetables are soft and fragrant.
- Add the Rice: Stir in the rinsed wild rice to the sautéed vegetables, ensuring the rice is well-coated with the oil and vegetable mixture. This step helps to slightly toast the rice and enhance its flavor.
- Incorporate the Broth: Pour the vegetable or chicken broth into the saucepan. Bring the mixture to a boil, then reduce the heat to low. Cover the pan with a lid and let it simmer for about 45-50 minutes, or until the wild rice is tender and has absorbed most of the liquid.
- Add the Toppings: Once the rice is cooked, stir in the slivered almonds and dried cranberries. These add a delightful crunch and a touch of sweetness to the dish.
- Season and Garnish: Remove the pilaf from heat, season with salt and pepper to taste, and garnish with fresh parsley before serving.
Extra Tips:
When preparing Wild Rice Pilaf, it’s essential to recognize that wild rice can take longer to cook than other types of rice. Be patient and allow it to fully absorb the broth for the best texture.
If you prefer a softer texture, you can add a little more broth and extend the cooking time. Feel free to experiment with additional herbs and spices such as thyme or rosemary to customize the flavor to your liking.
Finally, this dish can be prepared in advance and reheated, making it convenient for busy meals or entertaining guests.