

Grilled fish recipes can bring a touch of elegance to any meal, and they’re easier to master than you might think. Whether you’re a fan of the zesty Lemon-Dill Grilled Salmon or the sweet and tropical Mahi-Mahi with Mango Salsa, there’s something here for everyone. These recipes are all about enhancing the natural flavors with minimal effort. With the right techniques, like using a fish basket or crafting a savory marinade, you’ll be impressing your guests in no time. Ready to elevate your grilling game? Let’s get started!
Grilling Tips for Perfect Fish Every Time
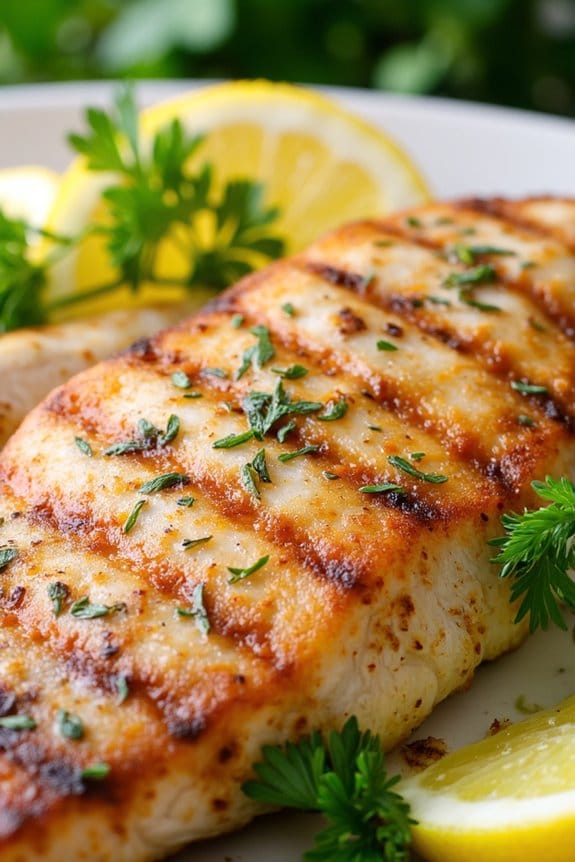
When it comes to grilling fish, achieving that perfect balance of a crispy outer layer with a tender, flaky interior is key. This Lemon Herb Grilled Fish recipe is designed to do just that, providing a deliciously tangy and aromatic dish that’s perfect for summer barbecues or a simple family dinner. The combination of fresh herbs, zesty lemon, and a touch of garlic enhances the natural flavors of the fish, making it a delightful meal for both seafood aficionados and casual diners alike.
To prepare this dish, you’ll need to choose a firm, white fish such as cod, halibut, or snapper, which hold up well on the grill. The marinade, made with fresh lemon juice, olive oil, and aromatic herbs, infuses the fish with flavor while helping to keep it moist during grilling. This recipe serves 4-6 people, making it perfect for small gatherings or family meals.
Ingredients:
- 4 to 6 fish fillets (approximately 5-6 ounces each)
- 1/4 cup olive oil
- 1/4 cup fresh lemon juice
- 2 tablespoons chopped fresh parsley
- 1 tablespoon chopped fresh dill
- 2 cloves garlic, minced
- Salt and black pepper to taste
- Lemon wedges, for garnish
- Fresh herbs, for garnish (optional)
Cooking Instructions:
- Prepare the Marinade: In a small bowl, whisk together the olive oil, lemon juice, chopped parsley, chopped dill, and minced garlic. Season the mixture with salt and black pepper to taste. This marinade won’t only infuse the fish with flavor but also help to tenderize it.
- Marinate the Fish: Place the fish fillets in a shallow dish or a resealable plastic bag. Pour the marinade over the fish, making sure that each fillet is well coated. Cover the dish with plastic wrap or seal the bag, and refrigerate for at least 30 minutes to allow the flavors to penetrate the fish.
- Preheat the Grill: Preheat your grill to medium-high heat. If using a charcoal grill, make certain the coals are evenly distributed and glowing red. Lightly oil the grill grates to prevent the fish from sticking.
- Grill the Fish: Remove the fish from the marinade and allow any excess to drip off. Place the fillets on the grill, skin-side down if applicable. Grill the fish for about 4-5 minutes per side, depending on the thickness of the fillets, until the fish is opaque and easily flakes with a fork.
- Serve: Remove the fish from the grill and transfer to a serving platter. Garnish with fresh lemon wedges and additional herbs if desired. Serve immediately while hot.
Extra Tips:
To prevent the fish from sticking to the grill, make sure your grill grates are clean and well-oiled. You can also use a fish basket or grill mat for extra security.
If you’re grilling skin-on fillets, start with the skin side down; this will help keep the fish intact and add a nice crispy texture. Additionally, avoid overcooking by checking for doneness early; fish continues to cook after being removed from the heat.
If you want to add a smoky flavor, consider using wood chips in your charcoal grill or a smoker box in a gas grill.
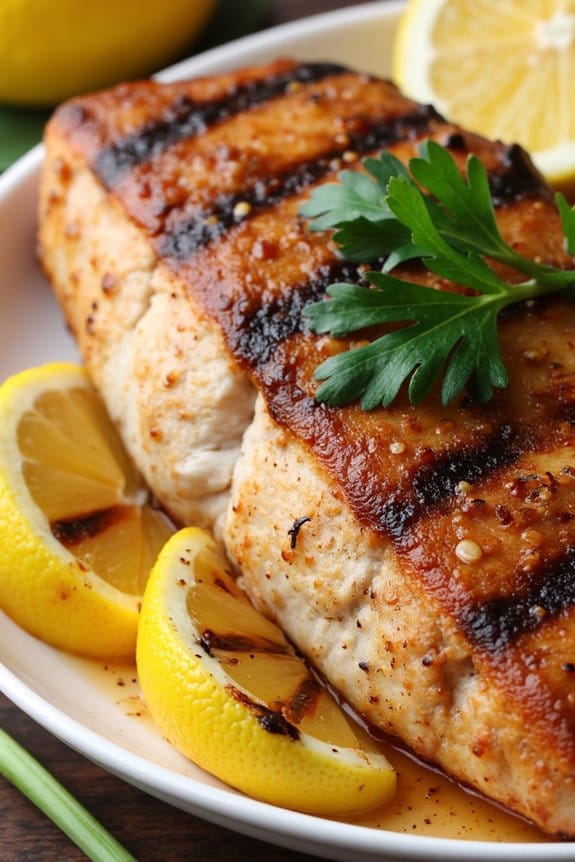
Lemon-Dill Grilled Salmon: A Fresh Favorite
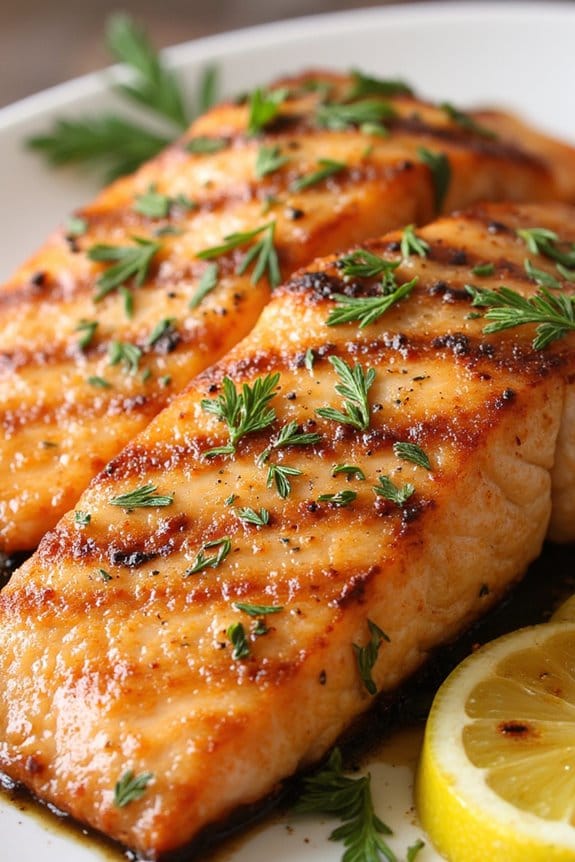
Lemon-Dill Grilled Salmon is a delightful dish that combines the tangy zest of lemon with the fresh, aromatic essence of dill. This recipe is perfect for those who appreciate the natural flavors of salmon, enhanced but not overpowered by the marinade. Ideal for a summer cookout or a cozy family dinner, this dish is both healthy and satisfying, rich in omega-3 fatty acids and a vibrant addition to any meal.
The key to this recipe is allowing the salmon to marinate long enough to absorb the bright citrus and herb notes, which are then beautifully caramelized on the grill.
The simplicity of Lemon-Dill Grilled Salmon makes it a go-to favorite for many home cooks. With just a few ingredients, you can create a restaurant-quality dish that will impress guests and family alike. The grilling process not only adds a smoky depth to the fish but also creates a deliciously crispy skin, which contrasts perfectly with the tender, flaky salmon flesh.
Whether you’re an experienced griller or a novice in the kitchen, this recipe is accessible and rewarding, offering a burst of fresh, clean flavors in every bite.
Ingredients (Serves 4-6):
- 4-6 salmon fillets (about 6 ounces each)
- 2 lemons, sliced into rounds
- 1/4 cup fresh dill, chopped
- 3 tablespoons olive oil
- 3 cloves garlic, minced
- Salt and pepper to taste
Cooking Instructions:
- Prepare the Marinade: In a small bowl, combine the olive oil, minced garlic, chopped dill, salt, and pepper. Stir well to create a uniform mixture. This will be the marinade for the salmon.
- Marinate the Salmon: Place the salmon fillets in a shallow dish or a resealable plastic bag. Pour the marinade over the salmon, making certain each fillet is well coated. Layer the lemon slices over and under the fillets. Seal the bag or cover the dish with plastic wrap and refrigerate for at least 30 minutes, or up to 2 hours for a stronger flavor.
- Preheat the Grill: Heat your grill to medium-high heat, around 375-400°F (190-200°C). If using a charcoal grill, make sure the coals are evenly distributed and lightly oiled to prevent sticking.
- Grill the Salmon: Remove the salmon from the marinade, allowing excess to drip off. Place the fillets on the grill, skin side down. Grill for about 4-5 minutes per side, or until the salmon is cooked through and flakes easily with a fork. The skin should be crispy, and the flesh should have a slight char.
- Serve: Transfer the grilled salmon to a serving platter. Garnish with additional fresh dill and lemon slices if desired. Serve immediately for the best flavor and texture.
Extra Tips: When grilling salmon, make sure the grill grates are clean and well-oiled to prevent the fish from sticking. You can also use a fish grilling basket for easier handling. If you prefer a more intense lemon flavor, consider adding lemon zest to the marinade.
Remember not to overcook the salmon; it should stay moist and tender inside. If you’re using a gas grill, closing the lid while cooking can help maintain an even temperature and speed up the cooking process. Enjoy this dish with a side of grilled vegetables or a fresh salad for a complete meal.
Mahi-Mahi With Mango Salsa: a Tropical Twist
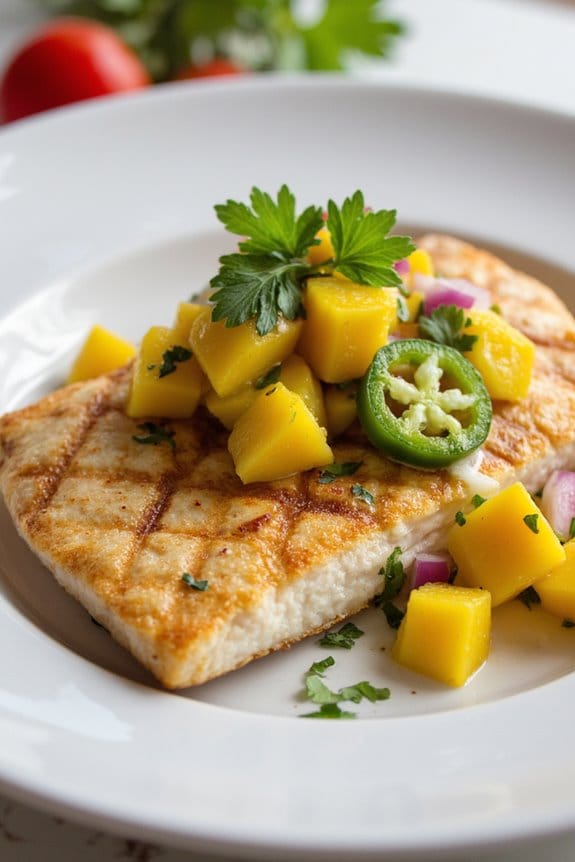
Mahi-Mahi With Mango Salsa is a delightful dish that combines the succulent flavors of the ocean with the sweet and tangy notes of tropical fruit. This recipe is perfect for a summer barbecue or any occasion where you want to impress your guests with a revitalizing and flavorful meal.
The mahi-mahi, a firm white fish, is seasoned and grilled to perfection, while the mango salsa adds a burst of color and flavor, tying the dish together beautifully. The key to this recipe is balancing the flavors of the grilled mahi-mahi with the vibrant mango salsa.
The salsa, made with fresh mango, red onion, cilantro, lime juice, and a hint of spice, complements the fish wonderfully. The result is a dish that’s not only delicious but also healthy and visually appealing. Perfect for serving 4-6 people, this recipe is sure to become a favorite at your dining table.
Ingredients:
- 4 mahi-mahi fillets (about 6 ounces each)
- 2 tablespoons olive oil
- Salt and pepper to taste
- 2 ripe mangoes, peeled, pitted, and diced
- 1/2 red onion, finely chopped
- 1/4 cup fresh cilantro, chopped
- 1 jalapeño, seeded and finely chopped
- Juice of 2 limes
- 1 tablespoon honey
Cooking Instructions:
- Prepare the Fish: Start by patting the mahi-mahi fillets dry with paper towels. Drizzle both sides with olive oil and season with salt and pepper. Let the fish sit at room temperature while you prepare the salsa.
- Make the Mango Salsa: In a medium bowl, combine the diced mangoes, red onion, cilantro, jalapeño, lime juice, and honey. Mix well to guarantee all ingredients are evenly distributed. Taste and adjust seasoning if necessary. Set aside to let the flavors meld together.
- Preheat the Grill: Heat your grill to medium-high heat. Confirm the grates are clean and lightly oiled to prevent sticking.
- Grill the Mahi-Mahi: Place the mahi-mahi fillets on the grill. Cook for about 4-5 minutes on each side, or until the fish is opaque and flakes easily with a fork. Cooking time may vary depending on the thickness of the fillets.
- Assemble the Dish: Once the fish is cooked, remove it from the grill and let it rest for a minute. Plate the fillets and generously top each one with the prepared mango salsa.
Extra Tips:
To guarantee the best flavor, use ripe mangoes that are slightly soft to the touch. This will give your salsa a natural sweetness that pairs well with the fish.
If you prefer a spicier salsa, you can leave some of the jalapeño seeds in, or add a pinch of cayenne pepper. For an added layer of flavor, you can also lightly char the mangoes on the grill before dicing them for the salsa.
This grilled Mahi-Mahi with Mango Salsa is as versatile as it’s delicious and pairs well with a side of coconut rice or a light green salad.
Herb Butter Tuna Steaks: Classic Grilled Goodness

Herb Butter Tuna Steaks are a delightful addition to any summer meal, bringing the classic flavors of grilled fish to your dining table. The rich, buttery herb mixture complements the tuna’s meaty texture, offering a sophisticated yet straightforward dish that’s perfect for both casual dinners and special occasions.
The grilling process imparts a smoky essence that enhances the natural taste of the tuna, making every bite flavorful and satisfying. This dish isn’t only delicious but also quick to prepare, making it ideal for those who want to enjoy a gourmet meal without spending hours in the kitchen.
The key to perfecting this recipe lies in the quality of the tuna steaks and the careful preparation of the herb butter, guaranteeing that every element is fresh and full of flavor. By following this recipe, you’ll create a mouthwatering meal that impresses family and friends alike.
Ingredients (Serving Size: 4-6 people)
- 4-6 tuna steaks (about 6 ounces each)
- 1/2 cup unsalted butter, softened
- 2 tablespoons fresh parsley, chopped
- 1 tablespoon fresh dill, chopped
- 1 tablespoon fresh chives, chopped
- 1 tablespoon lemon juice
- 1 teaspoon lemon zest
- Salt and pepper to taste
- Olive oil for grilling
Cooking Instructions
- Prepare the Herb Butter:
- In a small bowl, combine the softened butter, chopped parsley, dill, chives, lemon juice, lemon zest, salt, and pepper. Stir well until all ingredients are thoroughly mixed.
- Transfer the herb butter onto a piece of plastic wrap, shape into a log, and refrigerate until firm, about 30 minutes.
- Prepare the Tuna Steaks:
- Pat the tuna steaks dry with paper towels. Season both sides with salt and pepper.
- Brush each steak lightly with olive oil to prevent sticking during grilling.
- Preheat the Grill:
- Heat your grill to high heat, approximately 500°F (260°C). Confirm the grates are clean and well-oiled.
- Grill the Tuna Steaks:
- Place the tuna steaks on the grill, and cook for 2-3 minutes per side for medium-rare, or longer if desired. The steaks should have grill marks and be slightly opaque in the center.
- Serve with Herb Butter:
- Remove the tuna steaks from the grill and immediately top each with a slice of the prepared herb butter.
- Allow the butter to melt over the hot steaks, enhancing their flavor with its rich, herby goodness.
Extra Tips
When preparing Herb Butter Tuna Steaks, always choose high-quality, fresh tuna for the best taste and texture. If you prefer your tuna cooked beyond medium-rare, adjust the grilling time accordingly, but be cautious not to overcook, as tuna can become dry.
For an extra touch, consider adding a pinch of red pepper flakes to the herb butter for a subtle kick. Finally, let the steaks rest for a minute or two after grilling to allow the juices and flavors to settle before serving.
Garlic-Lime Grilled Tilapia: Simple and Delicious
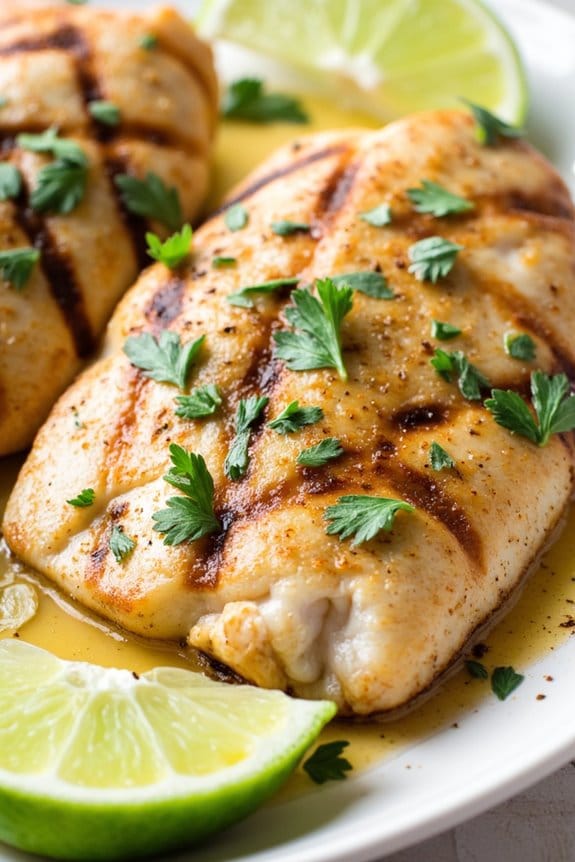
Garlic-Lime Grilled Tilapia is a simple and delicious dish that perfectly balances the zesty flavor of lime with the aromatic essence of garlic. This recipe is ideal for a healthy and quick weeknight dinner that doesn’t compromise on taste.
Tilapia, a mild white fish, is an excellent choice for grilling as it absorbs flavors well and cooks quickly. The combination of garlic and lime creates a revitalizing marinade that enhances the natural flavor of the fish, making it a delightful meal for both casual and formal occasions.
Grilling the tilapia not only adds smokiness but also gives it a beautiful char that complements the tangy marinade. This dish pairs well with a variety of sides, such as a fresh garden salad, grilled vegetables, or even a light rice pilaf.
Whether you’re hosting a backyard barbecue or simply cooking for your family, Garlic-Lime Grilled Tilapia will surely impress your guests and loved ones. With minimal preparation and quick cooking time, this recipe is perfect for those who want to enjoy a gourmet meal without spending hours in the kitchen.
Ingredients (Serves 4-6):
- 6 tilapia fillets
- 4 cloves garlic, minced
- 2 tablespoons olive oil
- 1/4 cup fresh lime juice (about 2 limes)
- 1 teaspoon lime zest
- 1 teaspoon ground cumin
- 1 teaspoon paprika
- Salt and pepper to taste
- Fresh cilantro, chopped, for garnish
- Lime wedges, for serving
Cooking Instructions:
- Prepare the Marinade: In a small bowl, combine the minced garlic, olive oil, lime juice, lime zest, cumin, paprika, salt, and pepper. Mix well until all ingredients are fully incorporated.
- Marinate the Tilapia: Place the tilapia fillets in a shallow dish or a resealable plastic bag. Pour the marinade over the fillets, guaranteeing they’re evenly coated. Seal the bag or cover the dish, and refrigerate for at least 30 minutes to allow the flavors to infuse.
- Preheat the Grill: While the tilapia is marinating, preheat your grill to medium-high heat. If using a gas grill, verify the grates are clean and lightly oiled to prevent sticking.
- Grill the Tilapia: Remove the tilapia from the marinade and place the fillets on the hot grill. Cook for 3-4 minutes per side, or until the fish is opaque and easily flakes with a fork. Be careful not to overcook, as tilapia can become dry quickly.
- Serve: Transfer the grilled tilapia to a serving platter. Garnish with freshly chopped cilantro and serve with lime wedges on the side for an extra burst of lime flavor.
Extra Tips: For the best results, use fresh limes and garlic to maximize the flavor of the marinade. If you don’t have access to an outdoor grill, a grill pan or broiler can also be used to cook the tilapia. Be sure to adjust cooking times as needed.
Additionally, make sure to pat the tilapia fillets dry with paper towels before marinating to help the marinade adhere better. This dish is best enjoyed immediately after cooking, but leftovers can be stored in an airtight container in the refrigerator for up to two days.
Citrus-Marinated Swordfish: A Zesty Delight
Citrus-Marinated Swordfish is a tantalizing dish that captures the essence of summer with its vibrant flavors and invigorating zest. The swordfish, known for its meaty texture and mild flavor, acts as the perfect canvas for the citrus marinade that enhances the fish’s natural taste. By allowing the swordfish to soak in a mixture of citrus juices, garlic, and herbs, you create a dish that bursts with a symphony of flavors, making it a delightful addition to any outdoor barbecue or dinner party.
The marinade not only infuses the fish with brightness but also helps in tenderizing the meat, making it succulent and moist when grilled to perfection. This Citrus-Marinated Swordfish recipe is a wonderful way to introduce variety into your seafood repertoire, with a preparation that’s as enjoyable as the eating. Whether you’re a seasoned grill master or a novice cook, this recipe is simple to follow and promises a meal that’s both impressive and satisfying.
Ingredients (Serving Size: 4-6 people)
- 4-6 swordfish steaks (about 6 ounces each)
- 1/2 cup fresh orange juice
- 1/4 cup fresh lemon juice
- 1/4 cup fresh lime juice
- 3 tablespoons olive oil
- 4 cloves garlic, minced
- 2 tablespoons fresh parsley, chopped
- 1 tablespoon fresh thyme leaves
- Salt and pepper to taste
- Olive oil for grilling
Cooking Instructions
- Prepare the Marinade: In a medium-sized bowl, combine the fresh orange juice, lemon juice, lime juice, olive oil, minced garlic, chopped parsley, fresh thyme leaves, salt, and pepper. Whisk the ingredients together until well blended.
- Marinate the Swordfish: Place the swordfish steaks in a large, shallow dish. Pour the marinade over the fish, making sure each steak is adequately coated. Cover the dish with plastic wrap and refrigerate for at least 30 minutes, or up to 2 hours for more intense flavor.
- Preheat the Grill: Preheat your grill to medium-high heat. If using a charcoal grill, ensure the coals are evenly distributed. If using a gas grill, allow it to heat for at least 10 minutes before cooking.
- Prepare the Grill: Lightly oil the grill grates with olive oil to prevent the fish from sticking. You can use a paper towel dipped in olive oil and tongs for this task.
- Grill the Swordfish: Remove the swordfish from the marinade, allowing excess marinade to drip off. Place the steaks on the grill. Cook for about 4-5 minutes on each side, depending on the thickness of the steaks. The fish is done when it’s opaque and flakes easily with a fork.
- Serve: Transfer the grilled swordfish to a serving platter, and garnish with additional chopped parsley or lemon wedges if desired. Serve immediately with your choice of sides.
Extra Tips
When grilling swordfish, it’s important to avoid overcooking, as it can become dry. Aim for a slightly pink center when you remove it from the grill, as the fish will continue to cook slightly after being taken off the heat.
To guarantee even cooking, let the swordfish come to room temperature before grilling. Additionally, using a fish spatula can help in carefully flipping the fish without breaking it. If you prefer, you can also grill swordfish on a cedar plank for added flavor, but make sure to soak the plank in water for at least an hour beforehand to prevent burning.
Halibut With Lemon-Caper Sauce: Full of Flavor
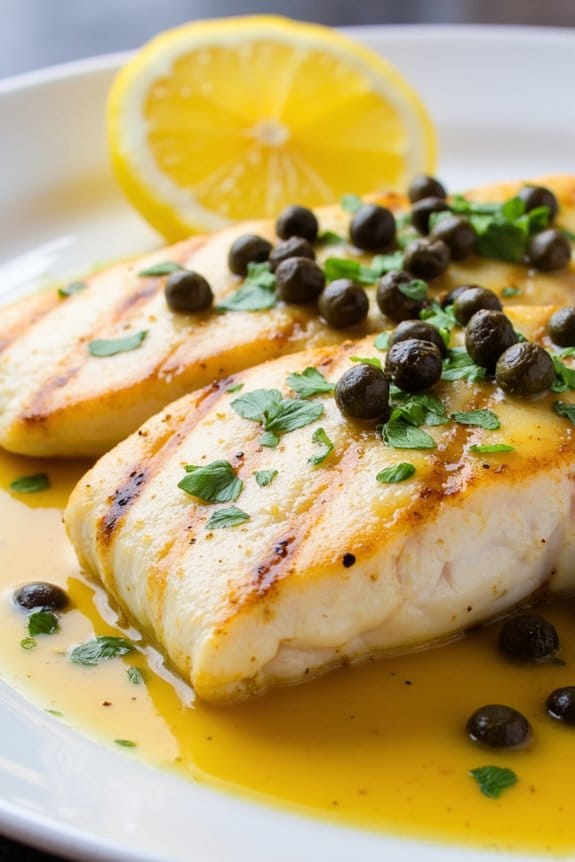
Grilled fish is a delightful way to enjoy a healthy and delicious meal, and our Halibut With Lemon-Caper Sauce is no exception. This dish combines the mild, sweet flavor of halibut with a tangy and savory lemon-caper sauce, creating a perfectly balanced and mouth-watering experience. Ideal for a family dinner or a small gathering, this recipe serves 4-6 people and is certain to impress your guests with its vibrant flavors and elegant presentation.
Halibut is a firm white fish that holds up well on the grill, making it an excellent choice for this dish. The lemon-caper sauce adds a zesty and invigorating contrast to the rich texture of the fish. This sauce is made with fresh lemon juice, capers, and a few simple ingredients that elevate the fish to gourmet levels without requiring a complicated preparation process. Follow the instructions below to create this delicious dish that will quickly become a favorite in your seafood repertoire.
Ingredients (Serves 4-6):
- 4-6 halibut fillets (about 6 oz each)
- 2 tablespoons olive oil
- Salt and freshly ground black pepper to taste
- 1/2 cup fresh lemon juice
- 1/4 cup capers, drained
- 1/4 cup unsalted butter
- 2 cloves garlic, minced
- 2 tablespoons fresh parsley, chopped
- Lemon wedges for serving
Cooking Instructions:
- Prepare the Halibut: Begin by patting the halibut fillets dry with paper towels. This helps achieve a nice sear on the grill. Rub each fillet with olive oil and season generously with salt and freshly ground black pepper on both sides.
- Preheat the Grill: Preheat your grill to medium-high heat. This should take about 10 minutes. Make sure the grill grates are clean and lightly oiled to prevent sticking.
- Grill the Halibut: Place the seasoned halibut fillets on the preheated grill. Grill for about 4-5 minutes on each side, depending on the thickness of the fillets, until the fish is opaque and flakes easily with a fork.
- Make the Lemon-Caper Sauce: While the fish is grilling, prepare the sauce. In a small saucepan over medium heat, melt the unsalted butter. Add the minced garlic and sauté until fragrant, about 1 minute. Stir in the fresh lemon juice and capers, and cook for an additional 2-3 minutes until heated through. Remove from heat and stir in the chopped parsley.
- Serve: Once the halibut is done, transfer the fillets to a serving platter. Spoon the lemon-caper sauce over the fish. Garnish with lemon wedges and additional parsley, if desired. Serve immediately.
Extra Tips:
For the best results, choose fresh halibut fillets that are evenly thick to guarantee even cooking. If fresh halibut isn’t available, frozen fillets can be used; just make sure they’re fully thawed before grilling.
To enhance the flavors further, consider marinating the halibut in a mixture of olive oil, lemon juice, and herbs for about 30 minutes before grilling. Additionally, keep an eye on the grill temperature and adjust as needed to prevent overcooking the fish.
Enjoy this dish with a side of grilled vegetables or a fresh salad for a complete meal.
Cajun-Spiced Catfish: A Spicy Southern Treat
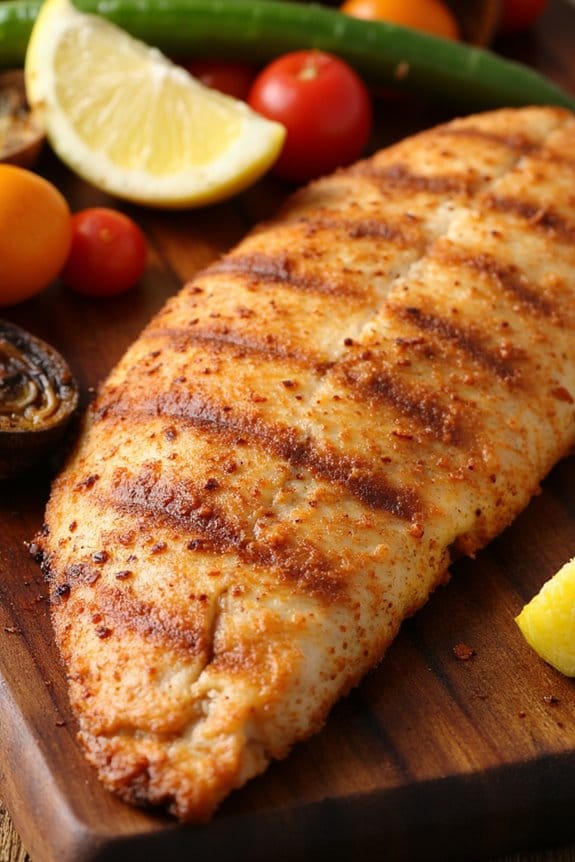
Cajun-Spiced Catfish is a deliciously fiery dish that brings the essence of Southern cuisine to your table. This dish combines the natural, mild flavors of catfish with a robust Cajun seasoning that’s certain to please those who enjoy a little kick in their meals. Perfectly grilled, this catfish recipe offers a delightful crispy texture on the outside while maintaining a moist and tender interior.
Whether you’re hosting a summer barbecue or simply want to elevate your weeknight dinner, Cajun-Spiced Catfish is a flavorful choice that captures the heart of Southern cooking.
The key to this dish is the homemade Cajun seasoning blend, which includes a mix of spices that complement the catfish without overpowering its natural taste. The grilling process locks in the flavors, creating a smoky aroma that pairs wonderfully with the spicy kick. This recipe isn’t only straightforward but also quick to prepare, making it ideal for busy evenings or when you’re entertaining guests.
Serve it alongside fresh salads, roasted vegetables, or cornbread to complete your Southern-inspired meal.
Ingredients for 4-6 servings:
- 4-6 catfish fillets (about 6-8 oz each)
- 2 tablespoons olive oil
- 2 tablespoons Cajun seasoning
- 1 teaspoon garlic powder
- 1 teaspoon onion powder
- 1 teaspoon paprika
- 1/2 teaspoon black pepper
- 1/2 teaspoon salt
- 1/4 teaspoon cayenne pepper (adjust according to spice preference)
- Lemon wedges, for serving
Cooking Instructions:
- Prepare the Grill: Preheat your grill to medium-high heat. If using a charcoal grill, make certain the coals are evenly distributed for consistent heat.
- Make the Cajun Spice Mix: In a small bowl, combine the Cajun seasoning, garlic powder, onion powder, paprika, black pepper, salt, and cayenne pepper. Mix well to guarantee the spices are evenly distributed.
- Season the Catfish: Pat the catfish fillets dry with paper towels. Brush each fillet with olive oil, then generously coat both sides with the Cajun spice mix, pressing the seasoning onto the fish to adhere.
- Grill the Catfish: Place the seasoned fillets on the preheated grill. Cook for about 4-5 minutes on each side, or until the fish is opaque and flakes easily with a fork. The grill marks should be visible, and the edges slightly crispy.
- Serve: Transfer the grilled catfish to a serving platter. Squeeze fresh lemon juice over the top and serve immediately with additional lemon wedges on the side.
Extra Tips:
When grilling fish, it’s important to confirm the grill grates are well oiled to prevent sticking. Consider using a fish basket for grilling if you’re worried about the fillets breaking apart.
Additionally, adjust the cayenne pepper according to your spice tolerance to make the dish as mild or as spicy as you like. Finally, let the fish rest for a minute or two after grilling; this helps the flavors settle and enhances the overall taste experience.
Mediterranean Branzino: Fresh and Herby
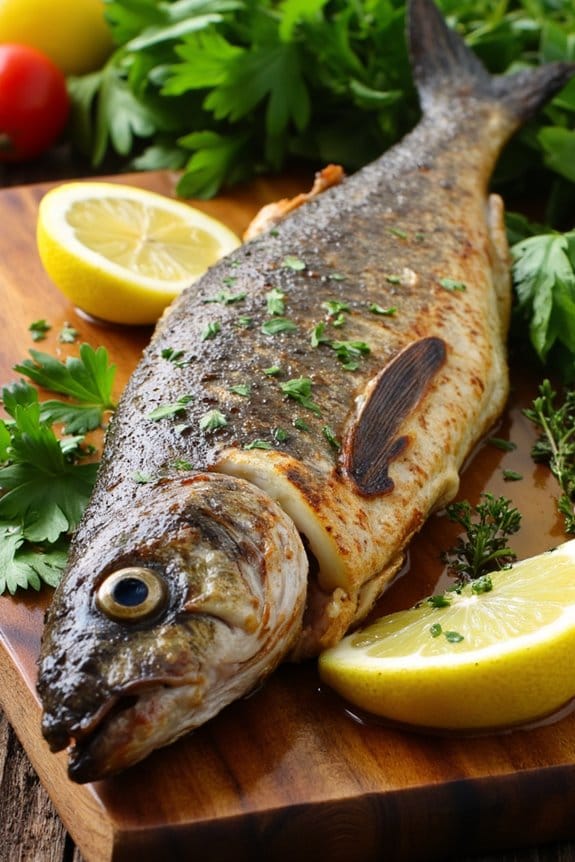
Mediterranean Branzino: Fresh and Herby is a delightful dish that brings the flavors of the Mediterranean Sea right to your table. This dish is perfect for seafood lovers who appreciate the simplicity and freshness of Mediterranean cuisine. The Branzino, also known as European Sea Bass, is a mild and tender fish that absorbs flavors beautifully, making it an ideal candidate for grilling.
By using fresh herbs and a few simple ingredients, you can create a flavorful and aromatic meal that’s both healthy and satisfying. This recipe highlights the natural flavor of the fish, complemented by the bright and zesty notes of lemon, garlic, and fresh herbs. Grilled to perfection, the fish remains moist and flaky, creating a delightful texture that pairs well with a variety of side dishes.
Whether you’re hosting a summer barbecue or looking to elevate your weeknight dinner, Mediterranean Branzino: Fresh and Herby is sure to captivate.
Ingredients (Serving Size: 4-6 people)
- 2 whole Branzino fish, cleaned and scaled
- 3 tablespoons olive oil
- 2 lemons, sliced
- 4 cloves garlic, minced
- 1 small bunch of fresh parsley, chopped
- 1 small bunch of fresh thyme
- Salt and pepper to taste
- 1 teaspoon smoked paprika (optional)
Cooking Instructions
- Prepare the Fish: Rinse the Branzino under cold water and pat dry with paper towels. Make several diagonal cuts on each side of the fish to help the marinade penetrate the flesh.
- Marinate the Fish: In a small bowl, mix olive oil, minced garlic, salt, pepper, and smoked paprika (if using). Rub this mixture over the entire surface of the fish, making sure to get inside the cuts and the cavity of the fish.
- Stuff the Fish: Stuff the cavity of each fish with lemon slices, fresh parsley, and thyme. Ascertain the herbs and lemon are evenly distributed inside the fish for maximum flavor.
- Preheat the Grill: Heat your grill to medium-high heat, making certain it’s clean and oiled to prevent the fish from sticking.
- Grill the Fish: Place the fish on the grill and cook for about 5-6 minutes on each side, or until the flesh is opaque and flakes easily with a fork. Use a wide spatula to carefully flip the fish halfway through cooking.
- Serve: Remove the fish from the grill and let it rest for a couple of minutes before serving. Garnish with additional lemon slices and fresh herbs if desired.
Extra Tips
When grilling fish, it’s important to ascertain that your grill is hot and well-oiled to prevent the fish from sticking. Use a fish spatula or a wide spatula to carefully turn the fish.
If you’re worried about flipping the fish, consider using a fish basket for easier handling. Additionally, always use fresh herbs for this recipe as they provide a vibrant flavor that dried herbs can’t match.
Finally, serving the fish with a side of grilled vegetables or a fresh salad can further enhance the meal’s Mediterranean flair.
Snapper With Tomato Relish: Quick and Zesty

Snapper with Tomato Relish is a delightful dish that combines the fresh, delicate flavor of snapper with a vibrant, zesty tomato relish. Perfect for a quick weeknight dinner or a weekend gathering, this recipe brings together the natural sweetness of ripe tomatoes with the savory and slightly spicy notes of herbs and spices. The result is a mouthwatering combination that’s both light and satisfying.
Grilled to perfection, the snapper remains tender and juicy, while the relish adds a burst of color and flavor to every bite. This dish serves 4-6 people and is ideal for those who enjoy the simplicity and freshness of grilled fish with a twist. The tomato relish can be prepared in advance, allowing you to focus on grilling the fish to perfection.
With minimal preparation and cooking time, Snapper with Tomato Relish is a fantastic choice for anyone looking to enjoy a healthy and flavorful meal without spending hours in the kitchen.
Ingredients:
- 4-6 snapper fillets
- 2 tablespoons olive oil
- Salt and pepper to taste
- 4 medium ripe tomatoes, diced
- 1 small red onion, finely chopped
- 2 tablespoons fresh basil, chopped
- 1 tablespoon fresh parsley, chopped
- 1 tablespoon capers, rinsed and drained
- 2 tablespoons balsamic vinegar
- 1 teaspoon red pepper flakes (optional)
- 1 lemon, cut into wedges
Cooking Instructions:
- Prepare the Tomato Relish:
- In a medium mixing bowl, combine the diced tomatoes, chopped red onion, fresh basil, parsley, and capers.
- Drizzle the balsamic vinegar over the mixture and add the red pepper flakes if you prefer a bit of heat.
- Mix everything gently until well combined. Set aside to allow the flavors to meld while you prepare the snapper.
- Season the Snapper:
- Pat the snapper fillets dry with a paper towel to remove excess moisture.
- Brush both sides of each fillet with olive oil and season generously with salt and pepper.
- Preheat the Grill:
- Preheat your grill to medium-high heat. Confirm the grates are clean and lightly oiled to prevent the fish from sticking.
- Grill the Snapper:
- Place the snapper fillets on the grill, skin-side down if applicable.
- Grill for 4-5 minutes per side, depending on the thickness of the fillets, until the fish is opaque and flakes easily with a fork.
- Serve:
- Transfer the grilled snapper to a serving platter and top each fillet with a generous spoonful of the tomato relish.
- Serve with lemon wedges on the side for squeezing over the fish just before eating.
Extra Tips:
For best results, choose fresh snapper fillets from a reputable source, as the quality of the fish will greatly impact the dish’s overall flavor. If you’re using a charcoal grill, add a few wood chips for a subtle smoky flavor that complements the zest of the tomato relish.
To save time, prepare the tomato relish up to a day in advance and store it in the refrigerator, allowing the flavors to develop even further. Remember to let the grilled fish rest for a minute or two before serving to allow the juices to redistribute, making sure every bite is as juicy as the last.
Almond and Thyme Grilled Trout: Tantalizing Flavors
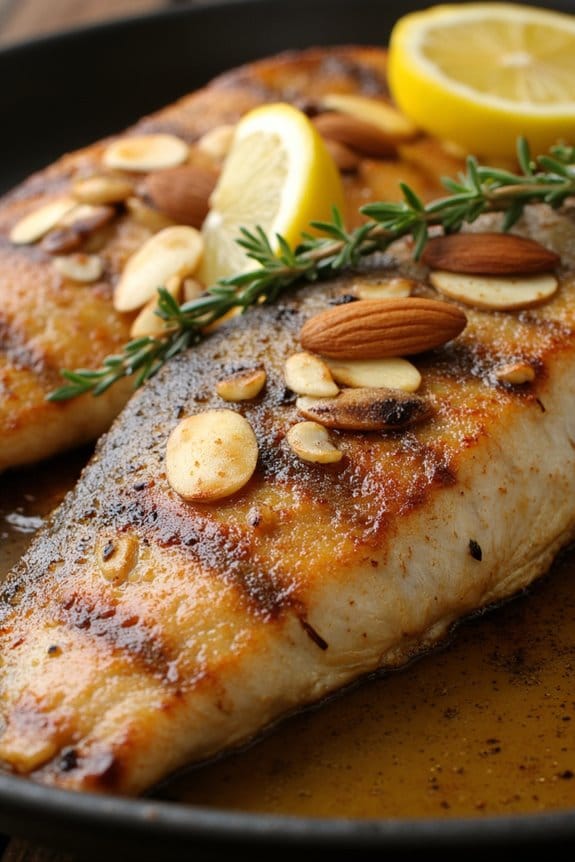
For a delightful foray into gourmet grilling, Almond and Thyme Grilled Trout offers a delectable combination of nutty and herbaceous flavors that will impress your family and friends. This dish is perfect for a summer evening, where fresh ingredients are embraced by the smoky warmth of the grill. The trout, known for its tender and flaky texture, serves as an excellent canvas for the subtlety of thyme and the rich crunch of almonds. Each bite delivers a harmonious blend of flavors, creating a meal that’s both satisfying and elegant.
The preparation of Almond and Thyme Grilled Trout is straightforward, making it an excellent choice for both novice and seasoned cooks. The recipe involves marinating the trout with fresh thyme, lemon juice, and olive oil, enhancing its natural flavors and guaranteeing it remains moist during grilling. The final touch is a sprinkle of toasted almonds, adding a delightful crunch that beautifully complements the tender fish. Serve this dish alongside a light salad or grilled vegetables to create a complete meal that celebrates the joy of outdoor cooking.
Ingredients (Serves 4-6):
- 4 whole trout, cleaned and gutted
- 3 tablespoons olive oil
- 3 tablespoons fresh lemon juice
- 4 sprigs fresh thyme
- Salt and pepper, to taste
- 1 cup sliced almonds, toasted
- Lemon wedges, for serving
Cooking Instructions:
- Prepare the Marinade: In a small bowl, combine the olive oil, lemon juice, salt, and pepper. Whisk together until well blended. Gently remove the leaves from the thyme sprigs and add them to the mixture.
- Marinate the Trout: Place the cleaned trout in a shallow dish. Pour the marinade over the fish, making sure each trout is well coated. Cover the dish with plastic wrap and let the fish marinate in the refrigerator for at least 30 minutes to 1 hour, allowing the flavors to meld.
- Preheat the Grill: While the trout is marinating, preheat your grill to medium-high heat. Make certain the grill grates are clean and lightly oiled to prevent sticking.
- Toast the Almonds: In a dry skillet over medium heat, toast the sliced almonds until golden brown, stirring frequently. Set aside to cool.
- Grill the Trout: Once the grill is hot, place the marinated trout directly onto the grill grates. Grill each side for about 5-7 minutes, or until the fish is cooked through and flakes easily with a fork. Be cautious when flipping to maintain the integrity of the fish.
- Serve the Dish: Transfer the grilled trout to a serving platter. Sprinkle the toasted almonds evenly over the top of the fish. Garnish with additional thyme sprigs and lemon wedges for an extra burst of flavor.
Extra Tips:
When grilling trout, consider using a fish basket or foil to make flipping easier and to avoid any pieces sticking to the grill.
It’s important not to over-marinate the fish, as the acidity from the lemon juice can start to “cook” the fish if left too long.
Always make sure your grill is properly preheated; a hot grill helps to sear the fish quickly, locking in juices and preventing it from drying out.
Finally, adjusting the seasoning to taste before serving guarantees a balanced flavor profile. Enjoy your meal with a chilled white wine for a perfect pairing.
Soy-Ginger Sea Bass: Succulent and Savory
Grilling fish is a delightful way to enjoy its natural flavors, and when combined with a savory marinade, it can elevate the dish to a whole new level. The Soy-Ginger Sea Bass is a perfect example of how a simple yet flavor-rich marinade can turn a common fish into a culinary masterpiece. The balance of soy sauce, ginger, and other simple ingredients creates a dish that’s both succulent and savory, making it a crowd-pleaser for any occasion.
The marination process is vital for this recipe, allowing the sea bass to absorb the robust flavors of soy and ginger. When grilled, the fish’s exterior becomes slightly crispy, while the inside remains moist and tender. This recipe serves 4-6 people, making it ideal for family dinners or small gatherings. Whether you’re a seasoned chef or a cooking enthusiast, this dish is straightforward to make and promises to be a hit at your dinner table.
Ingredients for 4-6 Servings:
- 4-6 sea bass fillets
- 1/2 cup soy sauce
- 1/4 cup freshly grated ginger
- 2 tablespoons honey
- 3 garlic cloves, minced
- 1 tablespoon sesame oil
- 1 tablespoon rice vinegar
- 2 tablespoons chopped green onions
- 2 tablespoons sesame seeds
- Salt and pepper to taste
- Lemon wedges for serving
Cooking Instructions:
- Prepare the Marinade: In a mixing bowl, combine the soy sauce, grated ginger, honey, minced garlic, sesame oil, and rice vinegar. Whisk the ingredients together until the honey is fully dissolved and the mixture is well combined.
- Marinate the Sea Bass: Place the sea bass fillets in a shallow dish or a resealable plastic bag. Pour the marinade over the fish, making sure each fillet is fully covered. Seal the bag or cover the dish and refrigerate for at least 30 minutes. For best results, marinate for up to 2 hours.
- Preheat the Grill: While the sea bass is marinating, preheat your grill to medium-high heat. Make sure the grill grates are clean and lightly oiled to prevent sticking.
- Grill the Sea Bass: Remove the sea bass from the marinade, allowing any excess to drip off. Place the fillets on the grill, skin-side down if applicable. Grill for about 4-5 minutes per side, or until the fish is opaque and easily flakes with a fork.
- Garnish and Serve: Once cooked, transfer the sea bass to a serving platter. Sprinkle with chopped green onions and sesame seeds. Serve with lemon wedges on the side for an added burst of freshness.
Extra Tips:
When grilling fish, it’s vital not to overcook it, as it can become dry and lose its delicate flavor. Use a fish spatula for easy flipping to prevent the fish from breaking apart. If you’re using a charcoal grill, create a two-zone fire to give you more control over the cooking temperature.
For an added layer of flavor, you can brush some of the leftover marinade onto the fish during the last minute of grilling, but make sure it’s fully cooked to avoid any raw marinade contamination. Enjoy your Soy-Ginger Sea Bass with a side of steamed rice or a fresh salad for a complete meal.
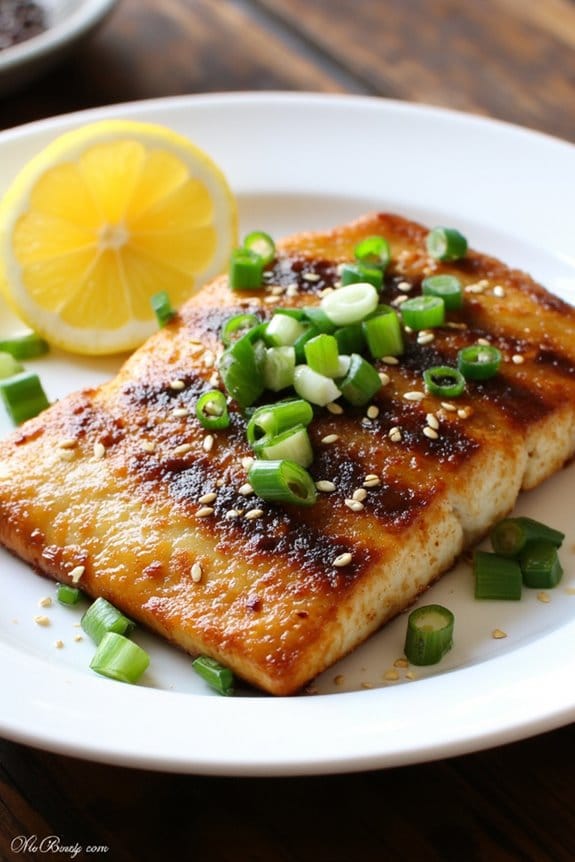
Miso-Scallion Grilled Cod: Asian-Style Delight

Miso-Scallion Grilled Cod is a delightful Asian-style dish that brings together the rich umami flavors of miso and the fresh zing of scallions to elevate the mild taste of cod. This recipe is perfect for those who enjoy a harmonious blend of simple yet bold flavors. The miso marinade imparts a savory depth to the fish, while grilling adds a smoky char that enhances its natural sweetness.
This dish isn’t only delicious but also quick to prepare, making it a fantastic option for a weeknight dinner or a special occasion. Grilled cod pairs well with a variety of side dishes, such as steamed rice, sautéed vegetables, or a fresh salad, making it versatile for any meal. The preparation is straightforward, involving marinating the cod in a flavorful mixture before grilling it to perfection.
Whether you’re a seasoned chef or a home cook looking to try something new, this Miso-Scallion Grilled Cod recipe is sure to impress both your family and guests.
Ingredients (Serves 4-6)
- 4 cod fillets (about 6 oz each)
- 1/4 cup white miso paste
- 2 tablespoons soy sauce
- 2 tablespoons mirin (Japanese sweet rice wine)
- 1 tablespoon rice vinegar
- 1 tablespoon sesame oil
- 2 teaspoons grated fresh ginger
- 4 garlic cloves, minced
- 1 bunch scallions, finely chopped
- 1 tablespoon sesame seeds
- Lemon wedges, for serving
Cooking Instructions
- Prepare the Marinade: In a medium bowl, whisk together the miso paste, soy sauce, mirin, rice vinegar, sesame oil, grated ginger, and minced garlic until smooth and well combined.
- Marinate the Cod: Place the cod fillets in a shallow dish or a resealable plastic bag. Pour the miso mixture over the fillets, making certain they’re evenly coated. Cover the dish or seal the bag and refrigerate for at least 30 minutes, allowing the flavors to infuse into the fish.
- Preheat the Grill: Preheat your grill to medium-high heat. If using a charcoal grill, make sure the coals are white-hot before you start cooking.
- Grill the Cod: Lightly oil the grill grates to prevent sticking. Remove the cod fillets from the marinade and place them on the grill. Cook for about 4-5 minutes on each side, or until the fish is opaque and flakes easily with a fork.
- Garnish and Serve: Once grilled, transfer the cod to a serving platter. Sprinkle with chopped scallions and sesame seeds. Serve immediately with lemon wedges on the side for squeezing over the fish.
Extra Tips
When grilling fish, it’s important to verify the grill is hot enough to prevent the fish from sticking. Always oil the grill grates before placing the fish on them.
If you don’t have access to a grill, you can use a grill pan or broil the fish in the oven for similar results. Be mindful of the cooking time, as fish cooks quickly and can become dry if overcooked.
Finally, allowing the fish to rest for a minute after grilling will help the juices redistribute, resulting in a more flavorful dish.
Sardines With Olive Oil and Herbs: Mediterranean Zest
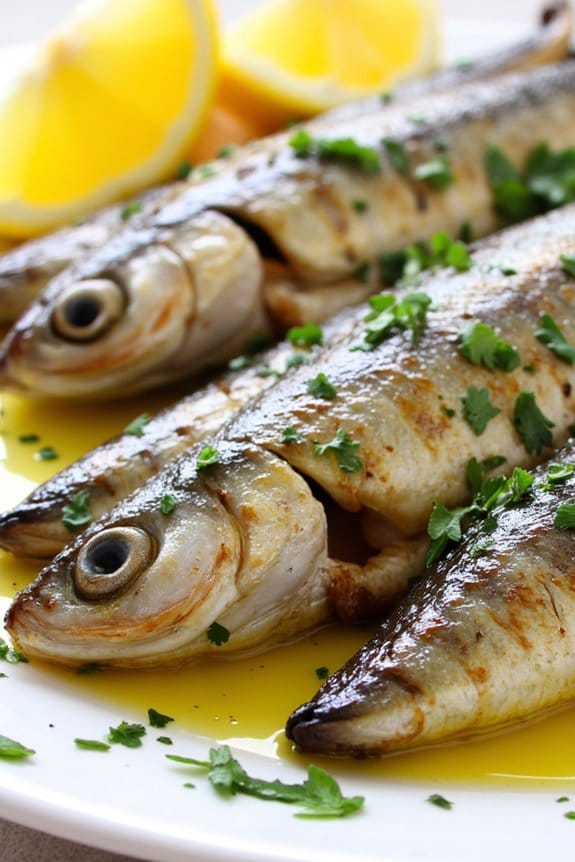
Sardines With Olive Oil and Herbs is a delightful dish that brings the vibrant flavors of the Mediterranean right to your table. This recipe combines the simplicity of fresh sardines with the rich and aromatic essence of olive oil and a medley of herbs. Perfect for a summer barbecue or a light dinner, these grilled sardines capture the essence of coastal cuisine, offering a delicious, healthy, and easy-to-prepare meal.
The olive oil not only enhances the flavor but also keeps the sardines moist and tender, while the herbs add a layer of aromatic complexity. Sardines are an excellent source of omega-3 fatty acids, making this dish both nutritious and flavorful. The preparation is straightforward, allowing the natural taste of the fish to shine through.
When grilled to perfection, the sardines develop a crispy skin that contrasts beautifully with the juicy, tender flesh. Serve them with a side of lemon wedges and a fresh salad to complete this Mediterranean feast. Whether you’re a seafood enthusiast or just looking to try something new, Sardines With Olive Oil and Herbs will surely become a favorite.
Ingredients (Serves 4-6):
- 12 fresh sardines, cleaned and gutted
- 1/4 cup extra virgin olive oil
- 2 tablespoons fresh lemon juice
- 3 garlic cloves, minced
- 1 tablespoon fresh parsley, chopped
- 1 tablespoon fresh thyme leaves
- 1 tablespoon fresh oregano, chopped
- Salt and pepper to taste
- Lemon wedges, for serving
Cooking Instructions:
- Prepare the Marinade: In a small bowl, whisk together the olive oil, lemon juice, minced garlic, chopped parsley, thyme, oregano, salt, and pepper. This flavorful marinade will infuse the sardines with a burst of Mediterranean zest.
- Marinate the Sardines: Place the cleaned sardines in a shallow dish. Pour the marinade over the sardines, ensuring they’re evenly coated. Cover the dish with plastic wrap and refrigerate for at least 30 minutes to allow the flavors to meld.
- Preheat the Grill: Preheat your grill to medium-high heat. Make sure the grates are clean and lightly oiled to prevent sticking.
- Grill the Sardines: Remove the sardines from the marinade and place them on the hot grill. Cook for 3-4 minutes on each side until the skin is crispy and the fish is cooked through. The fish should easily flake with a fork.
- Serve: Transfer the grilled sardines to a serving platter. Garnish with additional herbs and serve immediately with lemon wedges on the side for squeezing over the top.
Extra Tips:
For best results, use fresh sardines if available, as they’ve a superior flavor compared to frozen ones. If you’re unable to find fresh sardines, make sure to thaw frozen ones completely before marinating.
Keep an eye on the grill to avoid overcooking the sardines, as they’re delicate and can dry out quickly. If you don’t have access to a grill, you can also cook the sardines in a hot skillet or under a broiler.
Don’t forget to serve with a crisp white wine or a light beer to complement the dish perfectly.
Smoky Paprika Monkfish: A Robust Choice

Monkfish, often referred to as the “poor man’s lobster,” is a delightful fish known for its firm texture and sweet flavor. When paired with smoky paprika, it transforms into a robust dish that’s both flavorful and satisfying. This recipe for Smoky Paprika Monkfish is perfect for those who enjoy a dish that’s rich in taste yet simple to prepare.
The combination of spices and the grilling method brings out the best in this unique fish, making it a standout choice for any meal. Ideal for serving 4-6 people, this dish is perfect for a family dinner or a small gathering.
The monkfish is marinated in a blend of spices that include smoky paprika, giving it a vibrant color and deep flavor. Grilled to perfection, the result is a succulent piece of fish with a slight char that adds to its overall complexity. Accompanied by a side of grilled vegetables or a simple salad, Smoky Paprika Monkfish is sure to impress your guests with its bold flavors and elegant presentation.
Ingredients for 4-6 servings:
- 2 lbs monkfish fillets
- 2 tablespoons smoked paprika
- 1 tablespoon olive oil
- 1 tablespoon lemon juice
- 2 cloves garlic, minced
- 1 teaspoon salt
- 1/2 teaspoon black pepper
- 1 teaspoon dried oregano
- Lemon wedges for serving
Cooking Instructions:
- Prepare the Marinade: In a small bowl, combine the smoked paprika, olive oil, lemon juice, minced garlic, salt, black pepper, and dried oregano. Mix well until all the ingredients are thoroughly combined to form a smooth marinade.
- Marinate the Monkfish: Place the monkfish fillets in a shallow dish and pour the marinade over them. Confirm that each fillet is evenly coated with the marinade. Cover the dish with plastic wrap and refrigerate for at least 30 minutes to allow the flavors to penetrate the fish.
- Preheat the Grill: While the monkfish is marinating, preheat your grill to medium-high heat. If using a charcoal grill, confirm that the coals are evenly distributed and have a light layer of ash.
- Grill the Monkfish: Once the grill is ready, lightly oil the grill grates to prevent sticking. Place the marinated monkfish fillets on the grill. Cook for 4-5 minutes on each side, or until the fish is opaque and flakes easily with a fork. Be mindful not to overcook the fish, as it can become dry.
- Serve and Enjoy: Remove the grilled monkfish from the grill and let it rest for a couple of minutes. Serve the fish with fresh lemon wedges on the side for an added burst of citrus flavor.
Extra Tips:
When choosing monkfish, look for fillets that are firm and have a translucent sheen. This indicates freshness. If you find that the fish has a strong odor, it may not be fresh and should be avoided.
When grilling, use a fish spatula to gently handle the fillets and prevent them from breaking apart. Additionally, if you prefer a spicier kick, consider adding a pinch of cayenne pepper to the marinade.
This Smoky Paprika Monkfish pairs beautifully with a crisp white wine or a light, cool beer.