

Firing up the grill for dinner is my go-to way to make any meal feel extra special yet wonderfully uncomplicated. With the days getting warmer, I’m all about those quick and flavorful dishes that come together effortlessly on the grill. Think juicy lemon herb chicken breasts and smoky shrimp skewers that are sure to please. I’ve gathered some delicious recipes that will make every evening meal feel like a gourmet experience. Ready to see what’s cooking?
Grilled Lemon Herb Chicken Breasts
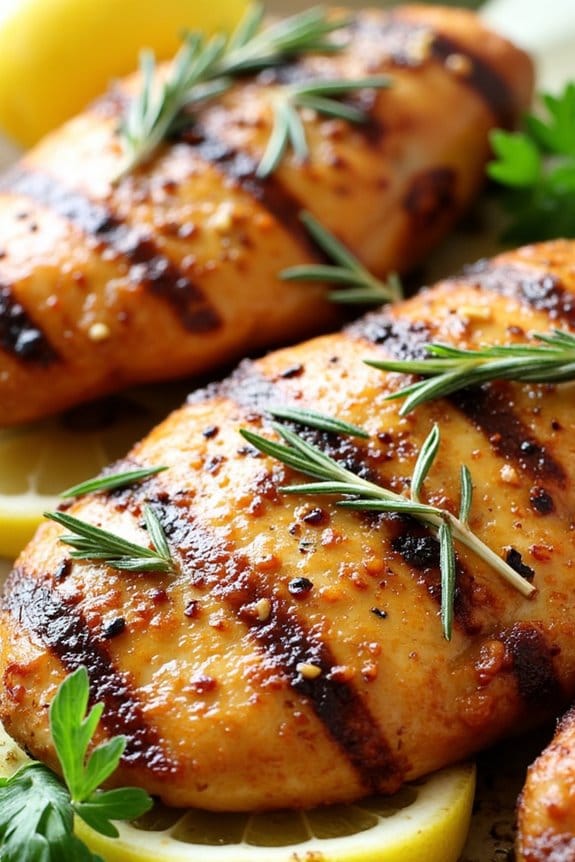
Grilled Lemon Herb Chicken Breasts are a delicious and healthy option for any summer barbecue or family dinner. This dish combines the zesty freshness of lemon with aromatic herbs to create a flavorful marinade that elevates the taste of the chicken to a whole new level. Grilled to perfection, these chicken breasts are juicy and tender, making them a favorite among both kids and adults.
Whether you’re a seasoned griller or a beginner, this recipe is simple to follow and guarantees a mouthwatering result every time. The key to this dish is in the marinade, which infuses the chicken with bright and savory flavors. Lemon juice adds a tangy kick, while a mixture of herbs such as rosemary, thyme, and parsley provides a fragrant aroma that complements the smoky char from the grill.
This recipe is perfect for serving 4-6 people, making it ideal for a small gathering or a cozy family meal. Pair these Grilled Lemon Herb Chicken Breasts with a side of grilled vegetables or a fresh salad for a complete and satisfying dinner.
Ingredients for 4-6 servings:
- 4-6 boneless, skinless chicken breasts
- 1/4 cup olive oil
- 1/4 cup freshly squeezed lemon juice
- 2 tablespoons lemon zest
- 3 cloves garlic, minced
- 1 tablespoon fresh rosemary, chopped
- 1 tablespoon fresh thyme leaves
- 1 tablespoon fresh parsley, chopped
- Salt and pepper to taste
Cooking Instructions:
- Prepare the Marinade: In a medium bowl, combine olive oil, lemon juice, lemon zest, minced garlic, chopped rosemary, thyme leaves, and parsley. Mix well to confirm all ingredients are evenly distributed. Season the marinade with salt and pepper to taste.
- Marinate the Chicken: Place the chicken breasts in a large resealable plastic bag or a shallow dish. Pour the marinade over the chicken, confirming each piece is well coated. Seal the bag or cover the dish with plastic wrap. Refrigerate for at least 1 hour, or up to 4 hours for maximum flavor infusion.
- Preheat the Grill: About 15 minutes before you plan to cook, preheat your grill to medium-high heat. If using a charcoal grill, confirm the coals are white-hot before proceeding.
- Grill the Chicken: Remove the chicken from the marinade, allowing any excess to drip off. Place the chicken on the grill, and cook for 6-7 minutes per side, or until the internal temperature reaches 165°F (75°C). Avoid flipping the chicken too frequently to confirm nice grill marks and even cooking.
- Rest and Serve: Once cooked, remove the chicken from the grill and let it rest for about 5 minutes. This allows the juices to redistribute, confirming the chicken remains juicy. Serve hot with your choice of side dishes.
Extra Tips:
To confirm even cooking, pound the chicken breasts to an even thickness before marinating. This prevents thinner parts from drying out while waiting for the thicker sections to cook through.
Additionally, if fresh herbs aren’t available, dried herbs can be substituted, but use about half the amount since they’re more concentrated. Finally, always let the chicken rest after grilling to lock in the moisture, making each bite as succulent as possible.
Perfectly Grilled Steak With Chimichurri
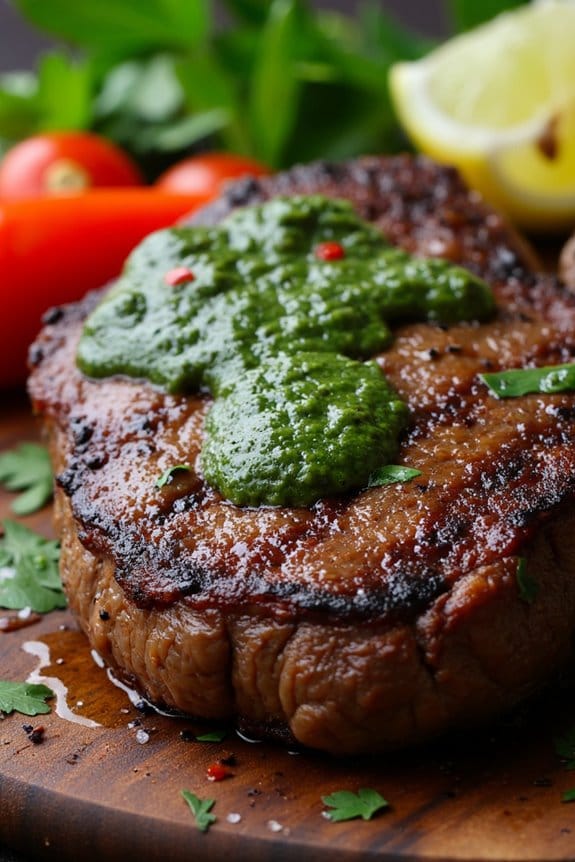
Grilling steak to perfection is an art that combines heat, timing, and a touch of patience. The Perfectly Grilled Steak With Chimichurri is a vibrant dish that brings together the rich flavors of a well-cooked steak with the fresh, zesty notes of a homemade chimichurri sauce. This Argentinian-inspired dish is perfect for a summer barbecue or a cozy dinner party, offering a taste that’s both robust and invigorating.
The key to this dish is to use high-quality cuts of steak and to give the chimichurri sauce enough time to meld its flavors, ideally overnight.
Chimichurri sauce is a blend of fresh herbs, garlic, vinegar, and oil, creating a vibrant green sauce that pairs beautifully with the richness of grilled steak. It’s a versatile sauce that adds a delightful zing to the dish, enhancing the natural flavors of the meat without overpowering it.
When preparing this dish, make sure to let the steak rest before slicing, which allows the juices to redistribute, resulting in a more tender and flavorful bite. Serving this dish to 4-6 people guarantees that everyone gets a satisfying portion, with enough chimichurri to drizzle over each succulent piece of steak.
Ingredients for 4-6 servings:
- 4 ribeye steaks (about 1 inch thick)
- Salt and freshly ground black pepper
- Olive oil for brushing
For the Chimichurri Sauce:
- 1 cup fresh parsley leaves, finely chopped
- 1/4 cup fresh cilantro leaves, finely chopped
- 3 cloves garlic, minced
- 1/2 cup olive oil
- 2 tablespoons red wine vinegar
- 1 tablespoon lemon juice
- 1 teaspoon dried oregano
- 1/2 teaspoon red pepper flakes
- Salt and pepper to taste
Cooking Instructions:
- Prepare the Chimichurri Sauce: In a medium bowl, combine parsley, cilantro, and garlic. Stir in olive oil, red wine vinegar, lemon juice, oregano, and red pepper flakes. Season with salt and pepper to taste. Mix well and let it sit at room temperature for at least 30 minutes, allowing the flavors to meld. For best results, prepare the sauce a day in advance and refrigerate, then bring to room temperature before serving.
- Preheat the Grill: Preheat your grill to high heat, about 450°F (232°C). Verify the grill grates are clean and lightly oiled to prevent the steak from sticking.
- Season the Steaks: Pat the steaks dry with paper towels, then brush lightly with olive oil. Season generously with salt and freshly ground black pepper on both sides.
- Grill the Steaks: Place the steaks on the grill and cook for about 4-5 minutes per side for medium-rare, or adjust the time according to your desired doneness. Use a meat thermometer to check the internal temperature: 130°F (54°C) for medium-rare, 140°F (60°C) for medium.
- Rest the Steaks: Once done, remove the steaks from the grill and let them rest on a cutting board tented with foil for 5-10 minutes. This resting period allows the juices to redistribute throughout the meat, guaranteeing a juicy steak.
- Serve: Slice the steaks against the grain and serve on a platter. Generously spoon chimichurri sauce over the top, and offer additional sauce on the side for guests to add to their taste.
Extra Tips:
For the best chimichurri, use fresh herbs and let the sauce sit overnight to deepen in flavor. When grilling, confirm your steaks are at room temperature before cooking to promote even cooking.
If using a charcoal grill, allow the coals to become ashy white to achieve the perfect grilling temperature. Remember, the thickness of your steak will affect the cooking time, so adjust accordingly and use a meat thermometer to ensure accuracy.
Enjoy your Perfectly Grilled Steak With Chimichurri with a side of grilled vegetables or a simple arugula salad for a complete meal.
Smoky Grilled Shrimp Skewers
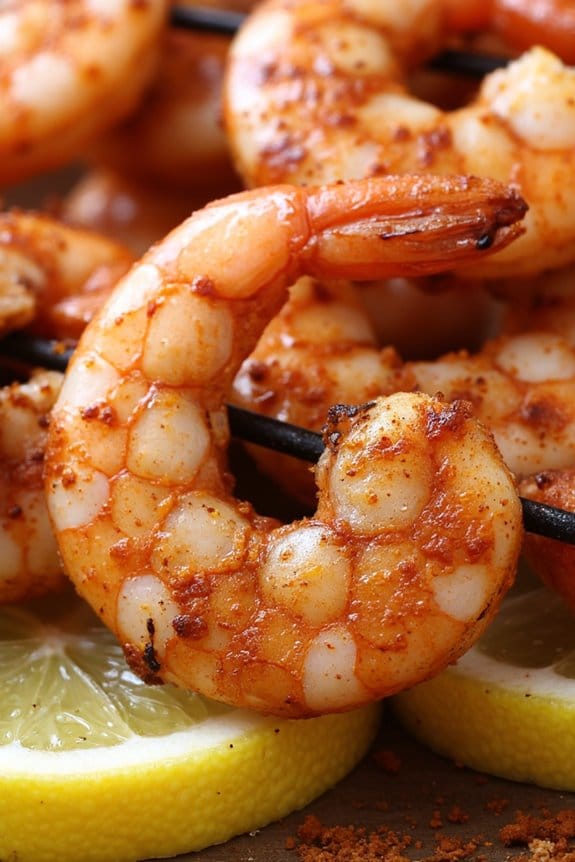
Elevate your grilling game with these irresistible Smoky Grilled Shrimp Skewers. Perfect for a summer BBQ or a casual dinner at home, these skewers offer a delightful combination of smoky, spicy, and tangy flavors. The shrimp are marinated in a robust mixture of spices and lemon juice, which enhances their natural sweetness and adds a burst of flavor with every bite.
Whether you serve them as an appetizer or the main course, these skewers are guaranteed to be a crowd-pleaser. The preparation is straightforward, making it an ideal dish even for those new to grilling. The key to success lies in the marinade, which not only imparts flavor but also helps keep the shrimp juicy and tender.
With just a few ingredients and minimal prep time, you’ll have a delicious meal ready to go. Serve the skewers with a side of grilled vegetables or a fresh salad for a complete and satisfying meal.
Ingredients (serving size: 4-6 people):
- 2 pounds large shrimp, peeled and deveined
- 3 tablespoons olive oil
- 2 tablespoons smoked paprika
- 1 tablespoon garlic powder
- 1 tablespoon onion powder
- 1 teaspoon cayenne pepper
- 1 teaspoon salt
- 1 teaspoon black pepper
- 2 lemons, juiced
- Wooden or metal skewers
Cooking Instructions:
- Marinate the Shrimp: In a large bowl, combine olive oil, smoked paprika, garlic powder, onion powder, cayenne pepper, salt, black pepper, and lemon juice. Mix well to create the marinade.
- Prepare the Shrimp: Add the shrimp to the bowl and toss them in the marinade until they’re well-coated. Cover the bowl and refrigerate for at least 30 minutes, allowing the flavors to meld together.
- Prepare the Skewers: If using wooden skewers, soak them in water for at least 30 minutes to prevent burning. If using metal skewers, proceed to the next step.
- Thread the Shrimp: Thread the marinated shrimp onto the skewers, making sure they’re evenly spaced. This guarantees even cooking and prevents overcrowding.
- Preheat the Grill: Heat your grill to medium-high heat. If using a charcoal grill, allow the coals to become ashy before placing the skewers on the grill.
- Grill the Shrimp: Place the skewers on the grill and cook for 2-3 minutes on each side, or until the shrimp are opaque and have a nice char. Be careful not to overcook, as shrimp can become rubbery.
- Serve and Enjoy: Remove the shrimp skewers from the grill and let them rest for a minute before serving. Serve with lemon wedges on the side for an extra burst of freshness.
Extra Tips:
For best results, try to buy fresh shrimp, but if only frozen is available, verify they’re completely thawed before marinating. Adjust the level of cayenne pepper according to your spice tolerance.
For an added depth of flavor, consider adding a touch of honey to the marinade, which will caramelize beautifully on the grill. If you prefer, you can add vegetables like bell peppers or cherry tomatoes to the skewers for a complete meal on a stick.
Finally, always keep an eye on the grill to prevent flare-ups, which can quickly turn your shrimp from perfectly grilled to overdone.
Grilled Pineapple and Pork Kebabs
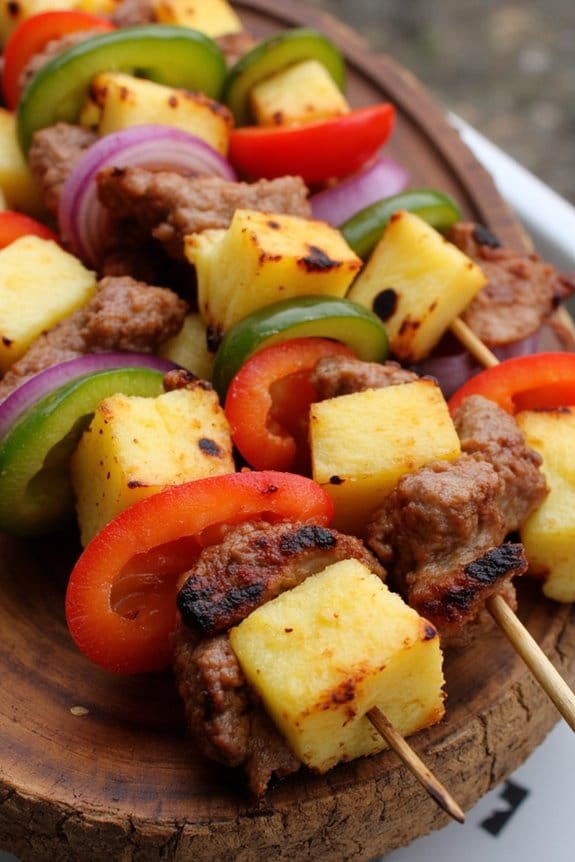
Grilled Pineapple and Pork Kebabs offer a delightful combination of sweet and savory flavors that are perfect for a summer barbecue or a simple outdoor dinner with family and friends. The succulent pork pairs beautifully with the juicy, caramelized pineapple, creating a dish that’s not only delicious but visually appealing as well.
Whether you’re a grilling novice or a seasoned pro, this dish is straightforward to prepare and is certain to impress your guests. This recipe is designed for a serving size of 4-6 people, making it ideal for a small gathering or a family meal. The preparation involves marinating the pork to enhance its flavor and tenderness, while the pineapple provides a revitalizing contrast.
The kebabs are then grilled to perfection, creating a delightful main course that pairs beautifully with a variety of side dishes.
Ingredients:
- 2 pounds pork tenderloin, cut into 1-inch cubes
- 1 fresh pineapple, peeled, cored, and cut into 1-inch chunks
- 1 large red bell pepper, cut into 1-inch pieces
- 1 large green bell pepper, cut into 1-inch pieces
- 1 large red onion, cut into wedges
- 1/4 cup soy sauce
- 1/4 cup honey
- 2 tablespoons olive oil
- 2 tablespoons apple cider vinegar
- 2 cloves garlic, minced
- 1 teaspoon ground ginger
- Salt and pepper to taste
- Skewers (soaked in water for 30 minutes if wooden)
Cooking Instructions:
- Prepare the Marinade: In a large mixing bowl, combine the soy sauce, honey, olive oil, apple cider vinegar, minced garlic, and ground ginger. Mix well to guarantee all the ingredients are evenly incorporated.
- Marinate the Pork: Add the pork cubes to the marinade, ensuring each piece is well-coated. Cover the bowl with plastic wrap and refrigerate for at least 1 hour, or up to overnight, to allow the flavors to infuse the meat.
- Preheat the Grill: Preheat your grill to medium-high heat. This guarantees the kebabs will cook evenly and develop a nice char.
- Assemble the Kebabs: Thread the marinated pork, pineapple chunks, bell pepper pieces, and onion wedges onto the skewers, alternating between ingredients for a balanced mix of flavors and colors.
- Grill the Kebabs: Place the kebabs on the preheated grill. Cook for about 12-15 minutes, turning occasionally, until the pork is cooked through and has a slightly charred exterior. The internal temperature of the pork should reach 145°F (63°C).
- Season and Serve: Remove the kebabs from the grill and season with salt and pepper to taste. Let them rest for a few minutes before serving to allow the juices to redistribute.
Extra Tips:
For the best results, make sure to cut the pork and pineapple into uniform sizes to guarantee even cooking. If you prefer a little extra kick, consider adding a dash of cayenne pepper or chili flakes to the marinade.
Wooden skewers should be soaked in water for at least 30 minutes before use to prevent them from burning on the grill. Additionally, if you’re using a gas grill, keep the lid closed while cooking to maintain consistent heat.
Enjoy your Grilled Pineapple and Pork Kebabs with a side of rice or a fresh salad for a complete meal.
Grilled Seasonal Vegetables With Balsamic Glaze
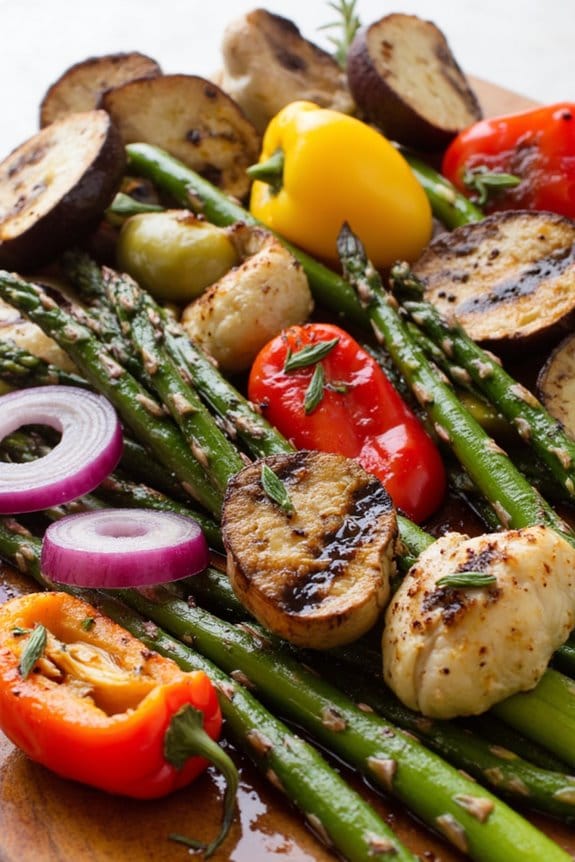
Grilling vegetables is a delightful way to bring out their natural flavors and create a healthy, vibrant dish that’s perfect for any meal. This recipe for Grilled Seasonal Vegetables With Balsamic Glaze isn’t only easy to prepare but also allows for flexibility with the choice of vegetables. Selecting what’s in season guarantees that you have the freshest and most flavorful produce available.
The balsamic glaze adds a touch of sweetness and tang, enhancing the natural taste of the vegetables while providing a beautiful, glossy finish. Serve this dish as a side to your favorite grilled meats or as a standalone vegetarian main. It offers a medley of textures and colors, making it as visually appealing as it’s delicious.
Whether you’re hosting a barbecue or enjoying a cozy dinner at home, this recipe is sure to please everyone at the table.
Ingredients (Serves 4-6):
- 2 red bell peppers, cut into strips
- 1 large zucchini, sliced diagonally
- 1 large yellow squash, sliced diagonally
- 1 red onion, cut into thick rings
- 1 bunch of asparagus, ends trimmed
- 8 oz. button mushrooms, cleaned and halved
- 1/4 cup olive oil
- Salt and pepper to taste
- 1/2 cup balsamic vinegar
- 2 tablespoons honey
- 1 teaspoon fresh thyme leaves (optional)
Cooking Instructions:
- Prepare the Balsamic Glaze: In a small saucepan over medium heat, combine the balsamic vinegar and honey. Stir occasionally and bring to a simmer. Allow it to reduce until it thickens to a glaze-like consistency, which should take about 10-15 minutes. Remove from heat and set aside to cool.
- Preheat the Grill: Heat your grill to medium-high. If using a charcoal grill, make sure the coals are evenly distributed. For a gas grill, preheat all burners.
- Prep the Vegetables: In a large bowl, combine the prepared bell peppers, zucchini, yellow squash, onion, asparagus, and mushrooms. Drizzle with olive oil, and season with salt and pepper. Toss until the vegetables are well-coated.
- Grill the Vegetables: Place the vegetables directly on the grill grates or use a grill basket for smaller pieces. Grill for about 4-5 minutes per side, or until you see grill marks and the vegetables are tender but still crisp.
- Drizzle with Balsamic Glaze: Once the vegetables are grilled to perfection, remove them from the grill and arrange them on a serving platter. Drizzle the balsamic glaze over the top and sprinkle with fresh thyme leaves if using.
- Serve Immediately: This dish is best served warm, straight from the grill, to fully enjoy the flavors and aromas.
Extra Tips:
To make the most of this dish, choose vegetables that are firm and ripe for grilling. If you prefer a smokier flavor, you can char the vegetables a bit more on the grill.
Be sure to keep an eye on the balsamic glaze as it reduces; it can quickly go from perfect to burnt if left unattended. If you have any leftover glaze, it can be stored in an airtight container in the refrigerator for up to a week and used on salads or as a marinade.
Charred Corn on the Cob With Lime Butter
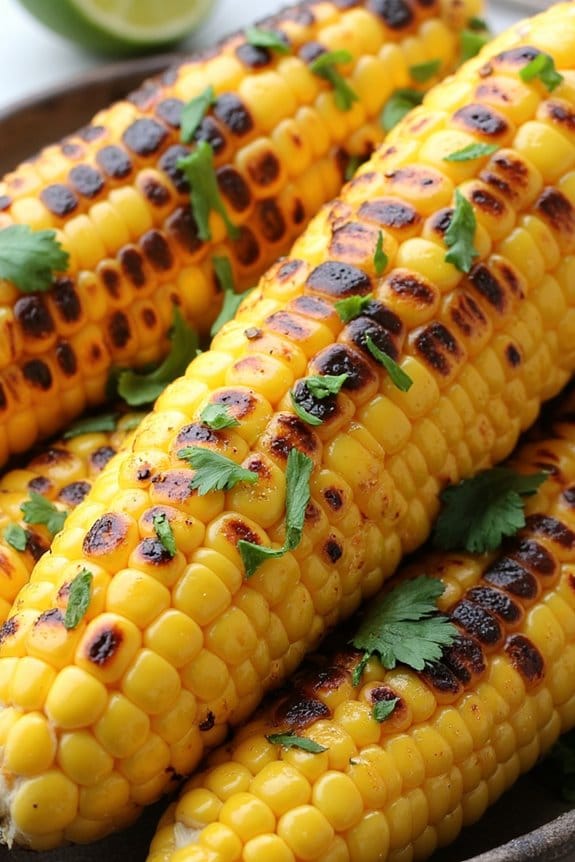
Grilled corn on the cob is a classic summer side dish that pairs perfectly with almost any grilled entree. The sweetness of the corn, combined with the smoky flavor from the grill, creates a delightful contrast that’s both satisfying and invigorating.
To elevate this dish, we add a luscious lime butter that infuses the corn with a zesty, tangy flavor, making it an irresistible addition to your outdoor dining experience.
This recipe for Charred Corn on the Cob with Lime Butter is designed to serve 4-6 people, making it perfect for family gatherings or small get-togethers. The preparation is simple, but the result is a flavorful dish that will impress your guests.
The lime butter not only enhances the natural sweetness of the corn but also adds a layer of complexity with its bright citrus notes, making each bite a delightful experience.
Ingredients:
- 6 ears of corn, husked
- 1/2 cup unsalted butter, softened
- 2 tablespoons fresh lime juice
- Zest of 1 lime
- 1 teaspoon sea salt
- 1/2 teaspoon freshly ground black pepper
- 1 teaspoon chili powder (optional)
- Fresh cilantro, chopped (for garnish)
Cooking Instructions:
- Prepare the Grill: Preheat your grill to medium-high heat. If using charcoal, make certain the coals are hot and covered in a light layer of ash.
- Make the Lime Butter: In a small bowl, combine the softened butter, lime juice, lime zest, sea salt, black pepper, and chili powder (if using). Mix thoroughly until all ingredients are well incorporated. Set aside.
- Grill the Corn: Place the husked ears of corn directly onto the grill grates. Grill for about 10-12 minutes, turning occasionally, until the corn is tender and evenly charred on all sides.
- Apply the Lime Butter: Once the corn is cooked, use a brush or a butter knife to generously coat each ear with the lime butter while it’s still hot. This will allow the butter to melt and seep into the kernels.
- Garnish and Serve: Transfer the corn to a serving platter. Garnish with freshly chopped cilantro for an added burst of freshness. Serve immediately while hot.
Extra Tips:
For the best results, choose fresh, in-season corn for maximum flavor and sweetness. If you prefer a bit of spice, consider adding a pinch of cayenne pepper to the lime butter.
Additionally, soaking the husked corn in water for about 10 minutes before grilling can help prevent the corn from drying out and make certain it stays juicy. If you don’t have a grill, you can also roast the corn in the oven on a high broil setting, turning occasionally to achieve a similar charred effect.
Grilled Portobello Mushroom Burgers
Grilled Portobello Mushroom Burgers are a delightful vegetarian alternative that burst with flavor and texture. These hearty mushrooms have a meaty consistency that makes them perfect for grilling and assembling into satisfying burgers. Marinated in a savory blend of balsamic vinegar, garlic, and herbs, the mushrooms absorb the rich flavors, making every bite a savory experience.
Whether you’re a vegetarian or simply looking to add more plant-based meals to your menu, these burgers are bound to impress.
The beauty of Grilled Portobello Mushroom Burgers is in their simplicity and versatility. The mushrooms are paired with fresh, vibrant toppings and nestled in a soft bun, creating a balanced meal that’s both wholesome and indulgent. You can customize these burgers with your favorite cheeses, sauces, and garnishes, making them a hit at any barbecue or family dinner.
Serve them with a side of grilled vegetables or a fresh salad for a complete meal that everyone will enjoy.
Ingredients (serving size: 4-6 people):
- 4-6 large Portobello mushroom caps
- 1/4 cup balsamic vinegar
- 2 tablespoons olive oil
- 2 cloves garlic, minced
- 1 teaspoon dried oregano
- Salt and pepper to taste
- 4-6 hamburger buns
- 4-6 slices of cheese (optional)
- Lettuce leaves
- Tomato slices
- Red onion slices
- Avocado (optional)
- Condiments of choice (e.g., mayonnaise, mustard, ketchup)
Cooking Instructions:
- Prepare the Marinade: In a small bowl, whisk together the balsamic vinegar, olive oil, minced garlic, oregano, salt, and pepper. This will serve as the flavor base for the mushrooms.
- Marinate the Mushrooms: Place the Portobello mushroom caps in a shallow dish and pour the marinade over them. Use a brush to guarantee each mushroom is well-coated. Allow the mushrooms to marinate for at least 30 minutes, turning them occasionally to absorb the flavors evenly.
- Preheat the Grill: Heat your grill to medium-high heat. This will guarantee that the mushrooms cook evenly and develop a nice char.
- Grill the Mushrooms: Place the marinated mushrooms on the grill, gill side up. Grill for 5-7 minutes on each side, or until they’re tender and have clear grill marks. If using cheese, place a slice on each mushroom cap during the last 2 minutes of grilling to allow it to melt.
- Toast the Buns: While the mushrooms are grilling, lightly toast the hamburger buns on the grill for 1-2 minutes until they’re golden brown.
- Assemble the Burgers: Begin by placing a grilled mushroom cap on the bottom half of each bun. Layer with lettuce, tomato slices, red onion slices, and avocado if desired. Add condiments of choice, then top with the other half of the bun.
- Serve: Serve the burgers immediately while they’re warm and enjoy!
Extra Tips:
To guarantee your Grilled Portobello Mushroom Burgers are as flavorful as possible, make sure to choose mushrooms that are firm and fresh. Avoid over-marinating, as the mushrooms can become too soft.
When grilling, watch closely to prevent burning, as the balsamic vinegar in the marinade can caramelize quickly. If you prefer a spicier kick, consider adding some sliced jalapeños or a spicy sauce to your burgers.
Spicy Grilled Salmon With Avocado Salsa
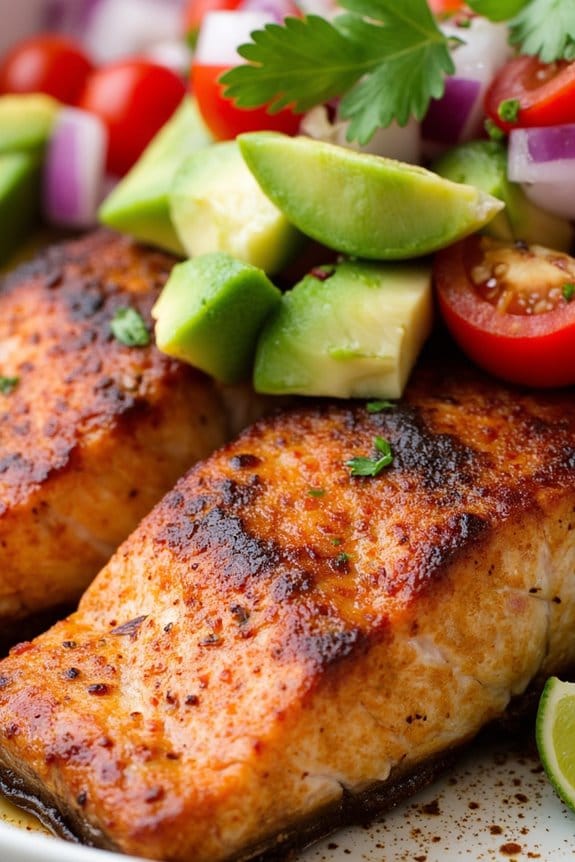
Spicy Grilled Salmon With Avocado Salsa is a delightful and nutritious dish that’s perfect for any summer evening. This recipe combines the rich, buttery flavor of salmon with a spicy kick, balanced by the creamy and revitalizing avocado salsa.
It’s not only a feast for the taste buds but also a visually appealing dish with vibrant colors of fresh ingredients. The combination of spice from the seasoning and the coolness of the salsa creates a harmony of flavors that will surely impress your family and friends.
Ideal for a gathering of 4-6 people, this dish makes for an excellent main course that’s both filling and satisfying. Grilling the salmon brings out its natural flavors while infusing a subtle smoky taste that complements the salsa perfectly.
The preparation is straightforward, allowing even novice cooks to create a restaurant-quality meal at home. Whether you’re hosting a dinner party or simply want to treat yourself to a gourmet meal, Spicy Grilled Salmon With Avocado Salsa is a must-try.
Ingredients for 4-6 servings:
- 4-6 salmon fillets (about 6-8 ounces each)
- 1 tablespoon olive oil
- 1 teaspoon paprika
- 1 teaspoon cayenne pepper
- 1 teaspoon garlic powder
- Salt and black pepper to taste
- 2 avocados, diced
- 1 small red onion, finely chopped
- 2 medium tomatoes, diced
- 1/4 cup fresh cilantro, chopped
- 1 lime, juiced
- 1 jalapeño, finely chopped (optional)
- Salt to taste
Cooking Instructions:
- Prepare the Salmon Marinade: In a small bowl, combine olive oil, paprika, cayenne pepper, garlic powder, salt, and black pepper. Mix well to form a paste.
- Season the Salmon: Rub the spice paste evenly over each salmon fillet, making sure to coat both sides thoroughly. Allow the salmon to marinate for at least 15-20 minutes to absorb the flavors.
- Preheat the Grill: While the salmon is marinating, preheat your grill to medium-high heat. Confirm the grates are clean and lightly oiled to prevent sticking.
- Grill the Salmon: Place the salmon fillets skin-side down on the grill. Cook for about 4-5 minutes per side, depending on the thickness of the fillets, until the salmon is cooked through and flakes easily with a fork.
- Prepare the Avocado Salsa: While the salmon is grilling, in a medium bowl, combine diced avocados, red onion, tomatoes, cilantro, lime juice, and jalapeño (if using). Season with salt to taste and gently toss to combine.
- Serve: Once the salmon is done, transfer to a serving platter and top each fillet with a generous spoonful of avocado salsa. Serve immediately, garnished with additional lime wedges if desired.
Extra Tips:
When grilling salmon, it’s important to confirm the grill is hot enough to prevent the fish from sticking. If you’re using a charcoal grill, wait until the coals are glowing red with a light layer of ash.
For a gas grill, preheat with the lid closed for at least 10 minutes. Additionally, when flipping the salmon, use a wide spatula to support the fillet and avoid breaking it apart.
If you prefer a milder salsa, you can omit the jalapeño or remove the seeds to reduce the heat level. Enjoy this dish with a side of rice or a fresh green salad for a complete meal.
Grilled Peach and Prosciutto Salad
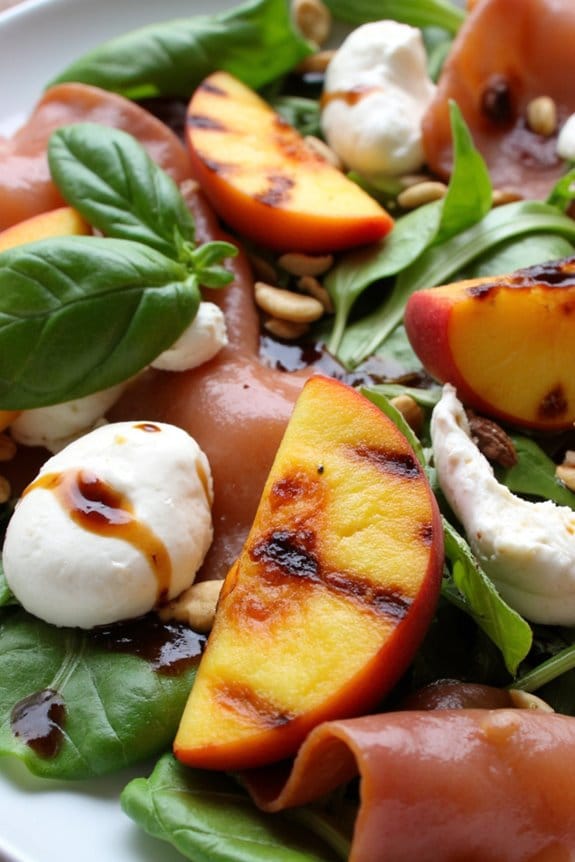
Grilled Peach and Prosciutto Salad is a delightful blend of sweet and savory flavors, making it a perfect dish for summer gatherings or a light dinner. The juicy sweetness of grilled peaches pairs beautifully with the salty, savory prosciutto, complemented by a bed of fresh greens and a tantalizing balsamic glaze.
This salad isn’t only easy to prepare but also presents beautifully, making it ideal for impressing guests with minimal effort. The preparation involves grilling the peaches to enhance their natural sweetness and creating a lovely caramelized texture. The prosciutto adds a rich, salty contrast, while the creamy mozzarella and toasted pine nuts provide additional layers of flavor and texture.
The concluding touch is a drizzle of balsamic glaze, which ties all the elements together for a harmonious and invigorating dish. This Grilled Peach and Prosciutto Salad serves 4-6 people, perfect for a family meal or a small gathering.
Ingredients:
- 4 ripe peaches, halved and pitted
- 1 tablespoon olive oil
- 12 slices of prosciutto
- 8 cups mixed salad greens (such as arugula, spinach, or mesclun)
- 1 ball of fresh mozzarella, sliced
- 1/4 cup pine nuts, toasted
- 1/4 cup fresh basil leaves
- Balsamic glaze, for drizzling
- Salt and pepper, to taste
Instructions:
1. Prepare the Grill:
Preheat your grill to medium-high heat. Make sure the grates are clean to prevent sticking.
2. Grill the Peaches:
Brush the cut sides of the peach halves with olive oil. Place them cut-side down on the grill. Grill for 3-4 minutes until they’ve visible grill marks and are slightly softened. Remove from the grill and let them cool slightly, then slice each half into wedges.
3. Toast the Pine Nuts:
While the peaches are grilling, heat a small skillet over medium heat. Add the pine nuts and toast, stirring frequently, until they’re golden brown, about 3-5 minutes. Be careful not to burn them. Remove from heat and set aside.
4. Assemble the Salad:
On a large serving platter or individual plates, arrange the mixed salad greens. Distribute the grilled peach wedges, slices of mozzarella, and prosciutto evenly over the greens.
5. Add Final Touches:
Sprinkle the toasted pine nuts and fresh basil leaves over the salad. Season with salt and pepper to taste.
6. Drizzle and Serve:
Finish with a generous drizzle of balsamic glaze over the entire salad. Serve immediately while the peaches are still slightly warm.
Extra Tips:
For the best results, choose peaches that are ripe but still firm to the touch. Overly ripe peaches may become too soft and fall apart on the grill.
If you don’t have a grill, you can use a grill pan on the stovetop to achieve similar results. To enhance the presentation, consider arranging the prosciutto in a decorative manner by loosely folding or rolling the slices.
Finally, if you prefer a milder cheese, substitute mozzarella with burrata for a creamier texture.
BBQ Grilled Pizza With Fresh Toppings

BBQ Grilled Pizza with Fresh Toppings is a delightful twist on traditional pizza, bringing a smoky and slightly charred flavor that only a grill can provide. This dish is perfect for a summer evening, combining the joy of barbecuing with the comfort of a homemade pizza.
The beauty of grilled pizza lies in its versatility; you can customize it with your favorite fresh toppings, making it a hit for any gathering or family dinner. Whether you’re a fan of classic Margherita flavors or prefer a more adventurous combination, BBQ Grilled Pizza offers endless possibilities.
To accomplish the perfect BBQ Grilled Pizza, you’ll need a few key ingredients and a bit of patience. The process involves grilling both the pizza dough and the toppings, which enhances their flavors and provides a unique texture.
By following a few simple steps, you can create a delicious pizza that boasts a crisp crust and a medley of fresh toppings. This recipe serves 4-6 people, making it ideal for sharing with friends and family.
Ingredients (Serves 4-6):
- 1 lb pizza dough (store-bought or homemade)
- 1 cup pizza sauce
- 2 cups shredded mozzarella cheese
- 1 cup cherry tomatoes, halved
- 1/2 cup sliced red onion
- 1 bell pepper, thinly sliced
- 1/2 cup fresh basil leaves
- 1/4 cup grated Parmesan cheese
- Olive oil for brushing
- Salt and pepper to taste
Cooking Instructions:
- Preheat the Grill: Preheat your grill to medium-high heat, approximately 500°F (260°C). Verify the grates are clean and lightly oiled to prevent sticking.
- Prepare the Dough: Roll out the pizza dough on a floured surface until it’s about 1/4 inch thick. Brush one side of the dough with olive oil to prevent sticking and to help achieve a crispy crust.
- Initial Grill: Place the dough on the grill, oiled side down. Close the lid and grill for about 2-3 minutes, or until grill marks appear and the dough is firm enough to flip.
- Flip and Add Toppings: Carefully flip the dough using tongs or a spatula. Immediately brush the grilled side with olive oil and spread pizza sauce evenly. Sprinkle mozzarella cheese over the sauce, then add cherry tomatoes, red onion, and bell pepper.
- Finish Grilling: Close the grill lid and cook for an additional 5-7 minutes, or until the cheese is melted and bubbly, and the crust is golden brown. Monitor the heat to avoid burning the crust.
- Garnish and Serve: Remove the pizza from the grill. Sprinkle with fresh basil leaves and grated Parmesan cheese. Season with salt and pepper to taste. Slice and serve immediately.
Extra Tips:
When grilling pizza, it’s essential to work quickly once the dough is on the grill to prevent it from burning. Have all your toppings prepped and ready to go before you start grilling.
If you prefer a crispier crust, roll the dough thinner or grill it a bit longer before adding toppings. For a smoky flavor, consider adding wood chips to your grill.
To avoid a soggy crust, verify any watery toppings like tomatoes are drained or patted dry before adding to the pizza. Enjoy experimenting with different toppings and sauces to create your perfect BBQ Grilled Pizza!