

When time is tight and dinner needs to be quick, grilling is my go-to solution. Picture a juicy lemon herb chicken, its aroma blending with fresh herbs. Or think about shrimp tacos that remind you of a sunny beach day. These quick grilled meals save time and are full of flavor. Ready for more tasty ideas for those hectic nights?
Quick And Easy Lemon Herb Chicken
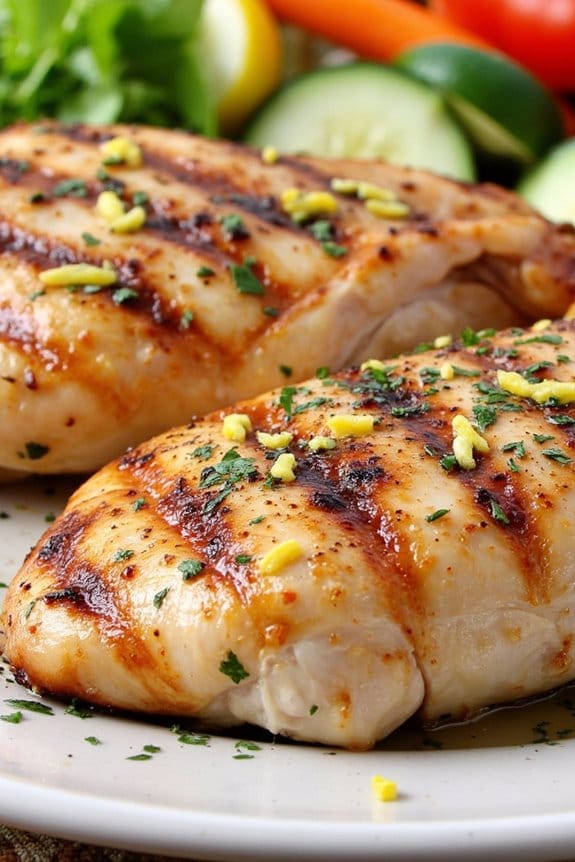
When time is of the essence, but you still want to serve a delicious and nutritious meal, search no further than this Quick And Easy Lemon Herb Chicken. This recipe combines the zesty freshness of lemon with a delightful mix of herbs to create a flavorful dish that’s both simple to prepare and bound to impress.
Perfect for a family dinner or a small gathering, this dish can be ready in no time, allowing you to spend more moments with your loved ones rather than in the kitchen.
Grilling the chicken gives it a lovely char and enhances the flavors of the marinade, while the lemon and herbs infuse the meat with a vibrant taste that’s both fresh and comforting. Whether you’re a seasoned chef or a beginner looking to expand your culinary repertoire, this recipe is straightforward and guarantees juicy, tender chicken every time.
Serve it alongside your favorite sides, like a fresh salad or grilled vegetables, for a complete meal.
Ingredients (serves 4-6 people):
- 4-6 boneless, skinless chicken breasts
- 1/4 cup olive oil
- 1/4 cup freshly squeezed lemon juice
- Zest of 1 lemon
- 3 cloves garlic, minced
- 1 tablespoon fresh parsley, chopped
- 1 tablespoon fresh thyme, chopped
- 1 teaspoon salt
- 1/2 teaspoon black pepper
Cooking Instructions:
- Prepare the Marinade: In a medium-sized bowl, combine the olive oil, lemon juice, lemon zest, minced garlic, chopped parsley, chopped thyme, salt, and black pepper. Mix well to create a uniform marinade.
- Marinate the Chicken: Place the chicken breasts in a large resealable plastic bag or a shallow dish. Pour the marinade over the chicken, making sure each piece is well coated. Seal the bag or cover the dish with plastic wrap, and refrigerate for at least 30 minutes to 2 hours for best results. If you’re short on time, even a quick 15-minute marination can add flavor.
- Preheat the Grill: Preheat your grill to medium-high heat. If using a charcoal grill, make certain the coals are white and ashy before starting to cook.
- Grill the Chicken: Remove the chicken from the marinade, shaking off any excess. Place the chicken breasts on the grill and cook for 6-7 minutes on each side, or until the internal temperature reaches 165°F (75°C). Avoid flipping the chicken too often to achieve nice grill marks.
- Rest and Serve: Once cooked, remove the chicken from the grill and let it rest for a few minutes before serving. This allows the juices to redistribute, making sure moist and tender chicken.
Extra Tips: For an even more flavorful dish, try adding a pinch of red pepper flakes to the marinade for a bit of heat. If you prefer, you can also substitute dried herbs for fresh ones, but use about a third of the amount since dried herbs are more potent.
If you don’t have a grill, a grill pan or a regular skillet will work just fine on the stovetop. Finally, always remember to let the chicken rest after grilling to lock in those delicious juices. Enjoy your meal!
Fast Grilled Shrimp Tacos With Slaw
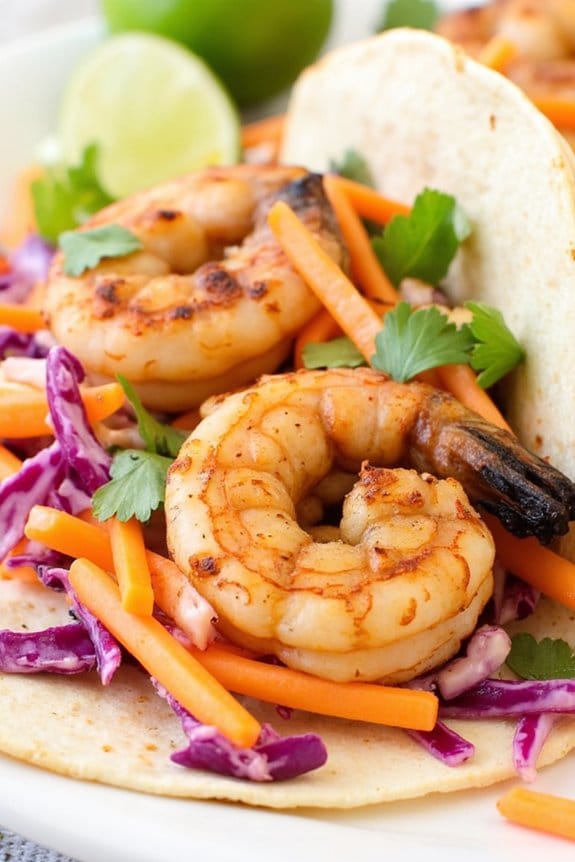
When it comes to quick and delicious meals, these Fast Grilled Shrimp Tacos With Slaw are a must-try. Perfect for a weeknight dinner or a casual gathering with friends, these tacos pack a punch of flavor while being incredibly easy to prepare. The combination of zesty grilled shrimp and invigorating slaw wrapped in soft flour tortillas is sure to satisfy your taste buds.
This dish isn’t only vibrant and appetizing but also nutritious, making it an ideal choice for those who want to enjoy a wholesome meal without spending hours in the kitchen.
The secret to these tacos lies in the marinade for the shrimp, which infuses them with a delightful blend of flavors. Paired with a crunchy slaw made from fresh vegetables and a tangy dressing, these tacos are both light and satisfying. The grilling process adds a smoky char to the shrimp, enhancing their natural sweetness.
Whether you’re a seasoned chef or a beginner, this recipe is simple enough for anyone to execute, leaving you with more time to enjoy your meal with loved ones.
Ingredients (Serving Size: 4-6 people):
- 1 1/2 pounds large shrimp, peeled and deveined
- 1 tablespoon olive oil
- 1 tablespoon lime juice
- 2 teaspoons chili powder
- 1 teaspoon cumin
- 1 teaspoon garlic powder
- Salt and pepper to taste
- 8-12 small flour tortillas
- 1/2 head of red cabbage, thinly sliced
- 1/2 head of green cabbage, thinly sliced
- 1 cup shredded carrots
- 1/4 cup fresh cilantro, chopped
- 1/4 cup mayonnaise
- 1 tablespoon apple cider vinegar
- 1 tablespoon honey
- 1 teaspoon Dijon mustard
Cooking Instructions:
- Prepare the Shrimp Marinade: In a large bowl, combine olive oil, lime juice, chili powder, cumin, garlic powder, salt, and pepper. Add the shrimp to the bowl and toss until they’re well-coated with the marinade. Let the shrimp marinate for about 15-20 minutes in the refrigerator.
- Prepare the Slaw: In a separate bowl, whisk together the mayonnaise, apple cider vinegar, honey, and Dijon mustard until smooth. Add the sliced red and green cabbage, shredded carrots, and chopped cilantro to the bowl, and toss everything together until the vegetables are evenly coated with the dressing. Set aside.
- Grill the Shrimp: Preheat your grill to medium-high heat. Thread the marinated shrimp onto skewers to make grilling easier. Place the skewers on the grill and cook for about 2-3 minutes on each side, or until the shrimp are opaque and have a nice char. Remove them from the grill and set aside.
- Warm the Tortillas: While the shrimp are grilling, you can warm the tortillas. Place them on the grill for about 30 seconds on each side, or until they’re warm and slightly toasted.
- Assemble the Tacos: To assemble the tacos, place a few grilled shrimp on each warm tortilla. Top with a generous scoop of the prepared slaw. Serve immediately with lime wedges on the side for an extra citrusy kick.
Extra Tips:
For the best results, make sure your grill is properly preheated before adding the shrimp to avoid sticking and for even cooking. If you’re using wooden skewers, be sure to soak them in water for at least 30 minutes before grilling to prevent them from burning.
Additionally, feel free to customize the slaw by adding other vegetables such as sliced bell peppers or radishes for extra crunch. If you prefer a spicier kick, you can add a diced jalapeño to the slaw or sprinkle some cayenne pepper into the shrimp marinade.
Enjoy your vibrant and flavorful tacos with a side of your favorite salsa or guacamole for a complete meal.
Speedy Grilled Veggie Skewers
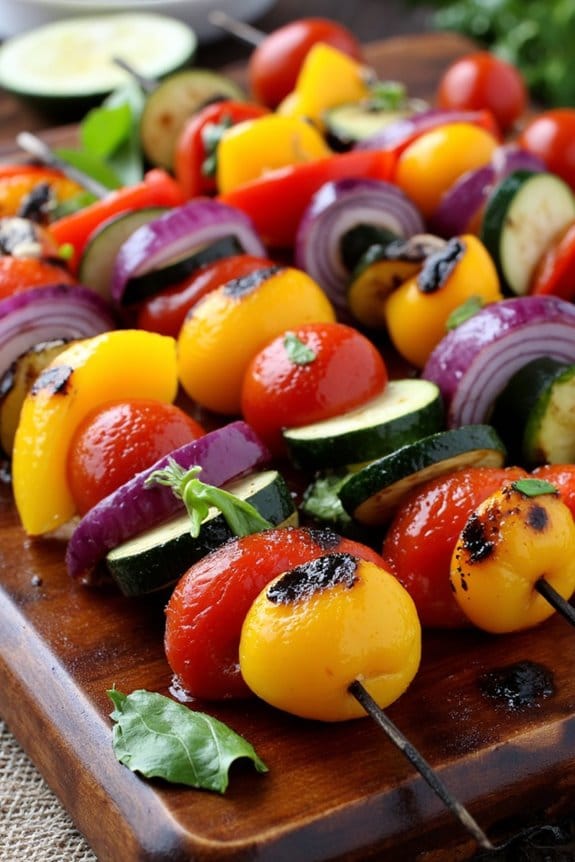
If you’re looking for a quick and delicious way to enjoy a healthy meal, these Speedy Grilled Veggie Skewers are perfect for you. Packed with flavor and vibrant colors, these skewers aren’t only a feast for the eyes but also for your palate. They’re an excellent side dish or can be a main course for a light dinner.
The key to making these skewers quickly is to use a variety of vegetables that cook at similar rates, guaranteeing everything is perfectly grilled in a short amount of time.
These veggie skewers are versatile and can be tailored to suit your taste. You can use any vegetables you have on hand, but the combination of bell peppers, zucchini, cherry tomatoes, and red onion provides a great mix of textures and flavors.
The added olive oil and simple seasoning bring out the natural flavors of the vegetables. Serve these skewers with a side of quinoa or a fresh salad for a complete meal that satisfies both vegetarians and non-vegetarians alike.
Ingredients for 4-6 servings:
- 2 large bell peppers (any color), cut into 1-inch pieces
- 2 medium zucchinis, sliced into 1/2-inch rounds
- 1 pint cherry tomatoes
- 1 large red onion, cut into wedges
- 1/4 cup olive oil
- 2 tablespoons balsamic vinegar
- 2 cloves garlic, minced
- 1 teaspoon dried oregano
- Salt and pepper to taste
- Wooden or metal skewers
Cooking Instructions:
- Prepare the Skewers: If using wooden skewers, soak them in water for at least 30 minutes to prevent them from burning on the grill. This can be done while you’re prepping the vegetables.
- Preheat the Grill: Heat your grill to medium-high heat, approximately 400°F (200°C).
- Prepare the Vegetables: Cut the bell peppers, zucchini, and red onion into the specified sizes. Keep the cherry tomatoes whole.
- Make the Marinade: In a large bowl, whisk together the olive oil, balsamic vinegar, minced garlic, oregano, salt, and pepper.
- Marinate the Vegetables: Add the prepared vegetables to the bowl with the marinade. Toss to coat evenly. Let them sit for about 10-15 minutes to absorb the flavors.
- Assemble the Skewers: Thread the marinated vegetables onto the skewers, alternating between the different types for a colorful presentation.
- Grill the Skewers: Place the skewers on the preheated grill. Cook for about 10-12 minutes, turning every few minutes to guarantee even grilling, until the vegetables are tender and have nice grill marks.
- Serve: Remove the skewers from the grill and serve immediately with your choice of side dishes.
Extra Tips:
To speed up the preparation, you can pre-cut the vegetables and prepare the marinade ahead of time, storing them in the refrigerator until you’re ready to grill.
If you have leftover marinade, feel free to brush it over the vegetables while grilling for an extra burst of flavor.
Additionally, make sure the grill is properly preheated to guarantee the vegetables cook evenly and achieve those desirable grill marks.
If you prefer your vegetables with a bit more crunch, reduce the grilling time slightly.
15-Minute Salmon On The Grill
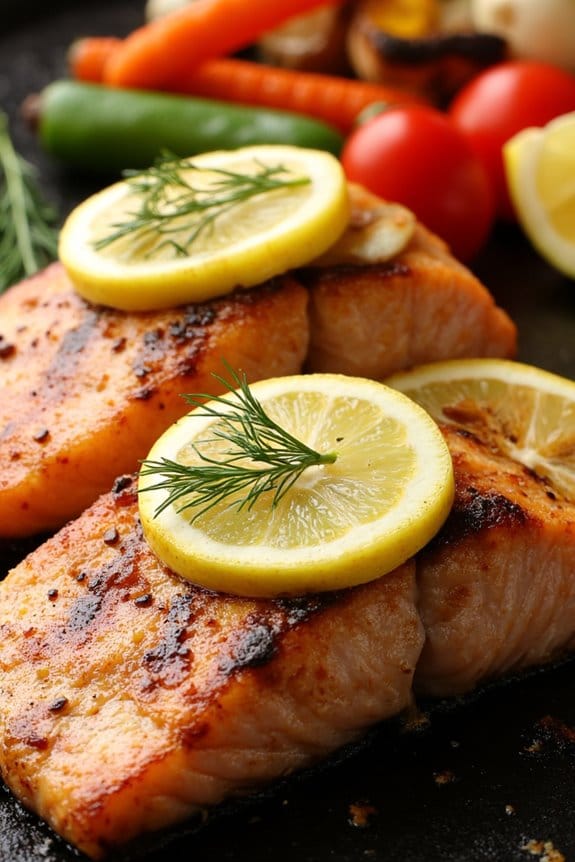
If you’re looking for a quick and healthy dinner option, this Minute Salmon On The Grill recipe is perfect for you. Not only is it incredibly fast to prepare, but it also packs a punch with flavors that will leave your taste buds buzzing. Grilled salmon is a fantastic source of omega-3 fatty acids, which are essential for heart health, and it pairs beautifully with a variety of side dishes, making it a versatile choice for any meal.
Whether you’re having guests over or just need a quick weeknight dinner, this recipe is sure to satisfy. The beauty of this dish lies in its simplicity and the grill’s ability to enhance the natural flavors of the salmon. With minimal ingredients and a short cooking time, this recipe allows the salmon’s taste to shine through while still offering a delightful, smoky aroma.
This Minute Salmon On The Grill is designed to serve 4-6 people, making it an ideal option for family dinners or small gatherings. Pair it with a side salad or some grilled vegetables for a complete and balanced meal.
Ingredients (Serves 4-6):
- 4-6 salmon fillets (about 6 ounces each)
- 2 tablespoons olive oil
- 1 lemon (sliced)
- 1 teaspoon salt
- 1 teaspoon black pepper
- 1 teaspoon garlic powder
- 1 teaspoon paprika
- Fresh dill (optional, for garnish)
Cooking Instructions:
- Prepare the Grill: Preheat your grill to medium-high heat, approximately 400°F (204°C). Clean the grill grates thoroughly to prevent the salmon from sticking.
- Season the Salmon: Pat the salmon fillets dry with paper towels. Brush each fillet lightly with olive oil on both sides. Season with salt, black pepper, garlic powder, and paprika, ensuring even coverage.
- Grill the Salmon: Place the salmon fillets skin-side down on the preheated grill. Close the lid and grill for about 4-5 minutes. The salmon should easily release from the grill when it’s ready to be flipped.
- Flip and Finish Cooking: Carefully flip the salmon fillets using a wide spatula. Place a lemon slice on top of each fillet. Continue grilling for another 3-4 minutes or until the salmon is opaque and flakes easily with a fork.
- Garnish and Serve: Remove the salmon from the grill and let it rest for a minute. Garnish with fresh dill if desired and serve immediately with your choice of sides.
Extra Tips: When grilling salmon, be sure not to overcook it, as it can quickly become dry. It’s important to monitor the fillets closely and use a meat thermometer if needed; the internal temperature should reach 145°F (63°C).
Also, using a grill mat or foil can help prevent the fish from sticking and make cleanup easier. If you prefer a spicier kick, consider adding a dash of cayenne pepper to the seasoning mix. Enjoy your delicious and nutritious Minute Salmon On The Grill!
Tasty Grilled Pork Chops In No Time
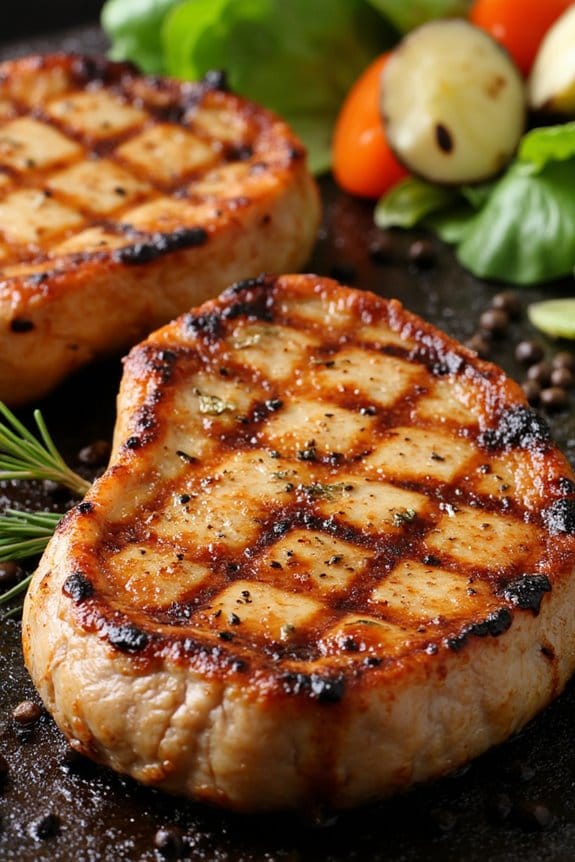
Grilled pork chops are a perfect quick dinner idea, offering a savory and juicy option that can be prepared in a flash. Whether you’re hosting a backyard barbecue or simply seeking a delicious weeknight meal, these grilled pork chops are bound to satisfy. The key is to use a simple marinade that enhances the natural flavors of the meat, providing a delightful crust on the outside while keeping the inside tender and moist.
To accomplish the perfect grilled pork chops, start by selecting bone-in chops that are about 1-inch thick, guaranteeing they cook evenly without drying out. The marinade is a delightful blend of olive oil, garlic, lemon juice, and a mix of spices that infuses the pork with mouthwatering flavors. With a quick marinating time and a few minutes on a hot grill, you can have a delicious and impressive meal on the table in no time.
Ingredients (Serves 4-6 people):
- 4-6 bone-in pork chops (1-inch thick)
- 1/4 cup olive oil
- 3 cloves garlic, minced
- 2 tablespoons lemon juice
- 1 tablespoon balsamic vinegar
- 1 teaspoon dried thyme
- 1 teaspoon dried rosemary
- 1 teaspoon paprika
- Salt and pepper to taste
Cooking Instructions:
- Prepare the Marinade: In a medium bowl, combine olive oil, minced garlic, lemon juice, balsamic vinegar, dried thyme, dried rosemary, paprika, salt, and pepper. Mix well to guarantee all ingredients are thoroughly combined.
- Marinate the Pork Chops: Place the pork chops in a large resealable plastic bag or shallow dish. Pour the marinade over the pork chops, making sure they’re well coated. Seal the bag or cover the dish and refrigerate for at least 30 minutes, or up to 2 hours for more intense flavor.
- Preheat the Grill: Preheat your grill to medium-high heat, approximately 400°F (200°C). Lightly oil the grill grates to prevent sticking.
- Grill the Pork Chops: Remove the pork chops from the marinade and place them on the preheated grill. Discard the remaining marinade. Grill the pork chops for about 4-5 minutes on each side, or until they reach an internal temperature of 145°F (63°C).
- Rest and Serve: Once cooked, remove the pork chops from the grill and allow them to rest for 5 minutes. This helps the juices redistribute throughout the meat, guaranteeing each bite is juicy and flavorful. Serve with your favorite sides and enjoy.
Extra Tips:
To guarantee perfectly cooked pork chops, use a meat thermometer to check the internal temperature. Avoid overcooking, as this can result in dry meat.
If you prefer a smoky flavor, consider adding a handful of soaked wood chips to the grill. For a bit of added heat, sprinkle some crushed red pepper flakes into the marinade.
Pair the pork chops with a fresh salad or grilled vegetables for a complete and satisfying meal.
Chimichurri Steak Off The Grill
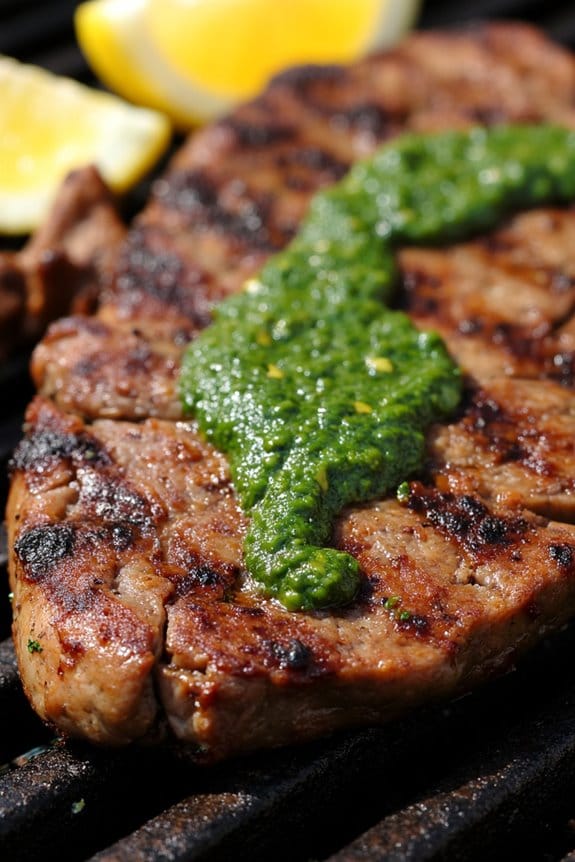
For a quick and flavorful dinner, Chimichurri Steak off the grill offers an invigorating combination of fresh herbs and succulent beef, perfect for any summer evening. This dish features juicy grilled steaks topped with a vibrant chimichurri sauce, a traditional Argentinean condiment made from parsley, garlic, vinegar, and olive oil. The zesty and herbal sauce not only enhances the rich taste of the steak but also adds a revitalizing note, making it a standout meal when you’re craving something both hearty and fresh.
To guarantee the best flavors, the steak should be marinated in the chimichurri sauce for at least 30 minutes before grilling. This allows the meat to absorb all the wonderful flavors, ensuring every bite is packed with taste. The grilling process is simple and quick, making this an ideal choice for a weeknight dinner or a weekend barbecue with friends and family. Serve it with a side of grilled vegetables or a fresh salad for a complete, satisfying meal.
Ingredients for 4-6 servings:
- 2 pounds of flank or skirt steak
- 1 cup fresh parsley leaves, finely chopped
- 1/2 cup fresh cilantro leaves, finely chopped
- 4 cloves garlic, minced
- 1/4 cup red wine vinegar
- 1/2 cup olive oil
- 1 teaspoon salt
- 1/2 teaspoon freshly ground black pepper
- 1/2 teaspoon crushed red pepper flakes (optional)
- 1 tablespoon fresh oregano, finely chopped (optional)
- 1 lemon, cut into wedges, for serving
Cooking Instructions:
- Prepare the Chimichurri Sauce: In a medium bowl, combine the chopped parsley, cilantro, garlic, red wine vinegar, olive oil, salt, black pepper, and crushed red pepper flakes. Mix thoroughly until well combined. If using oregano, add it at this stage. Set aside about half of the chimichurri sauce for serving and use the remaining for marinating the steak.
- Marinate the Steak: Place the steak in a shallow dish or a resealable plastic bag. Pour half of the chimichurri sauce over the steak, ensuring it’s well coated on all sides. Cover the dish or seal the bag and refrigerate for at least 30 minutes, allowing the flavors to infuse the meat.
- Preheat the Grill: Preheat your grill to high heat, around 450-500°F. Ensure the grates are clean and lightly oiled to prevent the steak from sticking.
- Grill the Steak: Remove the steak from the marinade and place it on the hot grill. Cook for about 4-5 minutes on each side, or until the desired doneness is reached. For medium-rare, aim for an internal temperature of about 130-135°F.
- Rest and Serve: Transfer the grilled steak to a cutting board and let it rest for about 5 minutes. This allows the juices to redistribute, making the meat more tender. Slice the steak against the grain into thin strips and serve with the reserved chimichurri sauce drizzled on top. Garnish with lemon wedges.
Extra Tips:
For the best results, make sure to slice the steak against the grain, which helps in maintaining tenderness. If you prefer a spicier kick, add more crushed red pepper flakes to the chimichurri sauce. This dish can also be cooked on a stovetop grill pan if outdoor grilling isn’t an option.
To enhance the flavors further, consider marinating the steak overnight in the refrigerator. Finally, confirm your grill is adequately preheated to achieve those beautiful grill marks and a nice sear.
Spicy Sausage And Peppers On The Grill
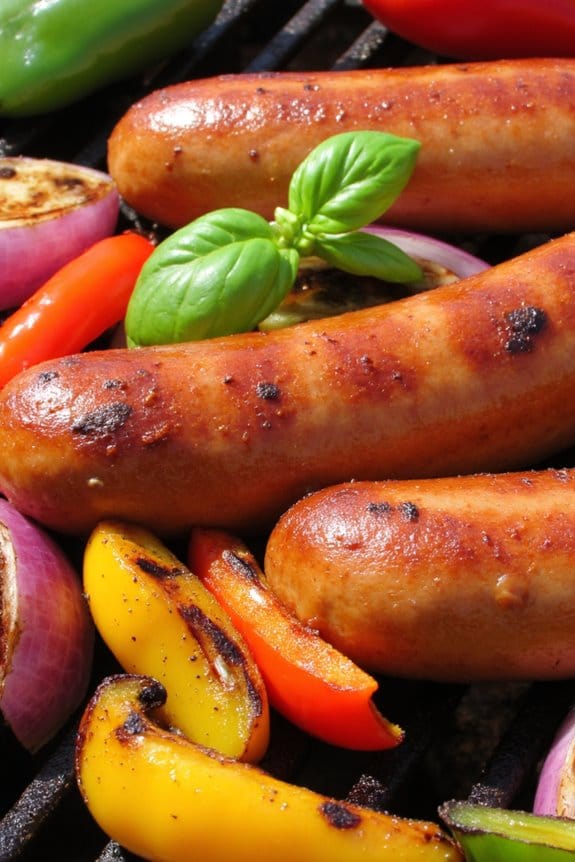
Spicy Sausage and Peppers on the Grill is a delightful and easy-to-make dish that brings out the vibrant flavors of summer. It’s perfect for a quick dinner gathering or a family meal that requires minimal prep and cleanup. This dish combines juicy sausages with colorful bell peppers, all infused with a spicy kick, giving you a meal that’s both satisfying and flavorful.
The grilling process not only brings out the natural sweetness of the peppers but also adds a smoky char to the sausages, making every bite a perfect balance of spicy and savory.
This recipe is designed to serve 4-6 people, making it ideal for a small gathering or a family dinner. It’s a versatile dish that can be served on its own, with some crusty bread, or over a bed of rice or pasta for a more filling meal. The key is to use high-quality sausages and fresh peppers to guarantee that the flavors truly pop.
Whether you’re a seasoned griller or a beginner, this recipe is straightforward and results in a delicious meal that’s sure to impress.
Ingredients:
- 6 spicy Italian sausages
- 3 large bell peppers (red, yellow, green)
- 1 large red onion
- 3 tablespoons olive oil
- 3 cloves garlic, minced
- 1 teaspoon crushed red pepper flakes
- Salt and pepper to taste
- 6 hoagie rolls (optional)
- Fresh basil for garnish (optional)
Cooking Instructions:
- Prepare the Grill: Preheat your grill to medium-high heat. Confirm the grates are clean and lightly oiled to prevent sticking.
- Prep the Vegetables: Slice the bell peppers and red onion into strips. In a large bowl, combine the peppers, onion, minced garlic, olive oil, crushed red pepper flakes, salt, and pepper. Toss until the vegetables are evenly coated with the oil and spices.
- Grill the Sausages: Place the sausages directly on the grill. Cook for about 8-10 minutes, turning occasionally, until they’re browned and cooked through.
- Grill the Vegetables: While the sausages are cooking, place the vegetable mixture in a grill basket or on a piece of aluminum foil. Grill for about 10 minutes, stirring occasionally, until the peppers and onions are tender and slightly charred.
- Assemble the Dish: If using hoagie rolls, lightly toast them on the grill for about 1 minute. Place a sausage in each roll (if using), top with the grilled peppers and onions, and garnish with fresh basil if desired.
Extra Tips:
For the best flavor, allow the sausages to come to room temperature before grilling. This guarantees even cooking throughout.
When choosing sausages, opt for those with natural casings as they tend to have a better texture when grilled. If you prefer less spice, you can reduce or omit the crushed red pepper flakes.
Additionally, feel free to experiment with different types of sausages or add other vegetables like zucchini or mushrooms for variety. Enjoy your Spicy Sausage and Peppers on the Grill hot off the grill for the best taste experience.
Juicy BBQ Chicken Thighs
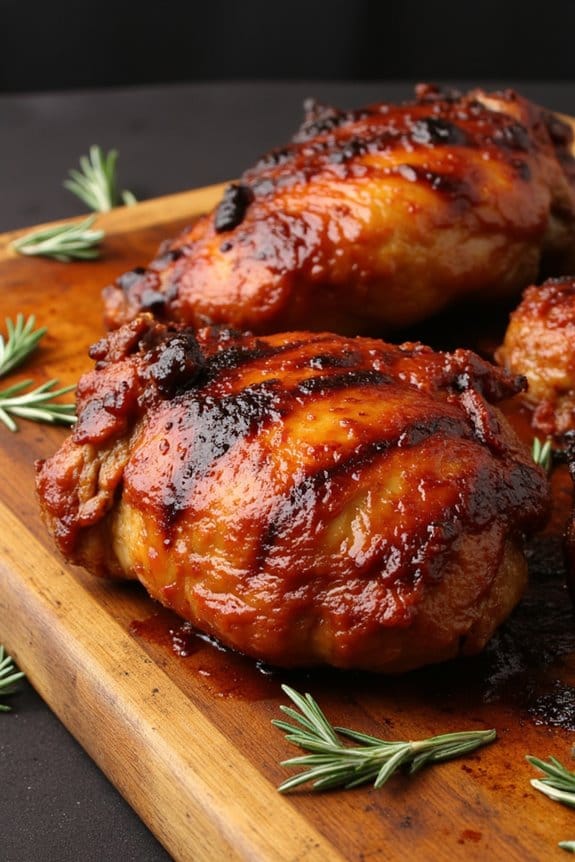
When you’re in the mood for a quick and satisfying grilled dinner, Juicy BBQ Chicken Thighs are the perfect choice. This dish combines the smoky flavors of the grill with the sweet and tangy taste of barbecue sauce, resulting in tender, mouth-watering chicken that’s bound to delight everyone at your table.
Chicken thighs are ideal for grilling because they remain moist and flavorful, even if slightly overcooked. This makes them a forgiving option for both novice and experienced grillers alike.
To achieve the perfect balance of flavor and juiciness, it’s important to marinate the chicken thighs before grilling. A simple marinade made with pantry staples infuses the chicken with flavor and helps tenderize the meat. Once marinated, the chicken is grilled to perfection, brushed with barbecue sauce, and cooked until caramelized and slightly charred.
This dish is great for serving 4-6 people, making it ideal for a family meal or a small gathering with friends.
Ingredients for 4-6 servings:
- 8 bone-in, skin-on chicken thighs
- 1 cup barbecue sauce
- 2 tablespoons olive oil
- 3 tablespoons apple cider vinegar
- 2 tablespoons brown sugar
- 1 tablespoon paprika
- 1 teaspoon garlic powder
- 1 teaspoon onion powder
- 1 teaspoon salt
- 1/2 teaspoon black pepper
Cooking Instructions:
- Prepare the Marinade: In a bowl, combine olive oil, apple cider vinegar, brown sugar, paprika, garlic powder, onion powder, salt, and black pepper. Mix well until the sugar dissolves and the ingredients are fully combined.
- Marinate the Chicken: Place the chicken thighs in a large resealable plastic bag or a shallow dish. Pour the marinade over the chicken, making sure each piece is well coated. Seal the bag or cover the dish and refrigerate for at least 1 hour, or up to 8 hours for more intense flavor.
- Preheat the Grill: About 15 minutes before cooking, preheat your grill to medium-high heat (around 375-400°F). If using a gas grill, heat one side to high and leave the other side on low for indirect grilling. If using charcoal, push the coals to one side.
- Start Grilling: Remove the chicken from the marinade and shake off excess. Place the chicken thighs skin-side down on the hot side of the grill. Grill for 4-5 minutes without moving to achieve good grill marks and crisp the skin.
- Flip and Continue Cooking: Turn the chicken thighs over and move them to the cooler side of the grill. Close the lid and cook for an additional 15-20 minutes, brushing with barbecue sauce every 5 minutes to build up the glaze.
- Check for Doneness: Use a meat thermometer to verify the internal temperature has reached 165°F. This confirms the chicken is cooked through while remaining juicy.
- Rest and Serve: Allow the chicken to rest for 5 minutes after removing it from the grill. This helps the juices redistribute throughout the meat, making sure each bite is moist and flavorful. Serve with extra barbecue sauce on the side.
Extra Tips:
For the best results, pat the chicken thighs dry with paper towels before marinating. This helps the marinade stick better to the chicken.
If you prefer a smokier flavor, consider adding wood chips to your grill. Always monitor the chicken closely while grilling to prevent flare-ups from the fat drippings.
Adjust grilling times based on the thickness of the chicken thighs and your grill’s specific heat settings. Enjoy your Juicy BBQ Chicken Thighs with a side of grilled vegetables or a fresh salad for a complete meal.
Grilled Halloumi And Veggie Wraps
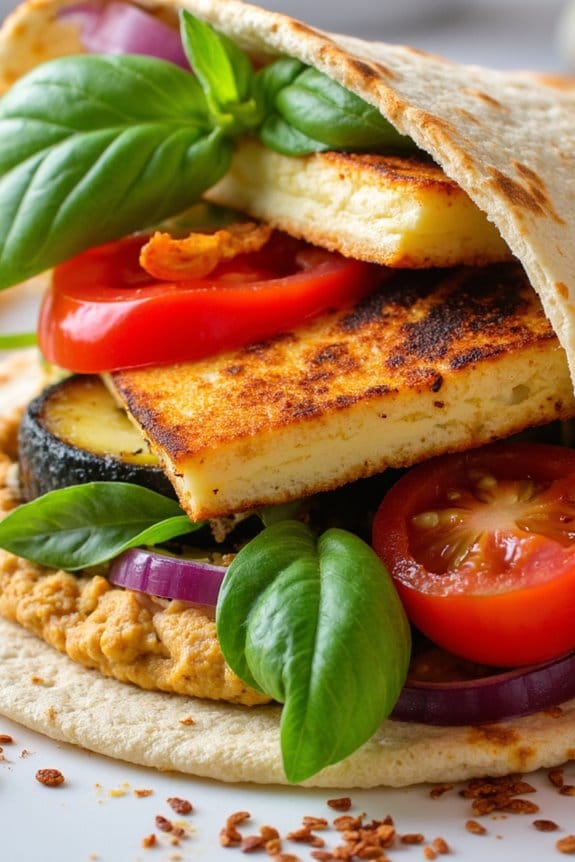
Grilled Halloumi and Veggie Wraps are a delightful and quick meal perfect for a summer evening or a weeknight dinner. This dish combines the salty, creamy texture of halloumi cheese with the fresh flavors of seasonal vegetables, all wrapped up in a warm tortilla.
It’s not only flavorful but also packed with nutrients, making it an excellent choice for vegetarians and meat-lovers alike. The grilling process enhances the smokiness of the vegetables and gives the halloumi a crispy exterior while keeping the inside soft.
Whether you’re hosting a casual dinner or looking for a quick meal option, this recipe is sure to astonish. The wraps can be customized with different vegetables or even a spicy sauce to suit your taste preferences.
Plus, the preparation time is minimal, allowing you to spend more time enjoying your meal and less time in the kitchen. These Grilled Halloumi and Veggie Wraps serve 4-6 people, guaranteeing everyone has their fill of this tasty dish.
Ingredients:
- 400g halloumi cheese, sliced
- 2 red bell peppers, sliced
- 1 large zucchini, sliced
- 1 red onion, sliced
- 200g cherry tomatoes, halved
- 2 tablespoons olive oil
- 1 teaspoon dried oregano
- Salt and pepper to taste
- 4-6 large flour tortillas
- 1 cup hummus
- Fresh basil leaves for garnish
- Optional: chili flakes for extra spice
Cooking Instructions:
- Preheat the Grill: Start by preheating your grill to medium-high heat. This guarantees that the halloumi and vegetables cook evenly and develop a nice char.
- Prepare the Vegetables: In a large mixing bowl, combine the sliced red bell peppers, zucchini, red onion, and cherry tomatoes. Drizzle with olive oil, sprinkle with oregano, and season with salt and pepper. Toss the vegetables until they’re well coated.
- Grill the Vegetables: Place the vegetables directly on the grill or use a grill basket. Cook for 8-10 minutes, turning occasionally, until they’re tender and have grill marks. Remove from the grill and set aside.
- Grill the Halloumi: Place the halloumi slices on the grill. Grill for about 2-3 minutes on each side, until the cheese is golden brown and crisp on the outside. Be sure not to overcook as halloumi can become rubbery if left on the grill for too long.
- Assemble the Wraps: Lay the flour tortillas flat and spread a generous layer of hummus on each. Add a portion of the grilled vegetables and halloumi slices. Garnish with fresh basil leaves and a sprinkle of chili flakes if using.
- Wrap and Serve: Roll up the tortillas tightly to enclose the fillings. Cut the wraps in half if desired and serve immediately.
Extra Tips:
To make the most of your Grilled Halloumi and Veggie Wraps, consider marinating the vegetables in olive oil and herbs for an hour before grilling for extra flavor.
Keep an eye on the halloumi while grilling as it cooks quickly and should be removed before it becomes too firm. You can also experiment with different sauces, such as tzatziki or a yogurt dressing, to add an extra layer of taste.
If you prefer a gluten-free option, swap the flour tortillas for corn tortillas or large lettuce leaves.
Quick Flatbread Pizzas On The Grill

Grilled flatbread pizzas are a fantastic way to enjoy a quick, delicious meal with minimal effort. Perfect for a weeknight dinner or a casual get-together, these pizzas bring together the smoky flavor of the grill with the ease of using pre-made flatbreads. The beauty of this dish lies in its versatility; you can customize it with your favorite toppings, making it perfect for families with varying tastes.
Whether you prefer a classic Margherita style or something more adventurous like BBQ chicken, flatbread pizzas on the grill are sure to please everyone at the table.
The key to making quick flatbread pizzas is to have all your ingredients prepped and ready to go before you start grilling. This guarantees that the process is smooth and your pizzas cook evenly without burning. Grilling the flatbreads adds a wonderful crispy texture, and the high heat of the grill melts the cheese beautifully. With a few essential ingredients and a hot grill, you can have a mouthwatering meal ready in no time.
Ingredients (Serving Size: 4-6 people):
- 4-6 pre-made flatbreads
- 1 cup pizza sauce or marinara
- 2 cups shredded mozzarella cheese
- 1 cup cherry tomatoes, halved
- 1/2 cup sliced pepperoni
- 1/2 cup sliced black olives
- Fresh basil leaves
- Olive oil
- Salt and pepper, to taste
Cooking Instructions:
- Preheat the Grill: Begin by preheating your grill to medium-high heat. This usually takes about 10-15 minutes. You want the grill to be hot enough to cook the flatbreads quickly without burning them.
- Prepare the Flatbreads: Brush each flatbread with a light coating of olive oil on both sides. This will help them crisp up nicely on the grill.
- Assemble the Pizzas: Spread a generous layer of pizza sauce over each flatbread, leaving a small border around the edges. Sprinkle mozzarella cheese evenly over the sauce. Add your desired toppings, such as cherry tomatoes, pepperoni, and black olives.
- Grill the Pizzas: Carefully place the assembled flatbreads on the grill. Close the lid and cook for about 5-7 minutes, or until the cheese is melted and bubbly, and the edges of the flatbreads are golden brown.
- Finish with Fresh Ingredients: Once cooked, remove the pizzas from the grill and top them with fresh basil leaves. Season with salt and pepper to taste.
- Serve and Enjoy: Slice the pizzas into wedges and serve immediately while hot and cheesy.
Extra Tips:
For the best results, keep a close eye on the pizzas while they cook, as grills can vary in heat and cooking times may differ. If you prefer a softer crust, reduce the grilling time slightly.
Feel free to experiment with different cheeses and toppings based on your personal preferences. For a healthier option, consider adding some fresh spinach or arugula after grilling.
Finally, if you don’t have a grill, you can also cook these flatbread pizzas in a preheated oven at 450°F (232°C) for about 8-10 minutes.