

Isn’t there something special about the aroma of a sizzling grill? As the sun sets, I can’t help but be drawn to the vibrant colors and rich flavors that turn simple ingredients into delicious dishes. Think juicy ribeye steaks with garlic butter or the bright zest of lemon herb salmon. It’s all about creating an unforgettable dining experience. Ready to discover the magic behind these grill recipes?
Juicy Ribeye Steak With Garlic Butter
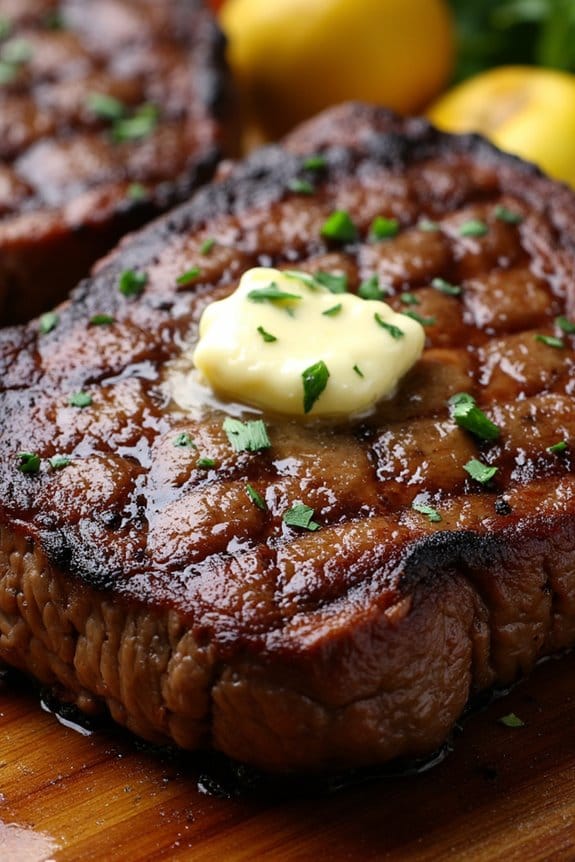
Juicy Ribeye Steak With Garlic Butter is a classic dish that brings out the best in steak with its rich flavor and tender texture. The key to this recipe lies in the perfect balance of a well-marinated ribeye steak and a luscious garlic butter that enhances the meat’s natural flavors.
When cooked on the grill, the ribeye steak develops a beautiful char that locks in the juices, making every bite succulent and flavorful. The garlic butter is generously slathered over the steak as it cooks, guaranteeing that each mouthful is infused with a buttery, garlicky goodness.
This dish is ideal for gatherings and special occasions, as it serves 4-6 people and is sure to impress your guests with its mouthwatering aroma and taste. The preparation is straightforward, but attention to detail will assure the steak is cooked to perfection.
By following the steps outlined below, you’ll be able to create a restaurant-quality steak right in your backyard. Pair it with your favorite sides and a nice bottle of red wine for a complete gourmet experience.
Ingredients (Serves 4-6)
- 4 ribeye steaks (about 1-inch thick)
- Salt
- Black pepper
- 1/2 cup unsalted butter, softened
- 4 cloves garlic, minced
- 1 tablespoon fresh parsley, chopped
- 1 tablespoon olive oil
Cooking Instructions
- Prepare the Steaks: Take the ribeye steaks out of the refrigerator and let them sit at room temperature for about 30 minutes. This helps them cook evenly. Pat the steaks dry with paper towels and season both sides generously with salt and black pepper.
- Make the Garlic Butter: In a small bowl, mix the softened butter, minced garlic, and chopped parsley until well combined. Set aside.
- Preheat the Grill: Heat your grill to high heat, about 450°F to 500°F. Lightly oil the grill grates with olive oil to prevent the steaks from sticking.
- Grill the Steaks: Place the ribeye steaks on the grill. Cook for about 4-5 minutes on each side for medium-rare, or adjust the cook time to your preferred doneness. Use tongs to flip the steaks; avoid using a fork as it can pierce the meat and release juices.
- Apply the Garlic Butter: During the final minute of grilling, add a tablespoon of the prepared garlic butter on top of each steak. Allow it to melt and seep into the meat.
- Rest the Steaks: Remove the steaks from the grill and let them rest for 5-10 minutes on a cutting board. This allows the juices to redistribute within the meat, making it more tender and flavorful.
Extra Tips
To achieve the perfect crust on your ribeye steaks, confirm your grill is preheated to the correct temperature before cooking. Avoid moving the steaks around too much while they’re grilling to develop a nice sear.
For an even richer flavor, consider aging your ribeye steaks in the refrigerator for a few days before cooking. Finally, use a meat thermometer to check the internal temperature of the steak to ascertain it’s cooked to your liking (125°F for medium-rare, 135°F for medium).
Smoky Chicken Skewers for Your Grill
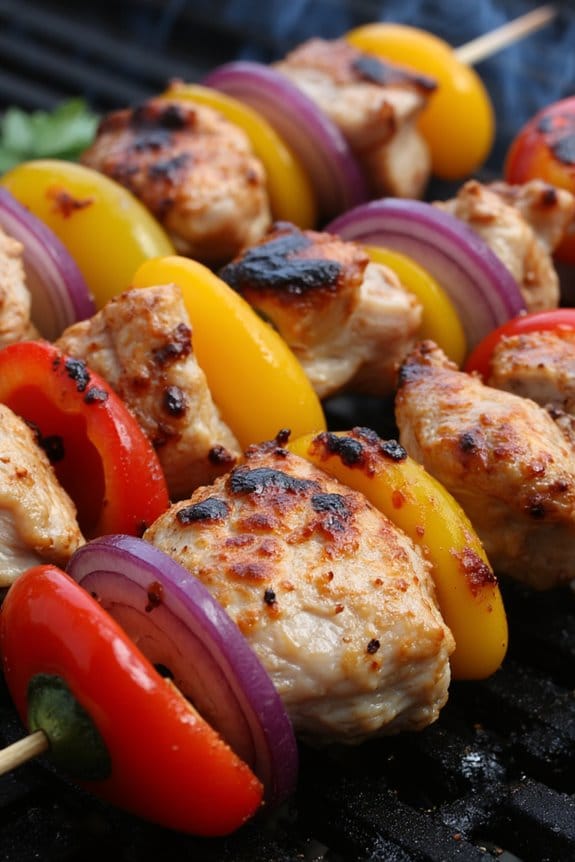
Nothing brings people together quite like a grill loaded with delicious food, and these Smoky Chicken Skewers are sure to be a crowd-pleaser at your next gathering. Marinated in a blend of spices and herbs, these skewers infuse the chicken with a smoky, savory flavor that’s complemented perfectly by a light char from the grill. They aren’t only a feast for the taste buds but also a visually appealing dish.
Whether you’re hosting a summer barbecue or just want to enjoy a delightful dinner outdoors, these skewers are a versatile addition to your grilling repertoire.
These skewers aren’t only easy to prepare but also quick to cook, making them an ideal choice for both novice and seasoned grill masters. The marinade requires some time to work its magic, so it’s best to plan ahead and allow the chicken to soak up all the flavors.
Once prepped, the skewers cook in a matter of minutes, delivering juicy and tender bites with a hint of smokiness. Serve them with a side of grilled vegetables or a fresh salad for a complete meal that’s both healthy and satisfying.
Ingredients for 4-6 servings:
- 2 pounds of boneless, skinless chicken thighs or breasts
- 1/4 cup olive oil
- 3 tablespoons soy sauce
- 2 tablespoons lemon juice
- 1 tablespoon smoked paprika
- 1 teaspoon garlic powder
- 1 teaspoon onion powder
- 1 teaspoon dried oregano
- 1/2 teaspoon black pepper
- 1/2 teaspoon salt
- 1/4 teaspoon cayenne pepper (optional for heat)
- 1 red bell pepper, cut into 1-inch pieces
- 1 yellow bell pepper, cut into 1-inch pieces
- 1 red onion, cut into 1-inch pieces
- Wooden or metal skewers
Cooking Instructions:
- Prepare the Marinade: In a large mixing bowl, combine the olive oil, soy sauce, lemon juice, smoked paprika, garlic powder, onion powder, oregano, black pepper, salt, and cayenne pepper. Whisk the ingredients together until well blended.
- Marinate the Chicken: Cut the chicken thighs or breasts into 1-inch cubes. Add them to the marinade, making sure each piece is well coated. Cover the bowl with plastic wrap and refrigerate for at least 1 hour, preferably overnight for maximum flavor absorption.
- Soak the Skewers: If using wooden skewers, soak them in water for at least 30 minutes to prevent burning on the grill.
- Assemble the Skewers: Preheat your grill to medium-high heat. While the grill is heating, thread the marinated chicken pieces onto the skewers, alternating with the red and yellow bell peppers and red onion pieces.
- Grill the Skewers: Place the assembled skewers on the preheated grill. Cook for about 10-12 minutes, turning occasionally, until the chicken is cooked through and has a nice char. The internal temperature of the chicken should reach 165°F (75°C).
- Serve: Once cooked, remove the skewers from the grill and let them rest for a few minutes before serving. This helps the juices redistribute throughout the chicken, keeping it moist and flavorful.
Extra Tips: For even more flavor, consider adding a few wood chips to your grill to enhance the smoky taste. If you prefer a spicier dish, feel free to increase the amount of cayenne pepper in the marinade.
Additionally, make sure that the grill grates are clean and well-oiled before starting to prevent the chicken from sticking. Experiment with different vegetables on the skewers like zucchini or cherry tomatoes for added variety. Enjoy these skewers hot off the grill for the best experience!
Lemon Herb Grilled Salmon Delight
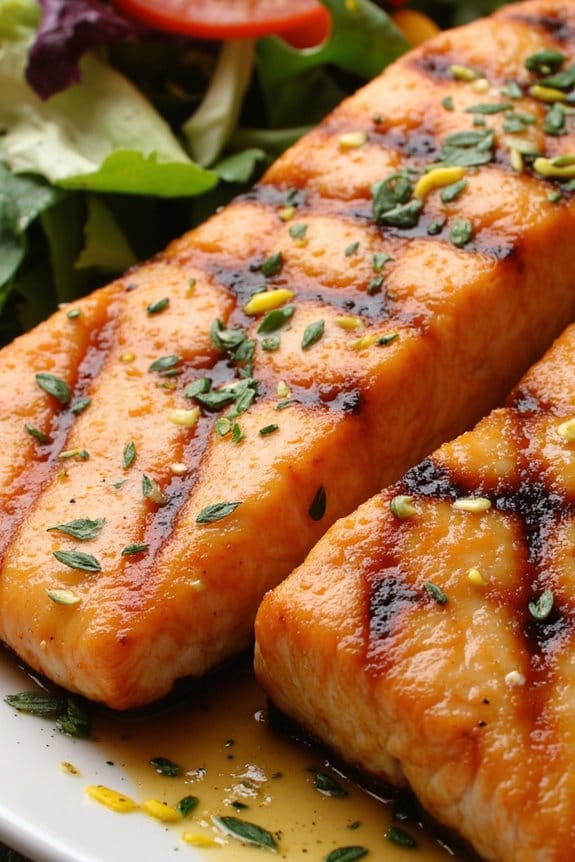
Lemon Herb Grilled Salmon Delight is a delightful and healthy way to enjoy the rich flavors of salmon, enhanced by the revitalizing taste of lemon and a blend of aromatic herbs. This dish is perfect for a summer evening barbecue or anytime you wish to savor the taste of the grill. The combination of zesty lemon juice, fresh herbs, and the natural richness of salmon creates a mouthwatering meal that’s both nutritious and satisfying.
Whether you’re hosting a dinner party or enjoying a family meal, this recipe is sure to impress your guests and leave everyone asking for seconds.
Grilling salmon is a simple technique that allows the fish to cook evenly while infusing it with a smoky flavor that’s hard to resist. The key to perfect grilled salmon lies in the preparation and the use of fresh, high-quality ingredients. With just a few steps, you can create a memorable dish that celebrates the flavors of the season.
The lemon herb marinade not only adds flavor but also helps keep the salmon moist during grilling. Serve this delightful dish with a side of grilled vegetables or a fresh salad for a complete and balanced meal.
Ingredients (serving size: 4-6 people):
- 4-6 salmon fillets, skin on
- 1/4 cup olive oil
- 2 tablespoons fresh lemon juice
- Zest of 1 lemon
- 2 tablespoons fresh dill, chopped
- 2 tablespoons fresh parsley, chopped
- 1 tablespoon fresh thyme leaves
- 3 cloves garlic, minced
- Salt and pepper to taste
- Lemon wedges, for serving
Instructions:
- Prepare the Marinade: In a medium bowl, combine the olive oil, lemon juice, lemon zest, chopped dill, parsley, thyme, minced garlic, salt, and pepper. Mix well to create a fragrant marinade.
- Marinate the Salmon: Place the salmon fillets in a shallow dish or a resealable plastic bag. Pour the marinade over the salmon, making sure each fillet is well-coated. Cover the dish or seal the bag and refrigerate for at least 30 minutes, allowing the flavors to meld.
- Preheat the Grill: Preheat your grill to medium-high heat. If using a charcoal grill, arrange the coals to create an even heat source. For a gas grill, set it to 375°F (190°C).
- Grill the Salmon: Lightly oil the grill grates to prevent sticking. Place the salmon fillets skin-side down on the grill. Close the lid and cook for 6-8 minutes, then carefully flip the fillets and cook for another 4-5 minutes, or until the salmon is opaque and flakes easily with a fork.
- Serve: Remove the salmon from the grill and let it rest for a few minutes. Serve with lemon wedges on the side for an extra burst of citrus flavor. Enjoy your Lemon Herb Grilled Salmon Delight with your favorite sides.
Extra Tips:
When grilling salmon, it’s important to keep an eye on the cooking time, as fish can easily become overcooked. Use a fish spatula to handle the fillets gently and prevent them from breaking apart.
If you prefer a more intense smoky flavor, try using wood chips or a cedar plank on the grill. Additionally, make sure your grill grates are clean and well-oiled to prevent sticking, which will help you achieve those beautiful grill marks that make this dish visually appealing.
Pork Chops Glazed With Apple Sweetness
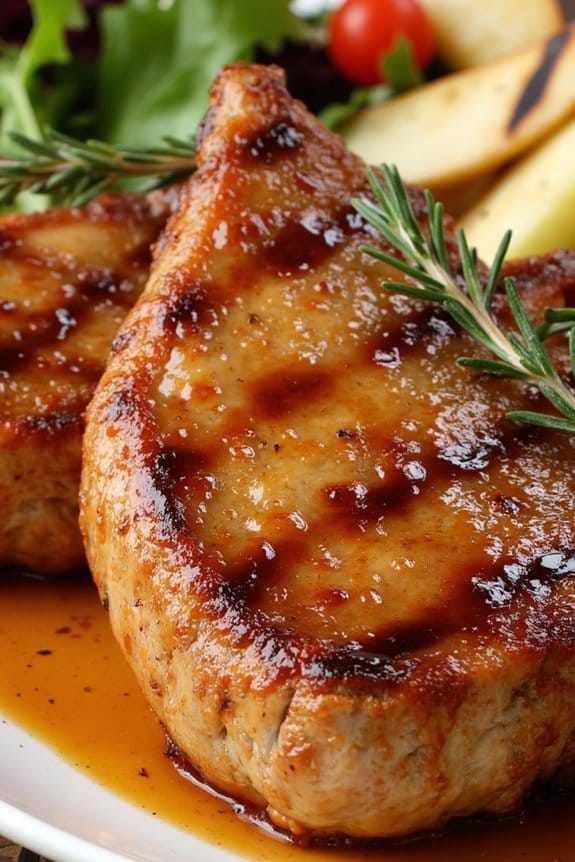
There’s something truly delightful about the combination of savory pork and the subtle sweetness of apples. This recipe for Pork Chops Glazed With Apple Sweetness brings that harmony to life with a succulent dish that’s perfect for grilling season. These juicy pork chops are marinated and basted with a luscious apple glaze, creating a rich and flavorful experience that pairs perfectly with the smoky char of the grill.
Whether you’re hosting a summer barbecue or simply enjoying a quiet family dinner outdoors, this recipe is sure to impress. The balance of flavors in this dish is achieved by using a blend of apple juice, honey, and spices, which infuse the pork with a sweet and slightly tangy glaze. Grilling the chops adds a delicious smoky depth that enhances the natural sweetness of the apple glaze.
Best enjoyed with a side of grilled vegetables or a fresh salad, these pork chops aren’t only delicious but also versatile. With this recipe, serving size can accommodate 4-6 people, making it ideal for gatherings or leftovers that taste just as good the next day.
Ingredients (Serving Size: 4-6 people):
- 4-6 bone-in pork chops (about 1-inch thick)
- 1 cup apple juice
- 1/4 cup honey
- 2 tablespoons apple cider vinegar
- 2 cloves garlic, minced
- 1 teaspoon ground cinnamon
- 1/2 teaspoon ground nutmeg
- 1 teaspoon salt
- 1/2 teaspoon black pepper
- 2 tablespoons olive oil
- Fresh thyme sprigs (for garnish)
Cooking Instructions:
- Prepare the Marinade: In a medium bowl, whisk together the apple juice, honey, apple cider vinegar, minced garlic, ground cinnamon, ground nutmeg, salt, and black pepper. This will serve as both the marinade and the glaze for your pork chops.
- Marinate the Pork Chops: Place the pork chops in a resealable plastic bag or a shallow dish. Pour half of the marinade over the pork chops, making sure they’re well coated. Reserve the remaining marinade for glazing. Seal the bag or cover the dish and refrigerate for at least 1 hour, or up to overnight for maximum flavor infusion.
- Preheat the Grill: Preheat your grill to medium-high heat. Lightly oil the grill grates to prevent sticking.
- Grill the Pork Chops: Remove the pork chops from the marinade and pat them dry with paper towels. Discard the used marinade. Brush the pork chops with olive oil. Place the chops on the grill and cook for about 4-5 minutes per side, or until they reach an internal temperature of 145°F (63°C).
- Apply the Glaze: During the last few minutes of grilling, baste the pork chops with the reserved marinade. Turn the chops occasionally to allow the glaze to caramelize and form a delicious crust.
- Rest and Garnish: Once cooked, remove the pork chops from the grill and let them rest for 3-5 minutes. This allows the juices to redistribute within the meat. Garnish with fresh thyme sprigs before serving.
Extra Tips:
For an extra burst of flavor, consider adding a splash of bourbon to the glaze for a more complex taste profile. If you prefer a thicker glaze, reduce the reserved marinade by simmering it in a small saucepan over medium heat until it reaches your desired consistency.
Always use a meat thermometer to ascertain your pork chops are cooked to a safe internal temperature. Enjoy your meal with a chilled apple cider for a revitalizing pairing.
Balsamic Drizzled Veggie Medley
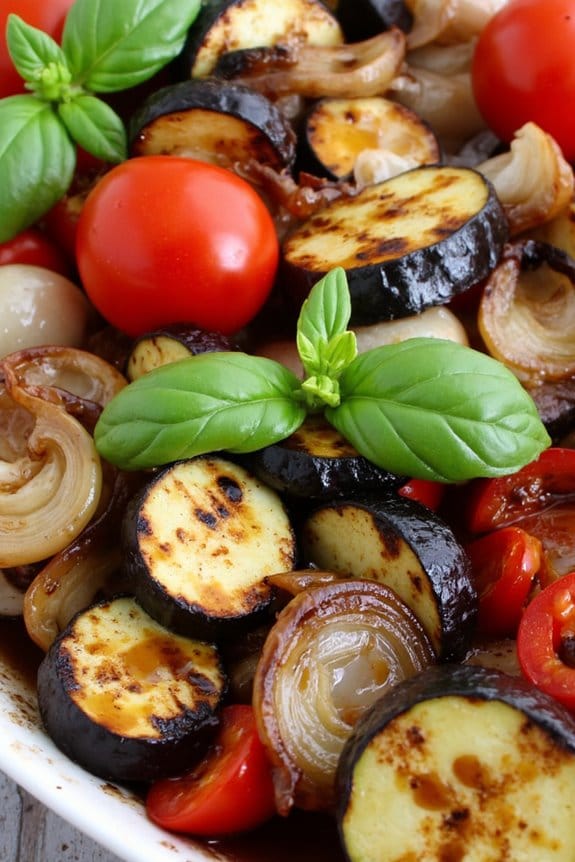
Grilling isn’t just for meats; it brings out the best in vegetables too. The Balsamic Drizzled Veggie Medley is a colorful, vibrant dish that takes full advantage of the grill’s smoky flavor. This dish isn’t only healthy but also a feast for the eyes, combining a variety of fresh vegetables that are perfect for summer cookouts or family dinners.
The balsamic reduction adds a tangy sweetness that complements the natural flavors of the veggies, making it a crowd-pleaser for vegetarians and meat-lovers alike. Whether you’re serving it as a side or main dish, this veggie medley is versatile and can be paired with almost any meal.
The key is in the preparation and selection of fresh, seasonal vegetables. Be ready to impress your family and friends with this easy-to-make, deliciously satisfying dish that captures the essence of summer grilling. This recipe serves 4-6 people.
Ingredients:
- 2 medium zucchinis
- 1 red bell pepper
- 1 yellow bell pepper
- 1 red onion
- 1 small eggplant
- 1 cup cherry tomatoes
- 3 tablespoons olive oil
- Salt and pepper to taste
- 1/4 cup balsamic vinegar
- 2 tablespoons honey
- 2 cloves garlic, minced
- Fresh basil leaves for garnish
Cooking Instructions:
- Prepare the Vegetables: Begin by washing all the vegetables thoroughly. Slice the zucchinis, bell peppers, and eggplant into 1/4-inch thick rounds. Quarter the red onion, and keep the cherry tomatoes whole.
- Make the Balsamic Reduction: In a small saucepan over medium heat, combine the balsamic vinegar and honey. Stir until the mixture comes to a boil, then reduce the heat to low and let it simmer until it thickens and reduces by half. This should take about 10 minutes. Remove from heat and set aside.
- Season the Vegetables: In a large mixing bowl, toss the sliced vegetables and whole cherry tomatoes with olive oil, minced garlic, salt, and pepper. Confirm that all the veggies are evenly coated.
- Preheat the Grill: Heat your grill to medium-high heat. If you’re using a charcoal grill, make sure the coals are white-hot for peak cooking.
- Grill the Vegetables: Place the vegetables directly on the grill grates. Grill the zucchini, eggplant, and bell peppers for about 4-5 minutes on each side, or until tender and slightly charred. The onions and cherry tomatoes should be grilled for about 3 minutes on each side.
- Assemble the Dish: Once all the vegetables are grilled to perfection, arrange them on a large serving platter. Drizzle the balsamic reduction generously over the top.
- Garnish and Serve: Finish by garnishing with fresh basil leaves, adding a pop of color and freshness to the dish. Serve immediately while warm.
Extra Tips:
To enhance the flavor of your Balsamic Drizzled Veggie Medley, consider marinating the vegetables in olive oil, garlic, salt, and pepper for at least 30 minutes before grilling. This allows the flavors to penetrate deeper into the veggies.
If you prefer a smokier flavor, you can add wood chips to your grill. Additionally, be mindful of the grill time, as different vegetables have varying cooking times. Keep a close eye on the grill to avoid burning, and adjust the grill heat as necessary to guarantee even cooking.
Spice up Your Meal: Shrimp Tacos With Avocado Salsa
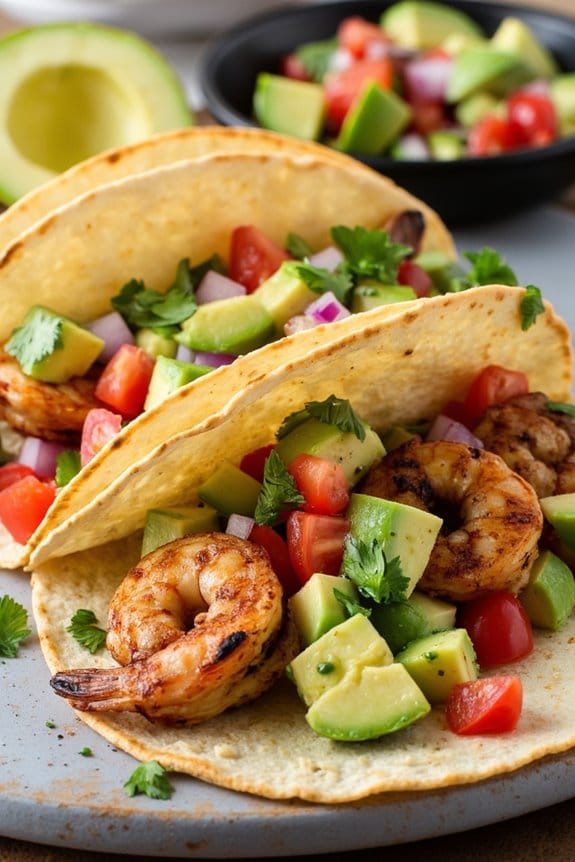
Shrimp Tacos with Avocado Salsa are a delightful way to enjoy a light, flavorful meal perfect for any occasion. The combination of smoky, grilled shrimp and creamy avocado salsa creates a harmonious blend of textures and flavors that will tantalize your taste buds.
These tacos aren’t only delicious but also quite simple to prepare, making them a great option for both casual gatherings and more formal dinners. Whether you’re a seasoned griller or a novice, this recipe will guide you through creating a dish that’s certain to impress.
Grilling the shrimp enhances their natural sweetness while imparting a subtle charred flavor that pairs perfectly with the zesty, fresh salsa. The avocado salsa, with its vibrant mix of avocado, lime, cilantro, and tomatoes, adds a revitalizing contrast to the warm, succulent shrimp.
Served in soft tortillas, these tacos become a complete meal that’s both satisfying and nutritious. Ideal for serving 4-6 people, this recipe is sure to become a favorite in your grilling repertoire.
Ingredients (serving size: 4-6 people):
- 1 1/2 pounds large shrimp, peeled and deveined
- 1 tablespoon olive oil
- 1 teaspoon chili powder
- 1/2 teaspoon ground cumin
- 1/2 teaspoon garlic powder
- Salt and pepper to taste
- 8-12 small corn or flour tortillas
- 2 ripe avocados, diced
- 1 medium tomato, diced
- 1/4 cup red onion, finely chopped
- 1/4 cup fresh cilantro, chopped
- 1 lime, juiced
- Salt to taste
Cooking Instructions:
- Prep the Shrimp: In a large bowl, combine the shrimp, olive oil, chili powder, cumin, garlic powder, salt, and pepper. Toss until the shrimp are evenly coated with the spices.
- Preheat the Grill: Heat your grill to medium-high heat. Confirm the grates are clean to prevent sticking.
- Grill the Shrimp: Thread the shrimp onto skewers for easier handling. Grill the shrimp for about 2-3 minutes per side until they’re pink and opaque. Be careful not to overcook them as they’ll become tough.
- Prepare the Avocado Salsa: In a medium bowl, combine the diced avocados, tomato, red onion, cilantro, and lime juice. Mix gently to combine, adding salt to taste. Set aside.
- Warm the Tortillas: Place the tortillas on the grill for about 30 seconds on each side to warm them up, making them pliable and slightly charred.
- Assemble the Tacos: Lay out the warmed tortillas and fill each with grilled shrimp. Top with a generous spoonful of avocado salsa. Serve immediately for best flavor.
Extra Tips:
For a more intense flavor, marinate the shrimp for 30 minutes in the refrigerator before grilling. If using wooden skewers, soak them in water for 30 minutes prior to grilling to prevent burning.
You can also add a touch of heat to the salsa by incorporating diced jalapeño or a splash of hot sauce. For added creaminess, consider adding a dollop of sour cream or a sprinkle of crumbled queso fresco on top of the tacos.
Flame-Kissed Lamb Chops With Mint Pesto
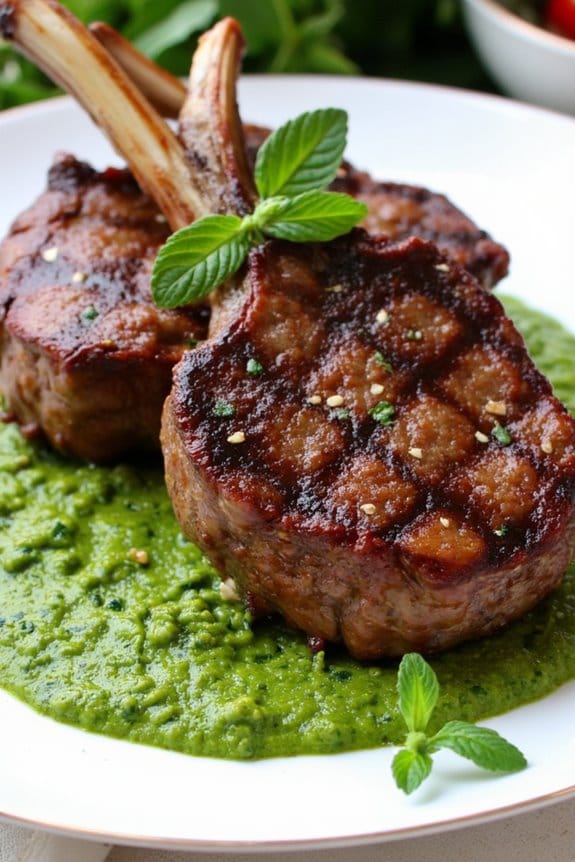
Flame-Kissed Lamb Chops With Mint Pesto is a delightful dish that combines the rich, savory flavor of perfectly grilled lamb chops with the fresh, vibrant notes of homemade mint pesto. This dish is perfect for an elegant outdoor dinner, offering a taste that’s both sophisticated and comforting.
The key to mastering this recipe is to achieve the ideal grill marks on the lamb chops, which not only enhance the flavor but also add an appealing visual element to the meal. Meanwhile, the mint pesto brings a rejuvenating balance, cutting through the richness of the lamb and elevating the dish to a whole new level.
Grilling lamb chops might seem intimidating, but with the right preparation and technique, it can be straightforward and rewarding. The secret lies in marinating the lamb chops to infuse them with flavor and ensuring the grill is at the right temperature for a beautiful sear.
The mint pesto, on the other hand, is a simple yet flavorful addition that can be made ahead of time. This dish is ideal for serving 4-6 people, making it a fantastic option for a family meal or a small gathering with friends.
Ingredients for Flame-Kissed Lamb Chops With Mint Pesto (Serves 4-6):
- 12 lamb chops
- 3 tablespoons olive oil
- 3 cloves garlic, minced
- 1 teaspoon salt
- 1 teaspoon black pepper
- 1 cup fresh mint leaves
- 1/2 cup fresh basil leaves
- 1/2 cup parsley leaves
- 1/2 cup pine nuts
- 1/2 cup grated Parmesan cheese
- 1/2 cup extra virgin olive oil
- 1 tablespoon lemon juice
Cooking Instructions:
- Marinate the Lamb Chops:
- In a small bowl, combine 3 tablespoons of olive oil, minced garlic, salt, and black pepper.
- Rub the mixture evenly over the lamb chops, ensuring each chop is well coated.
- Place the lamb chops in a dish, cover with plastic wrap, and marinate in the refrigerator for at least 1 hour, or up to overnight for maximum flavor.
- Prepare the Mint Pesto:
- In a food processor, combine fresh mint leaves, basil leaves, parsley leaves, pine nuts, and grated Parmesan cheese.
- Pulse until the mixture is finely chopped.
- With the processor running, gradually add the extra virgin olive oil and lemon juice until the pesto is smooth and creamy.
- Transfer the pesto to a bowl and set aside.
- Preheat the Grill:
- Preheat your grill to medium-high heat.
- Once the grill is hot, lightly oil the grill grates to prevent sticking.
- Grill the Lamb Chops:
- Remove the lamb chops from the refrigerator and allow them to come to room temperature, about 15 minutes.
- Place the lamb chops on the grill and cook for about 3-4 minutes per side, or until the internal temperature reaches at least 145°F for medium-rare.
- Adjust the cooking time based on your desired level of doneness.
- Serve:
- Remove the lamb chops from the grill and let them rest for 5 minutes.
- Serve the lamb chops warm, topped with a generous spoonful of mint pesto.
Extra Tips:
For the best flavor, use fresh herbs for the pesto and, if possible, grill the lamb chops over charcoal for a smoky flavor.
Be sure to let the lamb chops rest before serving; this allows the juices to redistribute throughout the meat, ensuring each bite is juicy and flavorful. If you’re short on time, the mint pesto can be made a day in advance and stored in the refrigerator. Just remember to bring it to room temperature before serving for the best taste.
Try These Tasty Portobello Mushrooms With Goat Cheese
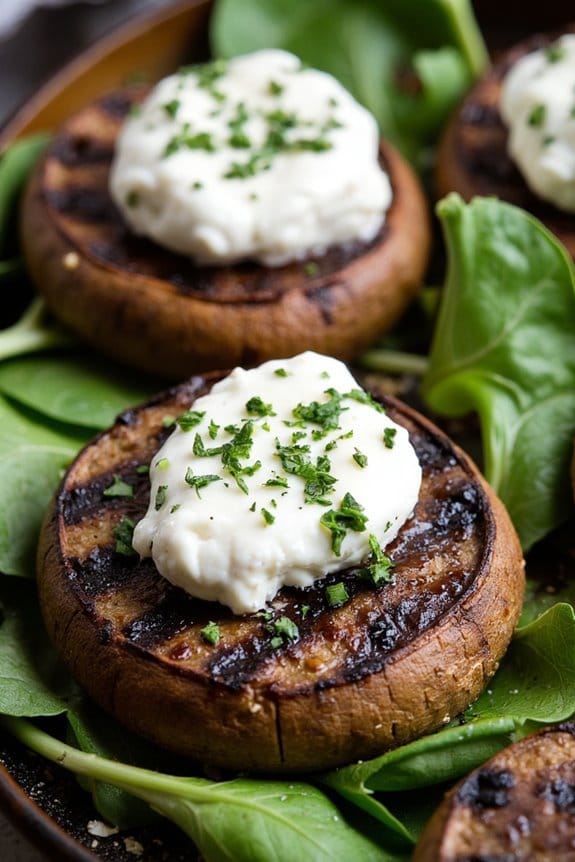
Grilling isn’t just for meat lovers; vegetarians can enjoy a range of delicious options cooked over an open flame, too. One standout dish is Grilled Portobello Mushrooms With Goat Cheese. This recipe embraces the hearty texture of portobello mushrooms, which serve as an excellent substitute for meat, while the creamy and tangy goat cheese adds a rich flavor profile. The combination of grilled mushrooms and goat cheese creates a delightful dish that’s perfect for a summer barbecue or a cozy fall dinner.
The preparation of the mushrooms is simple yet effective, allowing the natural flavors to shine through. By marinating the mushrooms before grilling, you infuse them with additional flavors that complement the earthiness of the mushrooms. When paired with the creamy goat cheese, this dish becomes an indulgent treat that will satisfy even the most discerning palates.
Whether you’re a seasoned grill master or a beginner, this recipe is easy to follow and certain to impress your guests.
Ingredients for 4-6 servings:
- 6 large portobello mushroom caps
- 4 tablespoons olive oil
- 3 tablespoons balsamic vinegar
- 2 cloves garlic, minced
- Salt and pepper to taste
- 6 ounces goat cheese
- 2 tablespoons fresh basil, chopped
- 1 tablespoon fresh thyme leaves
- 1 tablespoon honey (optional)
- 1 cup arugula (for serving, optional)
Cooking Instructions:
- Prepare the Marinade: In a small bowl, combine olive oil, balsamic vinegar, minced garlic, salt, and pepper. Mix well to create a marinade.
- Marinate the Mushrooms: Place the portobello mushroom caps in a shallow dish. Pour the marinade over the mushrooms, making sure they’re evenly coated. Let them marinate at room temperature for about 20-30 minutes, turning occasionally to make sure of even absorption of the marinade.
- Preheat the Grill: While the mushrooms are marinating, preheat your grill to medium-high heat.
- Grill the Mushrooms: Once the grill is ready, place the marinated mushroom caps on the grill, gill-side down. Grill for about 5-7 minutes per side, or until they’re tender and have nice grill marks.
- Add the Goat Cheese: During the last 2 minutes of grilling, flip the mushrooms and place a generous amount of goat cheese on each cap. Close the grill lid to allow the cheese to melt slightly.
- Serve: Remove the mushrooms from the grill and sprinkle with freshly chopped basil and thyme. Drizzle with honey if desired. Serve the mushrooms on a bed of arugula for an added touch of freshness.
Extra Tips:
To guarantee your mushrooms cook evenly, choose caps that are similar in size. If you find that the goat cheese isn’t melting as quickly as desired, you can cover the mushrooms with a piece of aluminum foil on the grill to trap heat.
Additionally, if you prefer a smokier flavor, consider adding soaked wood chips to your grill for an enhanced aroma. For a more robust dish, try adding a pinch of red pepper flakes to the marinade for a subtle kick.
BBQ Pineapple With a Cinnamon Twist
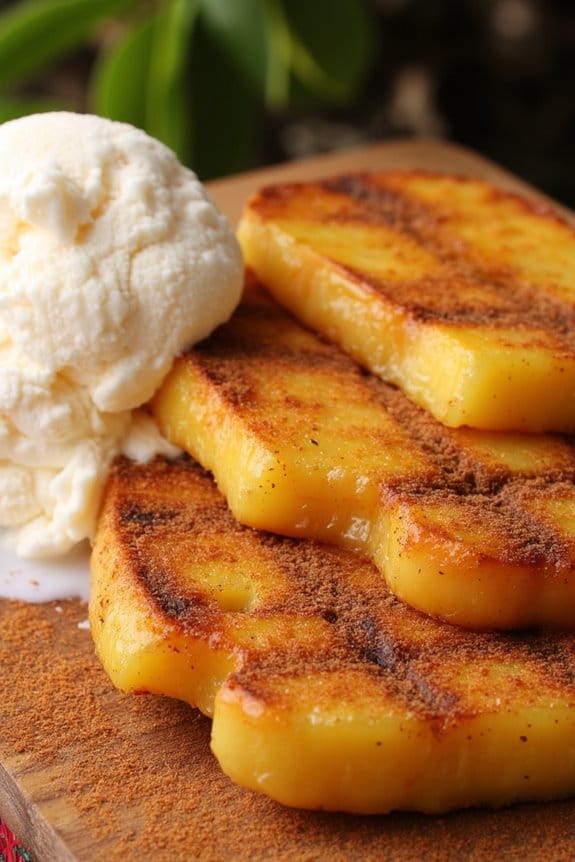
Grilling isn’t just reserved for savory meats and vegetables; it can also transform fruits into delightful desserts that tantalize the taste buds. Among these, BBQ Pineapple with a Cinnamon Twist stands out as a sweet and slightly spicy treat that combines the caramelized flavor of grilled pineapple with a fragrant touch of cinnamon. This dish is perfect for summer gatherings or any occasion where you want to impress your guests with a unique and delicious dessert straight from the grill.
The natural sugars in pineapple caramelize beautifully when grilled, creating a slightly crispy exterior that contrasts with the juicy, tender interior. Adding a cinnamon twist elevates this dish by introducing a warm spice note that complements the fruit’s tropical sweetness. This recipe serves 4-6 people, making it an ideal choice for a family get-together or a small party. With minimal ingredients and preparation time, BBQ Pineapple with a Cinnamon Twist is both simple and satisfying.
Ingredients for 4-6 People:
- 1 large ripe pineapple
- 1/4 cup brown sugar
- 1 tablespoon ground cinnamon
- 1 teaspoon vanilla extract
- 2 tablespoons unsalted butter, melted
- Optional: vanilla ice cream or whipped cream for serving
Cooking Instructions:
- Prepare the Pineapple: Begin by cutting off the top and bottom of the pineapple, then carefully slice away the outer skin. Cut the pineapple into rings or wedges, removing the core from each piece, if desired.
- Make the Cinnamon Mixture: In a small bowl, combine the brown sugar, ground cinnamon, and vanilla extract. Stir in the melted butter until the mixture is smooth and well combined.
- Coat the Pineapple: Use a pastry brush to generously coat each piece of pineapple with the cinnamon sugar mixture. Make sure each piece is evenly covered for maximum flavor.
- Preheat the Grill: Preheat your grill to medium-high heat. This will guarantee the pineapple gets those lovely grill marks and caramelizes properly.
- Grill the Pineapple: Place the coated pineapple pieces directly on the grill. Cook for about 3-5 minutes on each side, or until the pineapple is tender and has beautiful grill marks. Be careful not to overcook, as the pineapple can become too soft.
- Serve: Once grilled, remove the pineapple from the grill and let it cool slightly. Serve warm with a scoop of vanilla ice cream or a dollop of whipped cream for an extra indulgent treat.
Extra Tips:
For the best results, choose a ripe pineapple, which should have a sweet aroma at the base and a slight give when pressed. If you prefer a spicier twist, consider adding a pinch of cayenne pepper to the cinnamon mixture.
Additionally, to prevent sticking, make certain your grill is well-oiled before placing the pineapple on it. This dish pairs wonderfully with a scoop of coconut ice cream for an extra tropical flair.
Char-Grilled Asparagus With Parmesan and Lemon
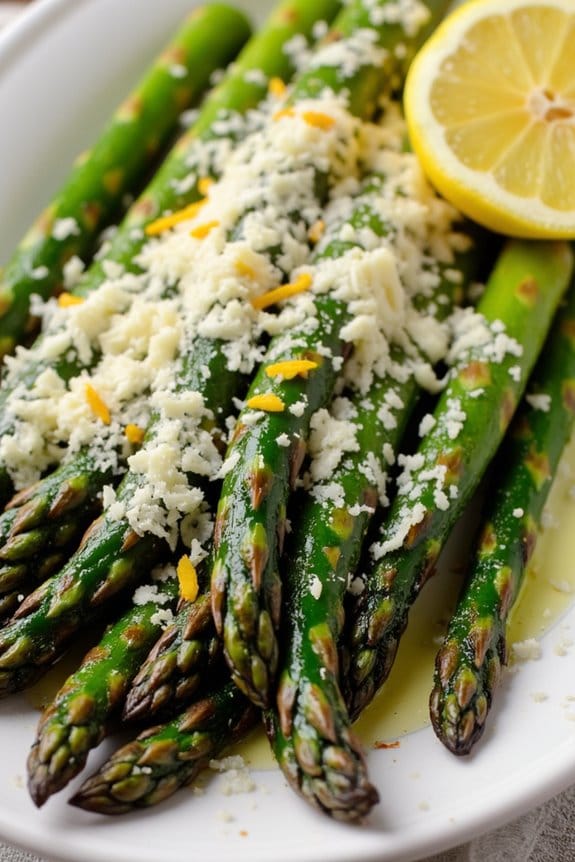
Char-Grilled Asparagus with Parmesan and Lemon is a delectable dish that combines the smoky flavor of grilled asparagus with the rich, savory taste of Parmesan cheese and the bright zest of fresh lemon.
This simple yet elegant recipe is perfect for an al fresco summer dinner or a special side dish for any occasion. The key to this dish is the perfect balance of flavors and the use of fresh, high-quality ingredients that enhance the natural taste of the asparagus.
Grilling the asparagus brings out its natural sweetness while adding a delightful char that complements the saltiness of the Parmesan and the acidity of the lemon. This dish isn’t only a treat for the taste buds but also a feast for the eyes, with vibrant green asparagus spears adorned with golden flecks of cheese and a sprinkle of lemon zest.
Serve this alongside grilled meats, fish, or even on its own as a light, invigorating appetizer.
Ingredients (Serves 4-6):
- 2 pounds fresh asparagus, trimmed
- 3 tablespoons olive oil
- Salt and freshly ground black pepper, to taste
- 1/2 cup freshly grated Parmesan cheese
- 1 lemon, zested and juiced
Cooking Instructions:
- Prepare the Grill: Preheat your grill to medium-high heat. Confirm the grill grates are clean and lightly oiled to prevent sticking.
- Prepare the Asparagus: Rinse the asparagus under cold water and pat dry with a paper towel. Trim the woody ends of the asparagus spears.
- Season the Asparagus: In a large bowl, toss the asparagus with olive oil, salt, and freshly ground black pepper until evenly coated.
- Grill the Asparagus: Place the asparagus spears in a single layer directly on the grill grates. Cook for about 5-7 minutes, turning occasionally, until the asparagus is tender and has developed beautiful grill marks.
- Add Parmesan and Lemon: Remove the asparagus from the grill and transfer to a serving platter. Immediately sprinkle the hot asparagus with freshly grated Parmesan cheese so it melts slightly. Drizzle with lemon juice and sprinkle lemon zest over the top.
- Serve: Serve the char-grilled asparagus warm, garnished with additional lemon zest and a few shavings of Parmesan if desired.
Extra Tips:
For the best results, select asparagus spears that are similar in thickness so they cook evenly.
Avoid overcooking the asparagus; it should be tender but still crisp to the bite. If you prefer a stronger lemon flavor, add more zest or a squeeze of lemon juice just before serving.
Pair this dish with a crisp white wine or a light, citrusy beer to complement the flavors.
Herb-Infused Swordfish on the Grill

Herb-Infused Swordfish on the Grill is a delightful dish that combines the rich, meaty texture of swordfish with the aromatic flavors of fresh herbs. This recipe is perfect for those who love grilling and strive to impress their dinner guests with a gourmet seafood meal. The swordfish, known for its firm texture, is an excellent choice for grilling as it holds up well over high heat and absorbs the flavors of the marinade beautifully.
When infused with a blend of herbs, garlic, and citrus, the swordfish transforms into a mouth-watering centerpiece for any summer gathering. Grilling swordfish is an art that involves balancing high heat with the right amount of seasoning. The key to this dish is the marinade, which not only infuses the swordfish with flavor but also helps keep it moist during cooking.
This recipe serves 4-6 people, making it ideal for a family dinner or a small party with friends. With just a little preparation, this Herb-Infused Swordfish on the Grill will become a staple in your grilling repertoire, providing a sophisticated yet simple option for your next outdoor meal.
Ingredients (Serves 4-6):
- 4 swordfish steaks (about 6-8 ounces each)
- 1/4 cup olive oil
- Juice of 2 lemons
- Zest of 1 lemon
- 4 cloves garlic, minced
- 2 tablespoons fresh rosemary, chopped
- 2 tablespoons fresh thyme, chopped
- Salt and pepper to taste
- Lemon wedges for serving
Cooking Instructions:
- Prepare the Marinade: In a small bowl, combine the olive oil, lemon juice, lemon zest, minced garlic, chopped rosemary, and thyme. Whisk the ingredients together until well blended.
- Marinate the Swordfish: Place the swordfish steaks in a shallow dish or a resealable plastic bag. Pour the marinade over the fish, making sure each steak is well-coated. Seal the bag or cover the dish with plastic wrap, and refrigerate for at least 30 minutes to 1 hour. This allows the flavors to penetrate the fish.
- Preheat the Grill: While the swordfish is marinating, preheat your grill to medium-high heat. If using a charcoal grill, ensure that the coals are hot and covered with white ash before cooking.
- Grill the Swordfish: Remove the swordfish from the marinade and let any excess drip off. Season each steak with salt and pepper. Place the steaks on the grill, and cook for about 4-5 minutes per side, or until the fish is opaque and flakes easily with a fork. Avoid overcooking as this can make the fish dry.
- Serve the Dish: Once cooked, remove the swordfish from the grill and let it rest for a few minutes. Serve with lemon wedges on the side for an extra burst of freshness.
Extra Tips:
When grilling swordfish, it’s important to keep an eye on the cooking time, as overcooking can lead to a dry texture. If you’re unsure, use a meat thermometer to confirm the internal temperature reaches 145°F.
For a unique twist, consider adding a touch of smoked paprika or chili flakes to the marinade for a hint of spice. Additionally, pairing the swordfish with a light salad or grilled vegetables can complement the flavors beautifully, providing a well-rounded meal that highlights the herb-infused flavors of the dish.
Flavorful Corn on the Cob With Chili Lime Butter
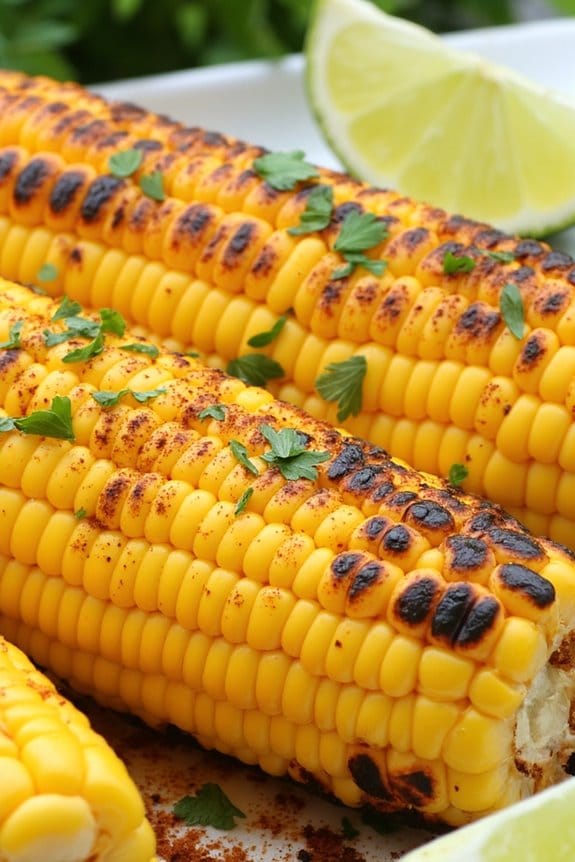
Grilling is a fantastic way to bring out the natural sweetness of corn, and when paired with a spicy and tangy chili lime butter, it transforms into a dish that’s both invigorating and deeply satisfying. This recipe for Flavorful Corn on the Cob With Chili Lime Butter is perfect for warm summer evenings when you’re looking for something easy yet delicious to serve to family and friends.
The combination of the char-grilled corn and the zesty butter creates a symphony of flavors that dance on the palate, making it a memorable side dish or even a main course for those who adore the taste of fresh, seasonal corn.
Imagine the sight of golden corn kernels, each coated lovingly in a rich and aromatic chili lime butter, steaming hot from the grill, promising a burst of flavors with every bite. This dish isn’t only a feast for your taste buds but also a vibrant addition to any dinner table, with its inviting colors and enticing aroma.
Whether you’re hosting a barbecue or simply looking to enhance your evening meal, this recipe is set to impress and delight.
Ingredients for 4-6 servings:
- 6 ears of corn, husked
- 1/2 cup unsalted butter, softened
- 1 tablespoon chili powder
- Zest of 1 lime
- 2 tablespoons lime juice
- 1 teaspoon salt
- 1/2 teaspoon ground black pepper
- 1/4 cup fresh cilantro, chopped
- Lime wedges, for serving
Cooking Instructions:
- Prepare the Grill: Preheat your grill to medium-high heat. If using a charcoal grill, verify the coals are glowing and covered with white ash for an even heat distribution.
- Make the Chili Lime Butter: In a small bowl, combine the softened butter, chili powder, lime zest, lime juice, salt, and black pepper. Mix thoroughly until all ingredients are well incorporated. Set aside.
- Grill the Corn: Place the husked ears of corn directly onto the preheated grill. Cook for about 10-12 minutes, turning occasionally, until the corn is tender and has a nice char on all sides.
- Apply the Butter: Once the corn is done grilling, remove it from the heat and immediately brush each ear generously with the prepared chili lime butter. The warmth of the corn will help the butter melt and seep into the kernels.
- Garnish and Serve: Sprinkle the chopped cilantro over the buttered corn. Serve immediately with lime wedges on the side for an extra citrusy kick.
Extra Tips:
For an even deeper flavor, consider soaking the corn in water for 15-20 minutes before grilling; this helps prevent the kernels from drying out and can add a slight steam effect while cooking.
If you prefer a spicier kick, add a pinch of cayenne pepper to the butter mixture. Additionally, you can pre-make the chili lime butter a day in advance and store it in the refrigerator, allowing the flavors to meld and intensify.
When ready to use, simply let it come to room temperature for easy spreading.
Stuffed Bell Peppers With Quinoa Perfection
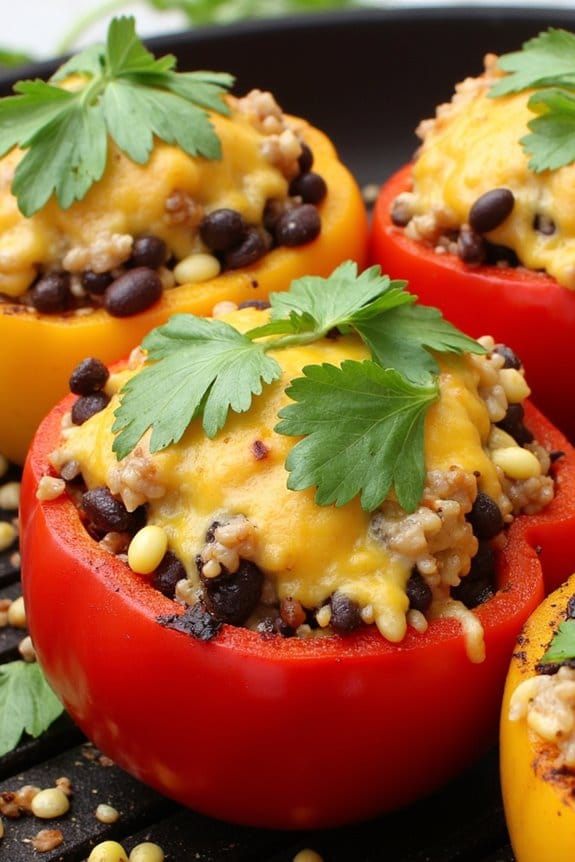
Grilling brings out the best in flavors, and when it comes to a meal like Stuffed Bell Peppers with Quinoa Perfection, it elevates the dish to a whole new level. The smoky char from the grill adds an extra depth to the peppers, making them an irresistible choice for a summer dinner.
This dish is a delightful combination of colorful bell peppers stuffed with a savory mixture of quinoa, vegetables, and spices, creating a wholesome and nutritious meal that satisfies both the taste buds and the soul.
Stuffed Bell Peppers with Quinoa Perfection isn’t only a treat for the palate but also a visually appealing dish. The vibrant colors of the bell peppers contrast beautifully with the rich, hearty filling inside. This particular recipe is designed to serve 4-6 people, making it an ideal choice for family gatherings or dinner parties.
It’s a versatile dish that can be easily adapted to suit a variety of dietary preferences, whether vegetarian, vegan, or even gluten-free with just a few simple adjustments.
Ingredients for 4-6 servings:
- 6 large bell peppers (any color)
- 1 cup quinoa
- 2 cups vegetable broth
- 1 can (15 oz) black beans, drained and rinsed
- 1 cup corn kernels (fresh, frozen, or canned)
- 1 medium onion, chopped
- 2 cloves garlic, minced
- 1 teaspoon cumin
- 1 teaspoon smoked paprika
- 1/2 teaspoon chili powder
- Salt and pepper to taste
- 1 cup shredded cheese (optional)
- Fresh cilantro, chopped for garnish
- Olive oil
Cooking Instructions:
- Prepare the Quinoa: Rinse the quinoa under cold water. In a medium saucepan, combine the quinoa and vegetable broth. Bring to a boil, then reduce the heat to low, cover, and simmer for about 15 minutes until the quinoa is cooked and the liquid is absorbed. Fluff with a fork and set aside.
- Prepare the Bell Peppers: While the quinoa is cooking, cut the tops off the bell peppers and remove the seeds and membranes. Brush the outside of the peppers lightly with olive oil.
- Prepare the Filling: In a large skillet, heat a tablespoon of olive oil over medium heat. Add the chopped onion and garlic, sautéing until the onion is translucent. Add the black beans, corn, cumin, smoked paprika, chili powder, salt, and pepper, stirring to combine. Cook for about 5 minutes until heated through. Add the cooked quinoa to the skillet and mix well.
- Stuff the Peppers: Fill each bell pepper with the quinoa mixture, pressing down gently to pack it in. If desired, top each pepper with shredded cheese.
- Grill the Peppers: Preheat the grill to medium heat. Place the stuffed peppers directly on the grill grates, cover, and cook for about 25-30 minutes until the peppers are tender and slightly charred. If using cheese, allow it to melt and bubble before removing from the grill.
- Serve: Carefully remove the peppers from the grill. Garnish with fresh cilantro and serve immediately.
Extra Tips:
For an added layer of flavor, consider roasting the bell peppers on the grill for a few minutes before stuffing them. This will enhance their smoky taste.
Also, you can switch up the filling by adding ingredients like diced tomatoes, chopped spinach, or even leftover grilled chicken for a non-vegetarian option. If you’re aiming for a vegan version, simply skip the cheese or use a plant-based alternative.
Finally, letting the peppers rest for a few minutes before serving allows the flavors to meld beautifully.