

Summer is the perfect time to gather around the grill and try something new. The aroma of spicy Sriracha honey-glazed wings or the sweetness of grilled pineapple and jalapeño skewers can turn any meal into a celebration. These vibrant dishes have a way of bringing everyone together, sparking conversations and laughter. If you’re eager to elevate your outdoor dining experience, these fresh ideas are just what you need. Let’s explore some delicious recipes that will make your summer grilling unforgettable!
Kickstart With Spicy Sriracha Honey-Glazed Wings
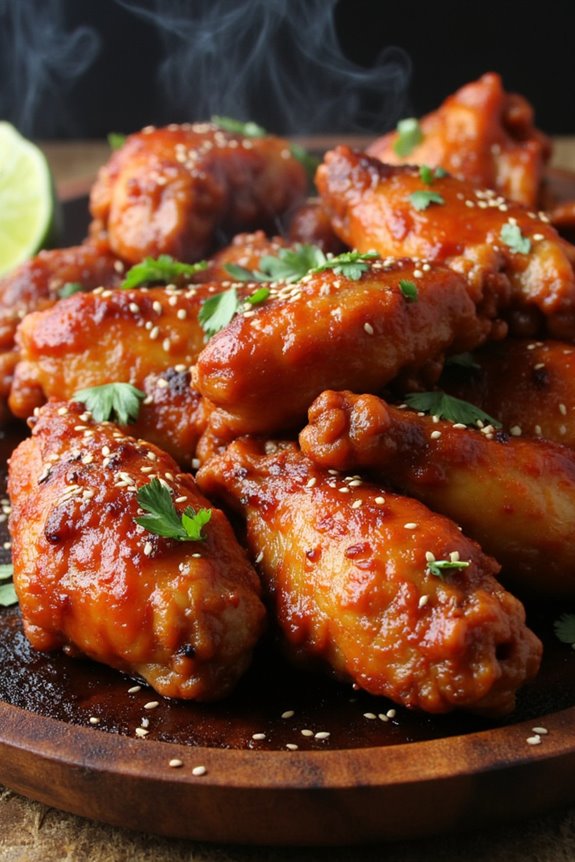
Kickstart your grill session with a fiery twist by preparing Spicy Sriracha Honey-Glazed Wings. These wings are the perfect combination of heat and sweet, with a sticky glaze that will have everyone reaching for more. The sriracha adds a robust spiciness that’s beautifully balanced by the rich sweetness of honey, creating a flavor explosion that’s sure to be a hit at any summer gathering.
Whether you’re hosting a backyard barbecue or a casual dinner for family and friends, these wings are bound to impress.
The key to achieving the perfect Spicy Sriracha Honey-Glazed Wings lies in the marination process, which allows the flavors to deeply penetrate the chicken, guaranteeing each bite is deliciously seasoned. Grilling the wings adds a smoky flavor that complements the spicy-sweet glaze, making them irresistibly tasty.
Serve them hot off the grill with a side of cooling ranch or blue cheese dressing to help tame the heat, and watch as they disappear in no time.
Ingredients (Serves 4-6):
- 3 pounds of chicken wings
- 1/2 cup sriracha sauce
- 1/4 cup honey
- 2 tablespoons soy sauce
- 1 tablespoon rice vinegar
- 1 tablespoon olive oil
- 2 teaspoons garlic powder
- 1 teaspoon onion powder
- 1 teaspoon salt
- 1 teaspoon black pepper
- 1 tablespoon sesame seeds (optional, for garnish)
- 2 tablespoons chopped fresh cilantro (optional, for garnish)
Cooking Instructions:
- Prepare the Marinade: In a large mixing bowl, combine the sriracha sauce, honey, soy sauce, rice vinegar, olive oil, garlic powder, onion powder, salt, and black pepper. Whisk until all ingredients are well combined and the mixture is smooth.
- Marinate the Wings: Add the chicken wings to the bowl with the marinade. Toss to confirm each wing is thoroughly coated. Cover the bowl with plastic wrap and refrigerate for at least 2 hours, or overnight for maximum flavor.
- Preheat the Grill: About 30 minutes before you’re ready to cook, preheat your grill to medium-high heat. If using a charcoal grill, confirm the coals are ashed over before cooking.
- Grill the Wings: Lightly oil the grill grates to prevent sticking. Remove the wings from the marinade, allowing excess marinade to drip off, and place them on the grill. Cook the wings for about 20-25 minutes, turning occasionally, until they’re cooked through and have a nice char.
- Glaze the Wings: During the last 5 minutes of grilling, brush the wings with any remaining marinade to enhance the flavor and create a sticky glaze.
- Serve and Garnish: Once cooked, remove the wings from the grill and transfer to a serving platter. Sprinkle with sesame seeds and chopped cilantro, if using. Serve immediately with ranch or blue cheese dressing on the side.
Extra Tips: To guarantee your wings are perfectly cooked, use a meat thermometer to check that the internal temperature reaches 165°F (75°C). If you prefer a milder version, reduce the amount of sriracha in the marinade.
For an extra crispy texture, consider broiling the wings for a few minutes after grilling. Additionally, you can adjust the sweetness by adding more or less honey according to your taste preference. Enjoy your wings with cold beverages to balance the heat!
Create Grilled Pineapple and Jalapeño Skewers
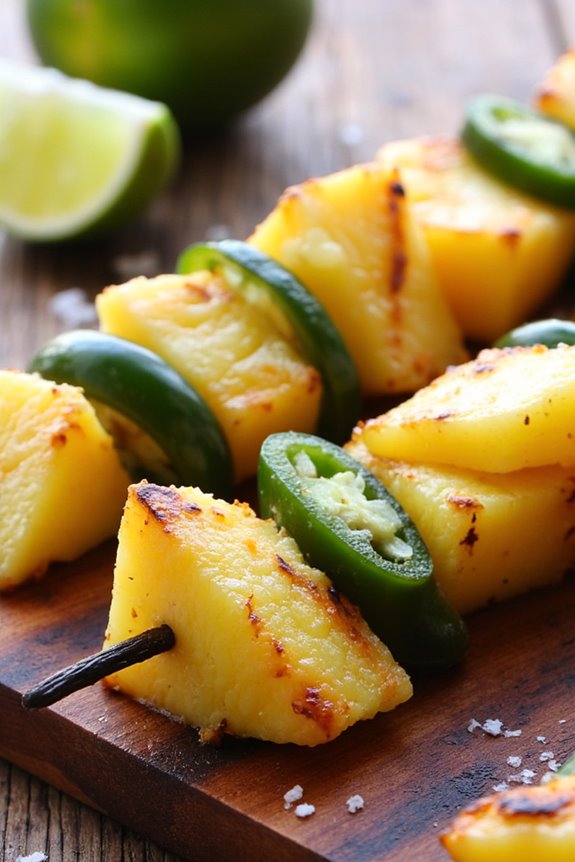
Grilled Pineapple and Jalapeño Skewers offer a tantalizing mix of sweet and spicy flavors, perfect for a summer barbecue. The natural sugars in the pineapple caramelize beautifully on the grill, creating a delightful contrast to the fiery heat of the jalapeño. This dish makes for an excellent appetizer or side dish, and its vibrant colors will add a revitalizing touch to your summer spread.
These skewers aren’t only visually appealing but also incredibly easy to prepare, making them a great choice for both novice and experienced grillers. The combination of juicy pineapple and spicy jalapeños, threaded onto skewers and grilled to perfection, is sure to impress your guests and provide a unique flavor experience. Serve them as a delicious accompaniment to grilled meats or enjoy them on their own as a light, flavorful snack.
Ingredients (serving size: 4-6 people):
- 1 fresh pineapple, peeled, cored, and cut into 1-inch chunks
- 4-5 jalapeño peppers, stemmed and sliced into thick rings
- 2 tablespoons olive oil
- 1 tablespoon honey
- 1 lime, juiced
- Salt, to taste
- Wooden or metal skewers
Cooking Instructions:
- Prepare the Skewers: If using wooden skewers, soak them in water for at least 30 minutes to prevent burning on the grill. This step is essential if you want to guarantee the skewers remain intact while grilling.
- Make the Marinade: In a small bowl, whisk together the olive oil, honey, lime juice, and a pinch of salt. This mixture will enhance the natural flavors of the pineapple and jalapeños and add a subtle sweetness.
- Assemble the Skewers: Thread pieces of pineapple and jalapeño alternately onto the skewers. Aim for a balance of flavors by using about 3-4 pieces of pineapple and 2-3 jalapeño rings per skewer.
- Brush with Marinade: Generously brush the assembled skewers with the prepared marinade, guaranteeing all sides are coated. This will help the flavors meld together as they cook.
- Preheat the Grill: Heat your grill to medium-high. You want a nice, hot surface to caramelize the sugars in the pineapple.
- Grill the Skewers: Place the skewers on the grill and cook for about 8-10 minutes, turning occasionally. Look for grill marks and a slight char on the pineapple, which indicates that they’re perfectly cooked.
- Serve: Remove the skewers from the grill and let them cool slightly before serving. You can serve them directly on the skewers or remove the pieces and arrange them on a platter.
Extra Tips:
To adjust the heat level, you can remove the seeds from the jalapeños before adding them to the skewers, as the seeds contain most of the pepper’s heat. For added flavor, consider sprinkling a pinch of chili powder or cayenne pepper over the skewers before grilling.
If you prefer a sweeter flavor, substitute the honey with brown sugar. Finally, remember to always handle jalapeños with care, washing hands thoroughly after touching them to avoid irritation.
How to Make Smoky Grilled Avocado Cups
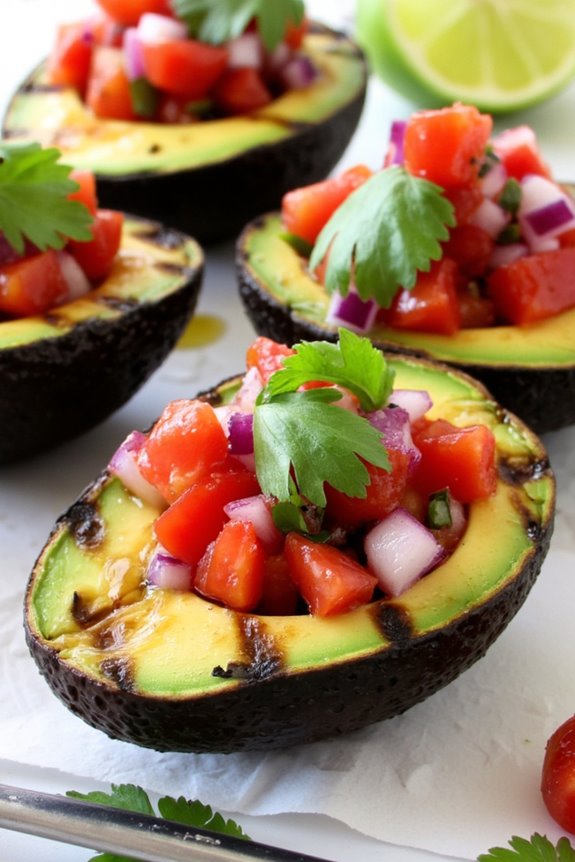
Grilling season is the perfect time to explore new and exciting ways to enjoy fresh produce. One delicious and unique dish to try is Smoky Grilled Avocado Cups. This recipe transforms creamy avocados into a smoky, char-grilled delight, filled with a rejuvenating and tangy salsa. The natural creaminess of avocados is enhanced by the smoky notes from the grill, while the salsa offers a burst of flavor with every bite.
It’s a fantastic appetizer or side dish that will be a hit at any summer gathering. Grilled Avocado Cups aren’t only visually appealing but also packed with nutrients, making them a healthy addition to your barbecue menu. The avocados are rich in healthy fats, and when paired with a fresh salsa made from tomatoes, red onion, cilantro, and lime juice, they deliver both flavor and nutrition.
This dish is simple to prepare and quick to cook, ensuring you spend more time enjoying the company of friends and family than in the kitchen. Let’s get started on creating this delicious dish that serves 4-6 people.
Ingredients:
- 4 ripe avocados
- 1 cup cherry tomatoes, diced
- 1/2 red onion, finely chopped
- 1/4 cup fresh cilantro, chopped
- 1 lime, juiced
- 1 tablespoon olive oil
- Salt and pepper to taste
- Optional: Jalapeño, minced for heat
Cooking Instructions:
- Prepare the Avocados: Cut the avocados in half lengthwise and remove the pits. Using a spoon, gently scoop out some of the flesh to make a cup-like shape, leaving a small border around the edges.
- Make the Salsa: In a mixing bowl, combine the diced cherry tomatoes, chopped red onion, cilantro, lime juice, and olive oil. Add salt and pepper to taste. If you like a bit of heat, include some minced jalapeño. Mix well and set aside.
- Preheat the Grill: Heat your grill to medium-high heat. Lightly brush the cut sides of the avocados with a little olive oil to prevent sticking.
- Grill the Avocados: Place the avocado halves cut side down on the grill. Grill for about 3-4 minutes, or until grill marks appear and the avocados are slightly charred.
- Assemble the Avocado Cups: Remove the avocados from the grill and let them cool slightly. Spoon the prepared salsa into each avocado half, filling the cups generously.
- Serve: Arrange the grilled avocado cups on a platter and serve immediately. Enjoy them as a starter or a delicious side dish.
Extra Tips:
For the best results, choose avocados that are ripe but still firm enough to hold their shape on the grill. If you’re preparing this dish ahead of time, keep the avocados uncut until just before grilling to prevent them from browning.
Experiment with different salsa variations by adding ingredients like corn, black beans, or diced mango for a sweeter twist. Grilled Avocado Cups are versatile and can be customized to suit your taste preferences.
Tangy Citrus-Marinated Chicken Breasts
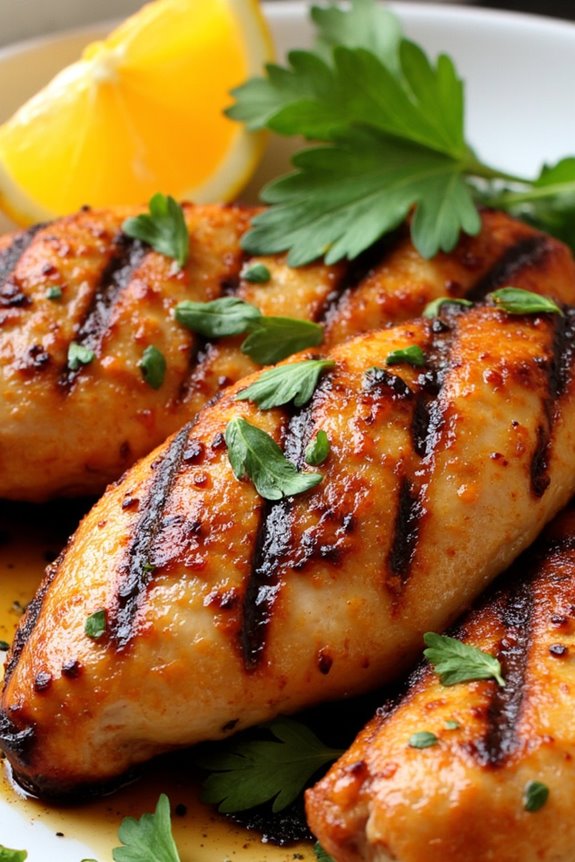
Tangy Citrus-Marinated Chicken Breasts are a delightful dish perfect for any summer grilling occasion. This recipe combines the invigorating flavors of citrus fruits with the savory goodness of grilled chicken, creating a mouthwatering dish that’s both healthy and delicious. The citrus marinade not only tenderizes the chicken breasts but also infuses them with a vibrant and zesty flavor, making them the star of your summer barbecue.
Whether you’re hosting a backyard cookout or simply enjoying a family dinner, these juicy, tangy chicken breasts are sure to impress your guests and loved ones.
The key to this dish is the marinade, which is a harmonious blend of citrus juices, garlic, and herbs that soak into the chicken, providing a burst of flavor in every bite. By marinating the chicken for a few hours, you’ll guarantee that the flavors penetrate deeply, resulting in tender and juicy meat.
Once grilled, the chicken breasts develop a beautiful char, enhancing their flavor and giving them a delectable smoky aroma. Serve these Tangy Citrus-Marinated Chicken Breasts with a side of fresh salad or grilled vegetables for a complete and satisfying meal.
Ingredients (serving size 4-6 people):
- 4-6 boneless, skinless chicken breasts
- 1/2 cup fresh orange juice
- 1/4 cup fresh lemon juice
- 1/4 cup fresh lime juice
- 4 cloves garlic, minced
- 1/4 cup olive oil
- 2 tablespoons honey
- 1 tablespoon soy sauce
- 1 teaspoon ground cumin
- 1 teaspoon smoked paprika
- Salt and pepper to taste
- Fresh cilantro for garnish (optional)
Cooking Instructions:
- Prepare the Marinade: In a medium bowl, whisk together the orange juice, lemon juice, lime juice, minced garlic, olive oil, honey, soy sauce, ground cumin, and smoked paprika until well combined. Season the marinade with salt and pepper to taste.
- Marinate the Chicken: Place the chicken breasts in a resealable plastic bag or a shallow dish. Pour the marinade over the chicken, guaranteeing that each breast is well coated. Seal the bag or cover the dish with plastic wrap. Refrigerate for at least 2 hours, or up to overnight, to allow the flavors to meld.
- Preheat the Grill: Preheat your grill to medium-high heat, approximately 375-400°F (190-200°C). Lightly oil the grill grates to prevent sticking.
- Grill the Chicken: Remove the chicken breasts from the marinade, allowing any excess to drip off. Place the chicken on the preheated grill. Cook for about 6-8 minutes per side, or until the internal temperature reaches 165°F (74°C) and the chicken is cooked through with nice grill marks.
- Rest and Serve: Once cooked, transfer the chicken breasts to a plate and let them rest for 5 minutes. This allows the juices to redistribute within the meat. Garnish with fresh cilantro if desired and serve hot with your choice of sides.
Extra Tips:
For an even more flavorful dish, consider scoring the chicken breasts slightly before marinating to help the marinade penetrate deeper into the meat.
Keep an eye on the grill temperature to prevent the chicken from drying out; indirect heat can be used if the grill is too hot. If you prefer a spicier version, add a pinch of red pepper flakes to the marinade.
Finally, remember to let the chicken rest before serving, as this helps maintain its juiciness. Enjoy your Tangy Citrus-Marinated Chicken Breasts with an invigorating summer beverage for a complete outdoor dining experience.
Craft Grilled Peach and Burrata Salad
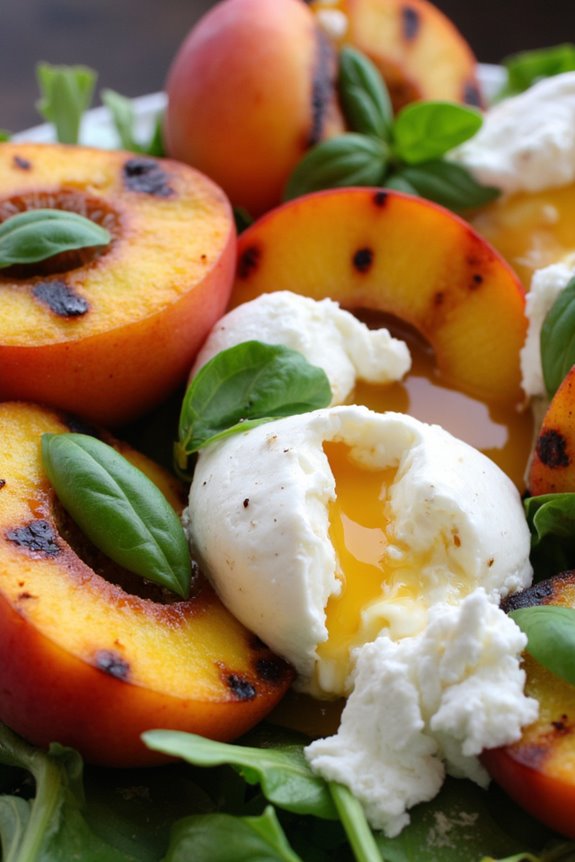
Grilled Peach and Burrata Salad is a delightful and invigorating addition to any summer menu. This dish combines the sweetness of grilled peaches with the creaminess of burrata cheese, creating a flavor profile that’s both sophisticated and satisfying. The grill’s smoky char enhances the natural sugars in the peaches, while the burrata adds a rich, buttery texture. A drizzle of honey and a sprinkle of fresh basil add a fragrant complexity that ties all the elements together beautifully.
Ideal for a warm summer evening, this salad is both simple to prepare and impressive to serve. It can be a standalone dish or a perfect accompaniment to grilled meats or seafood. The vibrant colors and fresh flavors make it not only a feast for the palate but also a visually appealing centerpiece. The recipe below provides all the necessary ingredients and steps to create this stunning dish for a serving size of 4-6 people.
Ingredients:
- 4 ripe peaches, halved and pitted
- 2 tablespoons olive oil
- Salt and pepper to taste
- 2 balls of burrata cheese
- 1/4 cup honey
- Fresh basil leaves, for garnish
- Arugula or mixed greens, optional
Instructions:
- Prepare the Grill: Preheat your grill to medium-high heat. Verify the grates are clean to prevent sticking and achieve those perfect grill marks on the peaches.
- Prepare the Peaches: Brush the cut sides of the peaches with olive oil and season lightly with salt and pepper. This will enhance the peaches’ natural sweetness and create a slight savory balance.
- Grill the Peaches: Place the peaches cut side down on the preheated grill. Cook for about 4-5 minutes, or until grill marks appear and the peaches are slightly softened. Flip them over and grill for an additional 2-3 minutes.
- Assemble the Salad: On a large serving platter or individual plates, arrange the arugula or mixed greens if using. Place the grilled peach halves on top.
- Add the Burrata: Tear the burrata balls and distribute them evenly over the peaches and greens. The creamy interior should slightly ooze over the peaches, enhancing their flavor.
- Finish with Honey and Basil: Drizzle honey over the entire salad, ensuring each component gets a touch of sweetness. Garnish with fresh basil leaves to add a fragrant, herbal note.
Extra Tips:
For the best results, choose peaches that are ripe yet firm to the touch. Overripe peaches may become too mushy when grilled.
If you prefer a more savory twist, consider adding a sprinkle of crushed red pepper flakes or a splash of balsamic glaze.
To make the dish more substantial, you can add prosciutto slices or toasted nuts for additional texture and flavor.
Finally, verify the burrata is at room temperature before serving to enjoy its full, creamy texture.
Enjoy Grilled Watermelon and Feta Bites
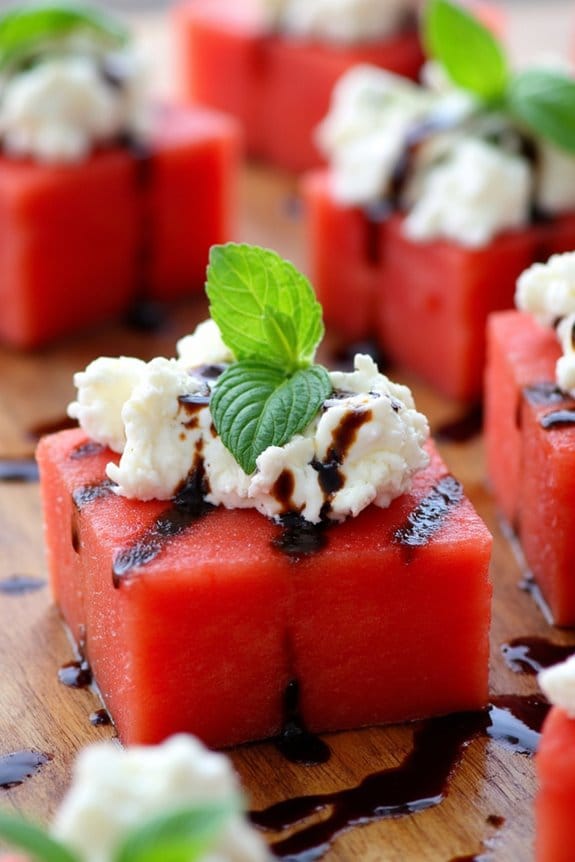
Summer is the perfect time to experiment with fresh, seasonal produce, and what better way to highlight the sweet and invigorating taste of watermelon than by grilling it? Grilled Watermelon and Feta Bites are the perfect combination of sweet, savory, and tangy flavors. The caramelization of the watermelon from the grill brings out its natural sweetness, which pairs wonderfully with the salty feta cheese and a hint of balsamic glaze.
This dish isn’t only a feast for the taste buds but also a visual delight, with vibrant colors that make it a stunning appetizer or side dish for any summer gathering.
Watermelon mightn’t be the first thing that comes to mind when you think of grilling, but the process adds a unique twist to the fruit’s texture and flavor. The grill marks create a slightly smoky taste, while the slight charring enhances its juiciness.
When combined with creamy and crumbly feta cheese, fresh mint, and a drizzle of balsamic reduction, these bites offer a delightful mix of textures and flavors. Perfect for serving 4-6 people, they’re sure to be a hit at your next barbecue or outdoor party.
Ingredients:
- 1 small seedless watermelon
- 8 ounces of feta cheese
- 2 tablespoons of olive oil
- Fresh mint leaves (for garnish)
- Balsamic glaze (for drizzling)
- Salt and pepper to taste
Cooking Instructions:
- Prepare the Watermelon: Cut the watermelon into 1-inch thick slices, then cut each slice into 2-inch squares. This size is perfect for easy grilling and handling.
- Preheat the Grill: Set your grill to medium-high heat. Make sure the grates are clean and lightly oiled to prevent sticking.
- Brush and Season: Brush each watermelon square with olive oil. This not only prevents them from sticking to the grill but also aids in caramelization. Season lightly with salt and pepper.
- Grill the Watermelon: Place the watermelon squares on the grill. Cook for about 2 minutes on each side, or until grill marks appear. Be careful not to overcook, as the watermelon can become mushy.
- Prepare the Feta Cheese: While the watermelon is grilling, cut the feta cheese into small cubes or crumble it if you prefer a more rustic look.
- Assemble the Bites: Once the watermelon is grilled, remove it from the grill and allow it to cool slightly. Top each grilled watermelon square with a piece of feta cheese.
- Garnish and Serve: Drizzle the balsamic glaze over the assembled watermelon and feta bites. Garnish with fresh mint leaves for an added burst of flavor and color. Serve immediately for the best taste experience.
Extra Tips:
To enhance the flavors even more, consider adding a pinch of chili flakes for a hint of spice or using flavored balsamic vinegar for an extra layer of complexity.
If you’re making this dish ahead of time, keep the grilled watermelon and feta separate until just before serving to maintain texture. Additionally, be mindful of the watermelon’s ripeness; overly ripe watermelon can become too soft when grilled.
Enjoy your invigorating Grilled Watermelon and Feta Bites with a chilled summer drink for the ultimate seasonal treat.
Herb-Infused Grilled Portobello Mushrooms
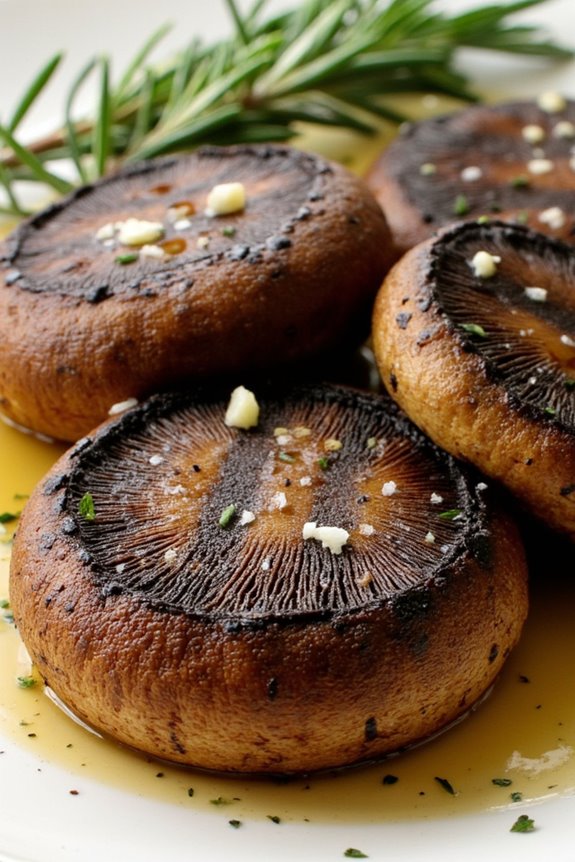
Grilling season is upon us, and it’s the perfect time to explore the savory flavors of Herb-Infused Grilled Portobello Mushrooms. Known for their meaty texture and rich umami taste, portobello mushrooms can be transformed into a delightful and satisfying dish with the right combination of fresh herbs and a touch of garlic.
This vegetarian grilling option isn’t only delicious but also simple to prepare, making it an ideal choice for a summer gathering or a casual weeknight dinner.
The infusion of herbs such as rosemary, thyme, and parsley with a hint of garlic creates an aromatic marinade that enhances the natural flavors of the mushrooms. When grilled to perfection, these mushrooms develop a smoky, charred exterior that contrasts beautifully with their tender, juicy interior.
Whether served as a main course or a flavorful side, Herb-Infused Grilled Portobello Mushrooms are sure to impress both vegetarians and meat-lovers alike.
Ingredients (Serving Size: 4-6 people):
- 6 large portobello mushrooms
- 1/4 cup olive oil
- 2 tablespoons balsamic vinegar
- 3 cloves garlic, minced
- 2 tablespoons fresh rosemary, chopped
- 2 tablespoons fresh thyme, chopped
- 2 tablespoons fresh parsley, chopped
- Salt and pepper to taste
Cooking Instructions:
- Prepare the Marinade: In a bowl, whisk together olive oil, balsamic vinegar, minced garlic, chopped rosemary, thyme, and parsley. Season the mixture with salt and pepper to taste.
- Clean the Mushrooms: Gently wipe the portobello mushrooms with a damp paper towel to remove any dirt. Remove the stems and, if desired, use a spoon to scrape out the gills for a cleaner presentation.
- Marinate the Mushrooms: Place the cleaned mushrooms in a shallow dish. Pour the herb-infused marinade over the mushrooms, making certain they’re well coated. Let them marinate for at least 30 minutes, turning occasionally to guarantee even absorption of flavors.
- Preheat the Grill: While the mushrooms are marinating, preheat your grill to medium-high heat. If using a charcoal grill, make sure the coals are evenly distributed.
- Grill the Mushrooms: Once the grill is hot, place the marinated mushrooms cap-side down directly on the grill grates. Grill for about 5-7 minutes per side, or until the mushrooms are tender and have developed nice grill marks.
- Serve: Remove the mushrooms from the grill and let them rest for a few minutes. Serve them whole as a steak alternative or slice them up as a topping for salads or sandwiches.
Extra Tips:
For an extra burst of flavor, consider adding a sprinkle of crumbled feta or goat cheese on top of the grilled mushrooms just before serving. If you prefer a bit of heat, a pinch of red pepper flakes in the marinade can add a spicy kick.
Additionally, using a grilling basket can help prevent the mushrooms from sticking or falling through the grill grates. Remember, the key to perfect grilled portobello mushrooms isn’t to overcook them, as they can become rubbery if left on the heat for too long.
Enjoy this versatile and flavorful dish at your next summer barbecue!
Zesty Lime and Garlic Shrimp Tacos

Zesty Lime and Garlic Shrimp Tacos are an ideal choice for a summer grilling adventure. This dish combines the fresh and tangy taste of lime with the aromatic kick of garlic, bringing out the natural sweetness of the shrimp. When grilled to perfection, the shrimp develop a slightly charred exterior while remaining juicy on the inside, making them irresistibly delicious.
These tacos are perfect for a casual gathering or a family meal in the backyard, offering a revitalizing and vibrant flavor that captures the essence of summer.
These tacos aren’t just about the shrimp – they’re complemented by a medley of fresh toppings and a zesty lime crema that adds a creamy tang to each bite. The combination of textures and flavors, from the crunchy cabbage to the creamy avocado, creates a satisfying and exciting taco experience.
Serve them with warm corn tortillas to complete the dish, and you have a meal that’s sure to become a favorite for any summer occasion.
Ingredients (Serves 4-6):
- 2 pounds large shrimp, peeled and deveined
- 3 tablespoons olive oil
- 4 cloves garlic, minced
- Zest of 2 limes
- Juice of 3 limes
- 1 teaspoon smoked paprika
- 1 teaspoon ground cumin
- Salt and pepper to taste
- 12-16 corn tortillas
- 2 cups shredded red cabbage
- 1 avocado, sliced
- 1/2 cup chopped fresh cilantro
- 1/4 cup sour cream
- 1 tablespoon mayonnaise
- 1 tablespoon lime juice
- Lime wedges, for serving
Cooking Instructions:
- Prepare the Marinade: In a large bowl, combine olive oil, minced garlic, lime zest, lime juice, smoked paprika, ground cumin, salt, and pepper. Whisk the ingredients together until well-blended.
- Marinate the Shrimp: Add the shrimp to the bowl with the marinade, making sure they’re well-coated. Cover the bowl and refrigerate for at least 30 minutes to allow the flavors to meld.
- Preheat the Grill: Heat your grill to medium-high heat. Lightly oil the grates to prevent sticking.
- Grill the Shrimp: Thread the marinated shrimp onto skewers. Place the skewers on the preheated grill and cook for 2-3 minutes per side, or until the shrimp are opaque and slightly charred. Remove the shrimp from the grill and set aside.
- Warm the Tortillas: While the shrimp are grilling, warm the corn tortillas on the grill for about 30 seconds per side, until soft and pliable.
- Prepare the Lime Crema: In a small bowl, mix together sour cream, mayonnaise, and lime juice until smooth. Adjust seasoning with salt and pepper.
- Assemble the Tacos: For each taco, place a few grilled shrimp on a warm tortilla. Top with shredded cabbage, sliced avocado, and a sprinkle of chopped cilantro. Drizzle with the lime crema.
- Serve: Arrange the tacos on a platter and serve immediately with lime wedges on the side for extra zest.
Extra Tips:
When preparing Zesty Lime and Garlic Shrimp Tacos, remember the shrimp are all of similar size to guarantee even cooking.
If using wooden skewers, soak them in water for at least 30 minutes before threading the shrimp to prevent them from burning on the grill.
Feel free to customize the toppings based on your preference; adding sliced jalapeños or a sprinkle of cotija cheese can add an extra layer of flavor and texture.
Finally, if you prefer a spicier kick, consider adding a pinch of cayenne pepper to the marinade.
Sweet and Spicy Grilled Corn on the Cob
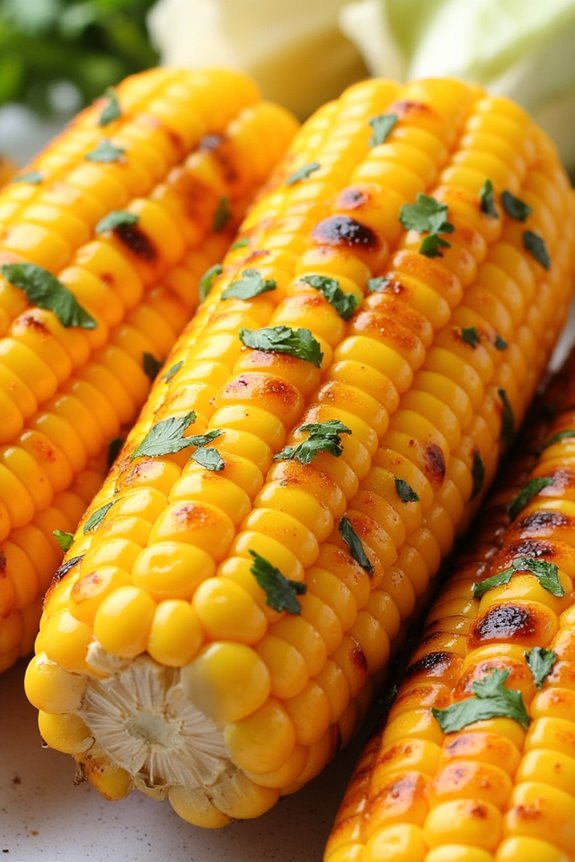
Sweet and Spicy Grilled Corn on the Cob is the perfect addition to your summer grilling menu. This dish combines the natural sweetness of corn with a kick of heat, creating a delightful flavor profile that will impress your family and guests.
Grilling the corn enhances its natural sugars and adds a smoky flavor that pairs beautifully with the sweet and spicy glaze. Whether you’re hosting a barbecue or simply enjoying a meal outdoors, this recipe is sure to be a hit.
This recipe is designed to serve 4-6 people, making it an ideal side dish for a small gathering. The glaze is a simple yet flavorful mix of honey, chili powder, and lime juice, which caramelizes beautifully on the grill.
With just a few ingredients and a little bit of time, you can transform ordinary corn on the cob into a standout dish that complements any grilled meat or vegetarian main course.
Ingredients (Serving Size: 4-6 people):
- 6 ears of corn, husked
- 1/4 cup honey
- 2 tablespoons unsalted butter, melted
- 1 teaspoon chili powder
- 1 teaspoon smoked paprika
- 1/2 teaspoon salt
- 1/4 teaspoon cayenne pepper (optional, for extra heat)
- 1 lime, juiced
- 2 tablespoons finely chopped cilantro (optional, for garnish)
Cooking Instructions:
- Prep the Corn: Begin by preheating your grill to medium-high heat. While the grill is heating, husk the corn and remove all silk strands. Rinse the corn under cold water and pat dry with a clean towel.
- Make the Glaze: In a small bowl, combine the honey, melted butter, chili powder, smoked paprika, salt, cayenne pepper (if using), and lime juice. Whisk until all ingredients are fully incorporated and the glaze is smooth.
- Grill the Corn: Place the corn directly on the grill grates. Close the lid and grill for about 10-12 minutes, turning occasionally. You want the corn to develop some char and become tender.
- Apply the Glaze: During the last few minutes of grilling, brush the glaze generously over the corn. Allow the glaze to caramelize slightly on the corn, which will take about 2 minutes per side. Keep turning the corn to prevent burning.
- Serve: Once the corn is grilled to your liking and the glaze is caramelized, remove it from the grill. Sprinkle with chopped cilantro if desired and serve immediately while hot.
Extra Tips:
For best results, choose fresh, sweet corn that’s in season. If you prefer a milder spice level, you can adjust the amount of chili powder and cayenne pepper to suit your taste.
Additionally, soaking the corn in water for 15 minutes before grilling can help prevent it from drying out and can enhance the grilling process. If you don’t have access to a grill, you can achieve similar results using a grill pan on the stovetop.
Enjoy your Sweet and Spicy Grilled Corn on the Cob as a delicious side or snack this summer!
Charred Vegetable and Pesto Flatbreads
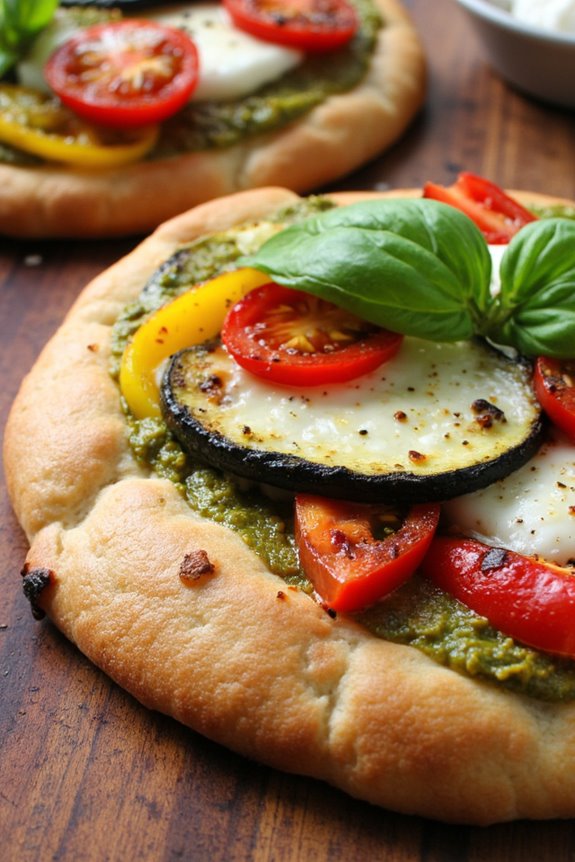
Summer is the perfect season to experiment with fresh and vibrant flavors on the grill, and Charred Vegetable and Pesto Flatbreads are a delightful way to do just that. This dish combines the smoky taste of grilled vegetables with the rich, herby aroma of pesto, all atop a crispy flatbread base.
It’s a simple yet flavorful option for a summer gathering or a light dinner, offering a perfect balance of textures and tastes that will leave everyone asking for more.
The beauty of this recipe lies in its versatility. You can use whichever vegetables you have on hand or prefer, making it a great way to utilize seasonal produce. The charred vegetables add a wonderful depth of flavor, while the pesto provides a fragrant and savory backdrop that complements the freshness of the vegetables.
Whether you’re a seasoned cook or a grilling novice, these flatbreads are a breeze to prepare and are sure to impress your guests.
Ingredients for Serving Size of 4-6 People:
- 4 flatbreads or naan
- 1 cup basil pesto
- 1 red bell pepper, sliced
- 1 yellow bell pepper, sliced
- 1 zucchini, sliced
- 1 red onion, sliced
- 8 oz cherry tomatoes, halved
- 1 cup mozzarella cheese, shredded
- Olive oil
- Salt and pepper
- Fresh basil leaves for garnish
Cooking Instructions:
- Prepare the Grill: Preheat your grill to medium-high heat. Confirm the grates are clean to prevent the flatbreads from sticking.
- Prepare the Vegetables: In a large bowl, toss the sliced bell peppers, zucchini, red onion, and cherry tomatoes with a drizzle of olive oil, salt, and pepper until evenly coated.
- Grill the Vegetables: Place the vegetables on the grill, turning occasionally, until they’re charred and tender. This should take about 8-10 minutes. Once done, remove them from the grill and set aside.
- Assemble the Flatbreads: Spread a generous layer of basil pesto over each flatbread. Arrange the grilled vegetables evenly over the pesto layer. Scatter the shredded mozzarella cheese on top.
- Grill the Flatbreads: Place the assembled flatbreads on the grill. Close the lid and cook for 5-7 minutes, or until the flatbreads are crispy and the cheese is melted and bubbly.
- Serve: Remove the flatbreads from the grill and let them cool for a couple of minutes. Garnish with fresh basil leaves before slicing into pieces. Serve warm.
Extra Tips:
For an extra burst of flavor, consider adding a drizzle of balsamic glaze over the top of the flatbreads before serving. Additionally, you can experiment with different types of cheese, such as goat cheese or feta, for a unique twist.
If you don’t have a grill, you can use a grill pan or even bake the flatbreads in the oven. Just make sure to keep an eye on them to achieve the desired crispness. Enjoy these flatbreads with a side salad or as a standalone dish for a satisfying summer meal.
Maple-Balsamic Grilled Pork Chops
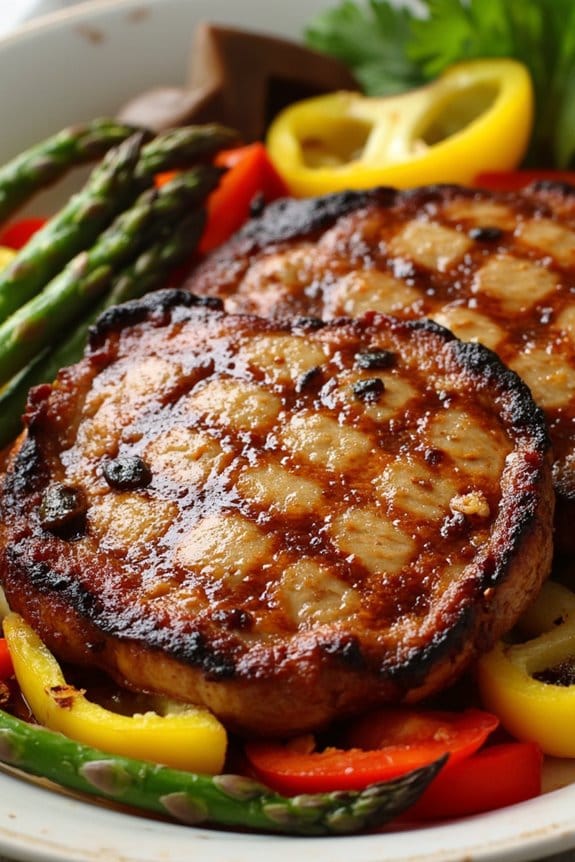
Maple-Balsamic Grilled Pork Chops are a delectable option for your summer grilling menu. The combination of sweet maple syrup and tangy balsamic vinegar creates a glaze that caramelizes beautifully on the grill, infusing the pork chops with rich, savory flavors.
This dish isn’t only easy to prepare, but it also impresses with its sophisticated taste, making it perfect for both casual family dinners and backyard gatherings.
To achieve the perfect Maple-Balsamic Grilled Pork Chops, it’s important to start with high-quality, thick-cut pork chops. The thickness guarantees that the meat remains juicy and tender through the grilling process. Marinating the chops in the maple-balsamic mixture for at least a couple of hours allows the flavors to penetrate the meat, resulting in a more robust taste.
This recipe serves 4-6 people, making it ideal for a small summer get-together.
Ingredients (serving size: 4-6 people):
- 4-6 thick-cut pork chops (about 1 inch thick)
- 1/2 cup maple syrup
- 1/4 cup balsamic vinegar
- 2 tablespoons olive oil
- 3 cloves garlic, minced
- 1 tablespoon Dijon mustard
- 1 teaspoon dried thyme
- Salt and pepper to taste
Cooking Instructions:
- Prepare the Marinade: In a medium-sized bowl, whisk together the maple syrup, balsamic vinegar, olive oil, minced garlic, Dijon mustard, dried thyme, salt, and pepper until well combined.
- Marinate the Pork Chops: Place the pork chops in a large resealable plastic bag or shallow dish. Pour the marinade over the pork chops, making sure they’re completely coated. Seal the bag or cover the dish, and refrigerate for at least 2 hours, or overnight for more intense flavor.
- Preheat the Grill: About 30 minutes before grilling, remove the pork chops from the refrigerator to allow them to come to room temperature. Preheat your grill to medium-high heat.
- Grill the Pork Chops: Remove the pork chops from the marinade, allowing any excess to drip off. Place them on the grill and cook for 4-5 minutes per side, or until the internal temperature reaches 145°F (63°C). Baste occasionally with the remaining marinade during grilling for extra flavor.
- Rest and Serve: Once cooked, remove the pork chops from the grill and let them rest for 5 minutes before serving. This resting period helps the juices redistribute throughout the meat, making sure every bite is moist and flavorful.
Extra Tips: When grilling pork chops, it’s essential not to overcook them, as they can quickly become dry. Using a meat thermometer is an effective way to verify they’re cooked to perfection.
Additionally, if you prefer a smokier flavor, consider adding soaked wood chips to the grill. For a complete meal, serve the pork chops with grilled vegetables or a fresh summer salad. Enjoy your delicious Maple-Balsamic Grilled Pork Chops with family and friends!