

Grilling is my go-to for quick and flavorful dinners, especially during those inviting summer evenings. Picture zesty lemon garlic chicken sizzling on the grill, its aroma filling the air. Smoky ribeye steaks seared to perfection are a treat, but it’s not just about the meats. Vibrant veggies and sweet grilled peaches can transform any meal. Each recipe is a promise of delicious simplicity, with plenty more to discover that will elevate your grilling game.
Grilling Basics for Beginners
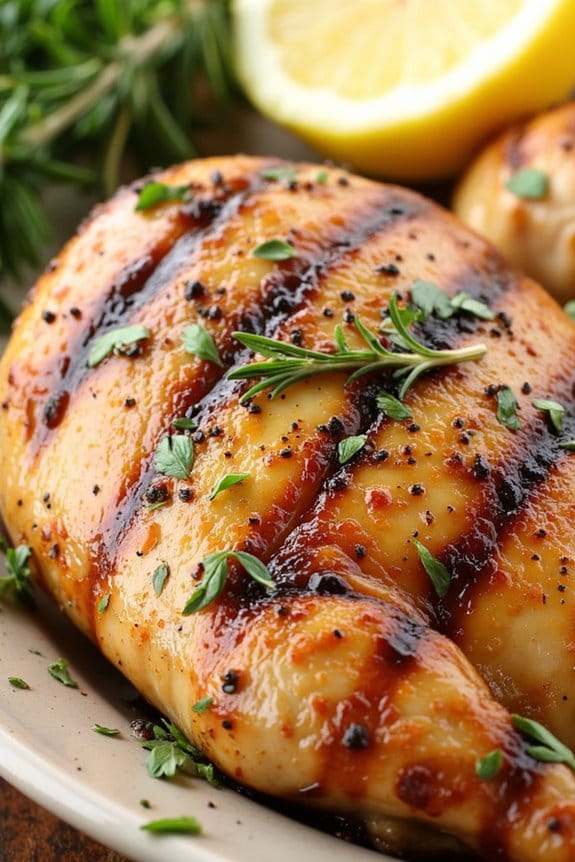
Grilled Lemon Herb Chicken is a simple yet flavorful dish perfect for beginners looking to get comfortable with grilling. This dish combines the tanginess of lemon with the aromatic notes of fresh herbs, creating a delightful blend that complements the juicy tenderness of the chicken.
Whether you’re hosting a backyard BBQ or simply cooking dinner for the family, this recipe is sure to impress and satisfy everyone at the table.
The beauty of this recipe lies in its simplicity and the fresh ingredients that elevate the natural flavors of the chicken. Marinating the chicken with lemon, garlic, and a variety of herbs infuses it with a vibrant taste, while grilling adds a smoky depth to the dish.
With just a few basic grilling techniques, even novice cooks can achieve perfectly cooked, juicy chicken with a crispy, flavorful exterior.
Ingredients (Serves 4-6 people):
- 4-6 boneless, skinless chicken breasts
- 1/4 cup olive oil
- Juice of 2 lemons
- Zest of 1 lemon
- 3 cloves garlic, minced
- 1 tablespoon fresh rosemary, chopped
- 1 tablespoon fresh thyme, chopped
- 1 tablespoon fresh parsley, chopped
- Salt and pepper to taste
Cooking Instructions:
1. Prepare the Marinade: In a medium-sized bowl, combine the olive oil, lemon juice, lemon zest, minced garlic, chopped rosemary, thyme, and parsley. Mix well to guarantee all the ingredients are fully integrated.
2. Marinate the Chicken: Place the chicken breasts in a shallow dish or a resealable plastic bag. Pour the marinade over the chicken, ensuring each piece is well coated. Cover the dish or seal the bag and refrigerate for at least 30 minutes, or up to 2 hours for a more intense flavor.
3. Preheat the Grill: While the chicken is marinating, preheat your grill to medium-high heat. If using a charcoal grill, ensure the coals are evenly distributed and have a gray ash coating.
4. Grill the Chicken: Remove the chicken from the marinade and let any excess drip off. Season each piece with salt and pepper. Place the chicken on the grill grates over direct heat. Grill for 6-7 minutes on each side, or until the internal temperature reaches 165°F (75°C).
Avoid pressing down on the chicken to help retain its juices.
5. Rest and Serve: Once cooked, remove the chicken from the grill and let it rest on a plate for about 5 minutes. This allows the juices to redistribute throughout the meat. Slice the chicken and serve it hot, garnished with additional fresh herbs if desired.
Extra Tips:
To guarantee even cooking, try to select chicken breasts that are similar in size and thickness. If needed, you can also pound the chicken breasts to an even thickness before marinating.
Additionally, for extra flavor, reserve some of the marinade (before adding the chicken) to use as a basting liquid while grilling. This will enhance the flavor and keep the chicken moist.
Always remember to clean your grill grates before and after cooking to maintain a smooth cooking surface and prevent sticking.
Lemon Garlic Chicken Breasts on the Grill
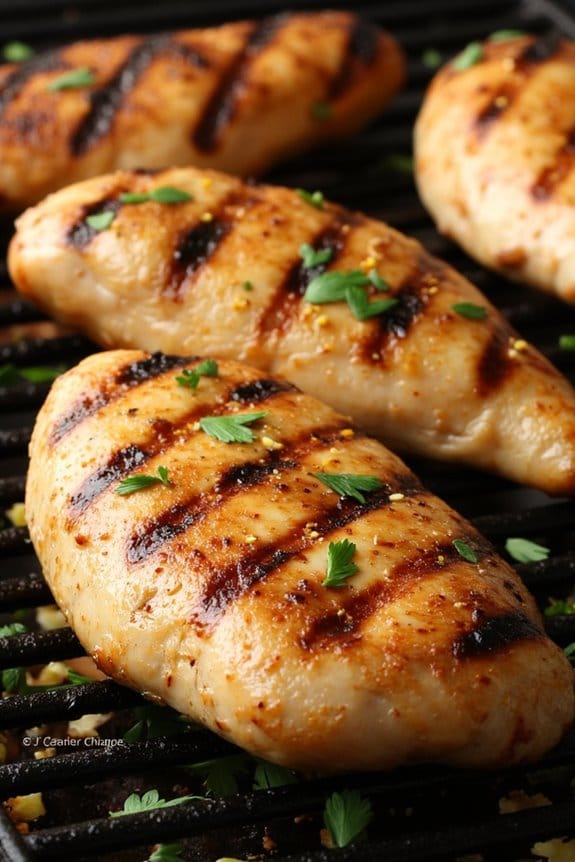
Lemon Garlic Chicken Breasts on the Grill is a simple yet flavorful dish that’s perfect for a quick dinner or a backyard barbecue. This recipe highlights the bright, zesty flavors of lemon and garlic, which complement the juicy, tender chicken breasts beautifully. Perfect for serving a family of 4-6 people, this dish is sure to become a favorite staple in your weekly meal planning.
With just a few ingredients and minimal prep time, you can create a delicious meal that’s both healthy and satisfying. Grilling the chicken adds an extra dimension of smoky flavor that pairs wonderfully with the fresh lemon and aromatic garlic. The marination process allows the chicken to absorb all the delicious flavors, guaranteeing every bite is packed with taste.
Whether you’re an experienced grill master or a beginner, this recipe is straightforward and easy to follow. Gather your ingredients, fire up the grill, and enjoy the delightful experience of Lemon Garlic Chicken Breasts on the Grill.
Ingredients (Serves 4-6):
- 4-6 boneless, skinless chicken breasts
- 1/4 cup olive oil
- 1/4 cup fresh lemon juice
- Zest of 1 lemon
- 4 cloves garlic, minced
- 1 teaspoon dried oregano
- Salt and pepper to taste
- Fresh parsley for garnish (optional)
Cooking Instructions:
- Prepare the Marinade: In a small bowl, combine the olive oil, lemon juice, lemon zest, minced garlic, dried oregano, salt, and pepper. Mix well to create a flavorful marinade.
- Marinate the Chicken: Place the chicken breasts in a large resealable plastic bag or a shallow dish. Pour the marinade over the chicken, guaranteeing each piece is well coated. Seal the bag or cover the dish with plastic wrap. Refrigerate for at least 30 minutes, preferably 1-2 hours, to allow the flavors to infuse.
- Preheat the Grill: Preheat your grill to medium-high heat. If using a charcoal grill, arrange the coals for direct grilling.
- Grill the Chicken: Remove the chicken from the marinade and let any excess drip off. Place the chicken breasts on the grill. Cook for about 6-7 minutes on each side, or until the internal temperature reaches 165°F (75°C) and the chicken is nicely charred and cooked through.
- Rest and Serve: Once cooked, remove the chicken from the grill and let it rest for a few minutes to allow the juices to redistribute. Garnish with fresh parsley if desired, and serve immediately.
Extra Tips:
For even more flavor, consider adding a pinch of red pepper flakes to the marinade for a subtle kick. If you’re using thicker chicken breasts, consider pounding them to an even thickness to guarantee they cook evenly on the grill.
Always use a meat thermometer to check for doneness to avoid overcooking. Finally, if you prefer a more intense lemon flavor, you can add extra lemon zest or even a splash of lemon juice just before serving. Enjoy your delicious Lemon Garlic Chicken Breasts on the Grill with a side of grilled vegetables or a fresh salad for a complete meal.
How to Perfectly Sear Ribeye Steaks
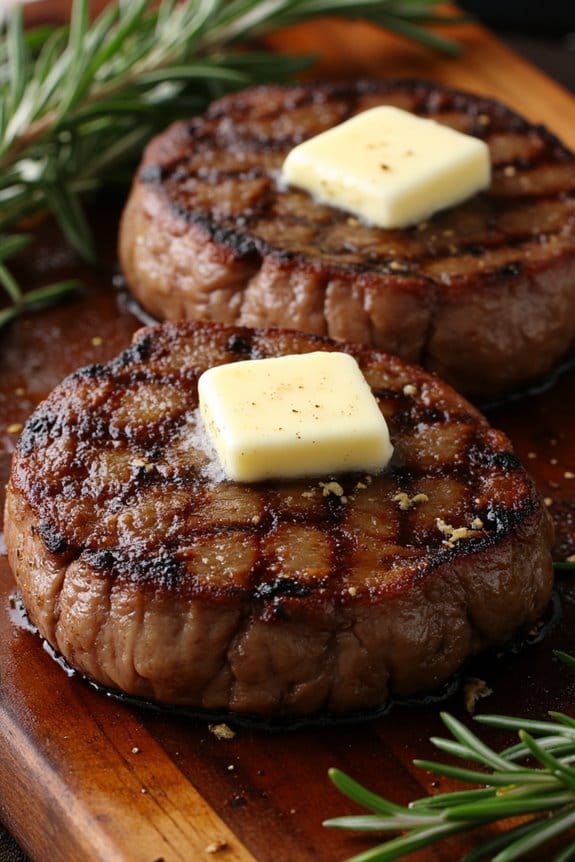
Ribeye steaks are known for their rich marbling and robust flavor, making them a popular choice for grilling enthusiasts. Perfectly searing a ribeye steak to achieve a caramelized crust while keeping the inside juicy requires a few essential techniques.
Begin by ensuring your steaks are at room temperature before cooking, as this helps them cook more evenly. A hot grill, combined with a simple seasoning of salt and pepper, is all you need to enhance the natural flavors of this premium cut.
Whether you’re grilling for a family dinner or a small gathering, the key to achieving a mouthwatering ribeye steak lies in the preparation and timing. Investing in a meat thermometer can make a significant difference, ensuring you reach the desired level of doneness.
Pair your perfectly seared ribeye steaks with your favorite sides, such as grilled vegetables or a fresh salad, to create a memorable meal.
Ingredients for 4-6 People:
- 4 ribeye steaks (approximately 1.5 inches thick)
- 2 tablespoons olive oil
- Salt
- Freshly ground black pepper
- 2 tablespoons unsalted butter
- 4 cloves garlic, minced
- Fresh rosemary or thyme sprigs (optional)
Cooking Instructions:
- Preparation: Remove the ribeye steaks from the refrigerator and let them sit at room temperature for at least 30 minutes. Pat them dry with paper towels to remove excess moisture, which helps in achieving a good sear.
- Seasoning: Rub each steak with olive oil, then generously season both sides with salt and freshly ground black pepper. This simple seasoning allows the natural flavors of the ribeye to shine.
- Preheat the Grill: Preheat your grill to high heat, approximately 450°F to 500°F. A hot grill is essential for creating a perfect sear.
- Searing the Steaks: Place the steaks on the grill and let them sear for about 4-5 minutes on each side. Avoid moving them too much, as this can prevent the formation of a good crust.
- Adding Flavor: During the final minute of grilling, add a pat of butter on top of each steak and sprinkle the minced garlic over them. If using, add rosemary or thyme sprigs for an aromatic touch.
- Checking Doneness: Use a meat thermometer to check the internal temperature of the steaks. For medium-rare, aim for 130°F; for medium, 140°F. Adjust your cooking time based on your preferred level of doneness.
- Resting the Steaks: Remove the steaks from the grill and let them rest for 5-10 minutes. Resting allows the juices to redistribute, resulting in a juicier steak.
- Serving: Slice the steaks against the grain and serve immediately with your chosen side dishes.
Extra Tips:
For the best results, choose ribeye steaks with good marbling, as this fat content contributes to the flavor and juiciness.
If you prefer a more charred exterior, consider using a cast-iron skillet on the grill to achieve an even crust. Additionally, using a digital meat thermometer can help avoid overcooking or undercooking the steaks, ensuring that each one is perfectly cooked to your liking.
Finally, always remember to let the steaks rest before slicing, as this step is vital for maintaining the tenderness and flavor of your ribeye.
Quick and Easy Shrimp Skewers on the Grill
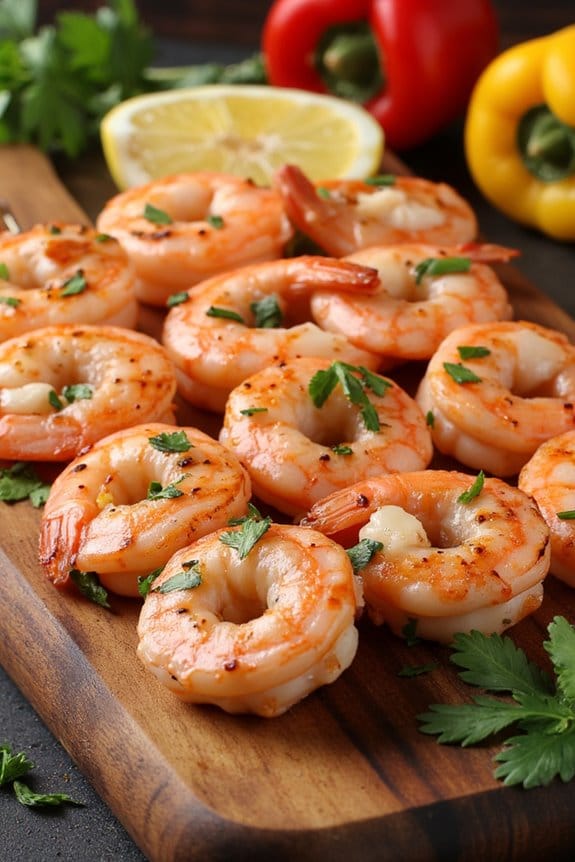
Grilling is a fantastic way to enjoy a delicious and healthy dinner with minimal effort, and shrimp skewers are a perfect example of just how easy and tasty grilled food can be. Shrimp cook quickly and absorb flavors beautifully, making them an ideal choice for a quick meal.
Whether you’re hosting a summer barbecue or just want a quick weeknight dinner, shrimp skewers offer a delightful combination of smoky, savory flavors with a touch of freshness from herbs and lemon. Plus, they’re easy to customize with your favorite spices and marinades.
This recipe for Quick and Easy Shrimp Skewers on the Grill is designed to serve 4-6 people and takes less than 30 minutes from start to finish. The shrimp are marinated briefly to infuse them with flavor, then threaded onto skewers and grilled to perfection. Pair these skewers with a simple side salad or some grilled vegetables for a satisfying meal that everyone will love.
Ingredients (serves 4-6):
- 2 pounds large shrimp, peeled and deveined
- 3 tablespoons olive oil
- 2 tablespoons fresh lemon juice
- 3 cloves garlic, minced
- 1 tablespoon fresh parsley, chopped
- 1 teaspoon smoked paprika
- 1/2 teaspoon salt
- 1/4 teaspoon black pepper
- Lemon wedges for serving
- Skewers (if using bamboo skewers, soak in water for 30 minutes prior)
Cooking Instructions:
- Prepare the Marinade: In a large bowl, whisk together olive oil, lemon juice, minced garlic, chopped parsley, smoked paprika, salt, and black pepper. Make certain the mixture is well combined.
- Marinate the Shrimp: Add the peeled and deveined shrimp to the marinade, making sure each shrimp is well-coated. Cover the bowl and let the shrimp marinate in the refrigerator for about 15 minutes. This will allow the flavors to meld but be careful not to marinate too long as the acid from the lemon juice can start to “cook” the shrimp.
- Preheat the Grill: While the shrimp are marinating, preheat your grill to medium-high heat. Make sure the grates are clean and lightly oiled to prevent sticking.
- Thread the Shrimp onto Skewers: Once marinated, thread the shrimp onto skewers. You can fit about 4-5 shrimp per skewer, depending on their size. Be sure to leave a little space between each shrimp for even cooking.
- Grill the Shrimp: Place the shrimp skewers on the preheated grill. Cook for about 2-3 minutes on each side, or until the shrimp are pink and opaque. Be careful not to overcook, as shrimp can become tough and rubbery.
- Serve: Remove the skewers from the grill and serve immediately with fresh lemon wedges on the side for squeezing over the shrimp.
Extra Tips:
To enhance the flavor of your shrimp skewers, consider adding vegetables such as bell peppers, cherry tomatoes, or zucchini slices to the skewers. This not only adds color but also complements the flavors of the shrimp beautifully.
If you’re using metal skewers, there’s no need to soak them like bamboo skewers, saving you a step. Also, when grilling, make sure to keep an eye on the shrimp as they cook very quickly; grilling them just until they turn pink will ensure they remain juicy and tender. Enjoy your meal with a cold beverage for the perfect grilling experience!
Creating a Flavor-Packed Grilled Vegetable Medley

Grilling vegetables is a fantastic way to bring out their natural sweetness and enhance their flavors with a hint of smokiness. A grilled vegetable medley isn’t only a vibrant addition to any meal but also a healthy and satisfying dish that can stand alone or complement your favorite grilled proteins. This recipe combines a colorful array of seasonal vegetables with a simple marinade to create a flavor-packed side dish or main course that will delight both vegetarians and meat-lovers alike.
This grilled vegetable medley is perfect for serving 4-6 people, making it an ideal choice for family dinners or small gatherings. The key to a successful medley is choosing fresh, high-quality vegetables and cutting them into uniform sizes to guarantee even cooking. The marinade, made from a blend of olive oil, balsamic vinegar, garlic, and herbs, infuses the vegetables with a rich, savory flavor while keeping them moist and tender.
Ingredients:
- 2 medium zucchini, sliced into thick rounds
- 2 red bell peppers, deseeded and cut into large chunks
- 1 large red onion, peeled and cut into wedges
- 1 pint cherry tomatoes
- 8 oz baby bella mushrooms, cleaned and halved
- 2 tablespoons olive oil
- 2 tablespoons balsamic vinegar
- 3 cloves garlic, minced
- 1 teaspoon dried oregano
- 1 teaspoon dried thyme
- Salt and freshly ground black pepper to taste
- Fresh basil leaves for garnish (optional)
Cooking Instructions:
- Prepare the Vegetables: Wash all the vegetables thoroughly. Slice the zucchini into thick rounds, cut the bell peppers into large chunks, wedge the onion, halve the cherry tomatoes, and clean and halve the mushrooms. Confirm all pieces are roughly the same size for even cooking.
- Make the Marinade: In a large mixing bowl, combine olive oil, balsamic vinegar, minced garlic, oregano, thyme, salt, and pepper. Whisk the ingredients together until well-blended.
- Marinate the Vegetables: Place all the prepared vegetables into the bowl with the marinade. Toss them gently to confirm each piece is evenly coated. Allow the vegetables to marinate for at least 15-30 minutes for the flavors to meld.
- Preheat the Grill: While the vegetables are marinating, preheat your grill to medium-high heat. If using a charcoal grill, confirm the coals are evenly distributed and covered with a light layer of ash.
- Grill the Vegetables: Once the grill is ready, place the vegetables on the grill grates using a grill basket or skewers to prevent them from falling through. Grill the vegetables for about 10-12 minutes, turning occasionally, until they’re tender and have nice grill marks.
- Serve: Remove the vegetables from the grill and transfer them to a serving platter. Garnish with fresh basil leaves if desired. Serve immediately as a side dish or as a main course with your choice of protein.
Extra Tips:
For the best results, always grill vegetables over a medium-high heat to achieve a nice char without burning them. If you’re using wooden skewers for grilling, remember to soak them in water for at least 30 minutes beforehand to prevent them from catching fire.
Additionally, feel free to experiment with different types of vegetables based on what’s in season or what you have on hand, such as asparagus, eggplant, or corn. This dish can also be made ahead of time; simply grill the vegetables and store them in the refrigerator. When ready to serve, reheat them on the grill or in a warm oven.
Juicy BBQ Pork Chops With a Twist

Juicy BBQ Pork Chops With a Twist are perfect for an easy dinner that will impress your family and friends. This recipe takes classic BBQ pork chops and gives them a unique flavor twist with a special marinade and a hint of spice. The pork chops are marinated to perfection, guaranteeing they’re tender and packed with flavor, then grilled to achieve a beautiful char that complements the juicy interior.
Whether you’re hosting a summer barbecue or simply want to enjoy a delicious dinner at home, these pork chops are sure to be a hit.
The twist in this recipe comes from a zesty marinade that combines traditional BBQ flavors with a hint of sweetness and a touch of heat. This combination not only enhances the natural flavors of the pork but also creates a delightful contrast with the smoky char from the grill.
For a complete meal, serve these pork chops with your favorite sides such as grilled vegetables, a fresh salad, or some creamy mashed potatoes. With simple ingredients and straightforward instructions, this recipe is a surefire way to elevate your grilling game.
Ingredients (for 4-6 servings):
- 4-6 pork chops (bone-in or boneless, about 1 inch thick)
- 1/2 cup BBQ sauce
- 1/4 cup soy sauce
- 1/4 cup honey
- 2 tablespoons apple cider vinegar
- 2 teaspoons smoked paprika
- 1 teaspoon garlic powder
- 1 teaspoon onion powder
- 1/2 teaspoon cayenne pepper (optional for heat)
- Salt and pepper to taste
- Olive oil for grilling
Cooking Instructions:
- Prepare the Marinade:
- In a medium-sized bowl, combine the BBQ sauce, soy sauce, honey, apple cider vinegar, smoked paprika, garlic powder, onion powder, and cayenne pepper. Mix well until all ingredients are fully incorporated.
- Marinate the Pork Chops:
- Place the pork chops in a large resealable plastic bag or a shallow dish. Pour the marinade over the pork chops, guaranteeing they’re well coated. Seal the bag or cover the dish with plastic wrap, and refrigerate for at least 1 hour, or up to 8 hours for maximum flavor.
- Preheat the Grill:
- Preheat your grill to medium-high heat. Brush the grill grates with olive oil to prevent the pork chops from sticking.
- Grill the Pork Chops:
- Remove the pork chops from the marinade, allowing any excess to drip off. Season both sides of the chops with salt and pepper. Place the chops on the preheated grill and cook for 4-5 minutes per side, or until the internal temperature reaches 145°F (63°C). Adjust cooking time as needed based on the thickness of the chops.
- Rest the Pork Chops:
- Once cooked, transfer the pork chops to a plate and let them rest for 5 minutes. This allows the juices to redistribute, guaranteeing the chops remain juicy.
- Serve:
- Serve the juicy BBQ pork chops hot, garnished with extra BBQ sauce if desired. Pair with your choice of sides for a complete meal.
Extra Tips:
To guarantee even cooking, try to select pork chops that are of similar size and thickness. If you’re using a charcoal grill, allow the coals to become white-hot before placing the chops on the grill for ideal heat.
Additionally, if you prefer a smokier flavor, consider adding wood chips to the grill. Always use a meat thermometer to check for doneness, as this will prevent overcooking and guarantee the pork chops are juicy and tender. Enjoy experimenting with different BBQ sauces and spices to find your perfect flavor combination!
Quick Zesty Grilled Fish Tacos
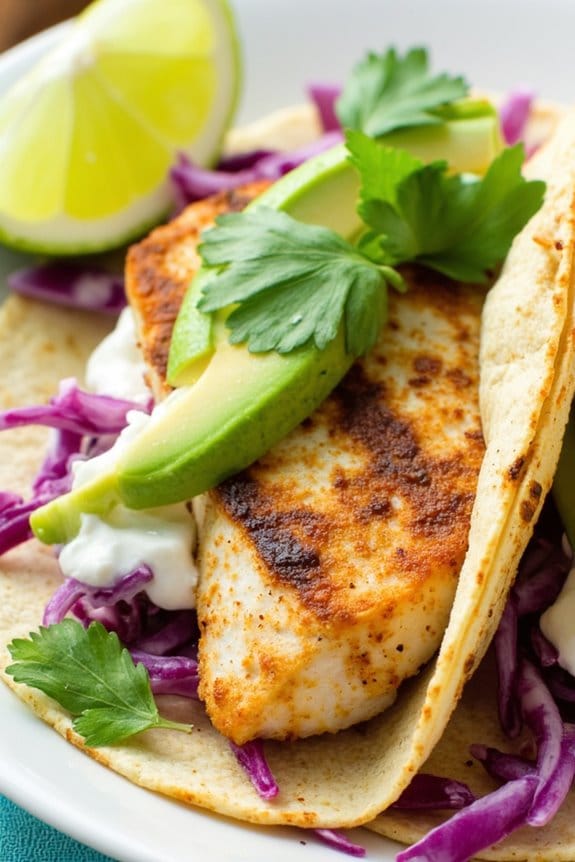
Looking for a delicious and easy dinner option that brings a burst of flavor to your table? Quick Zesty Grilled Fish Tacos are the perfect choice for a fresh and light meal that’s both satisfying and incredibly simple to prepare.
These tacos feature tender, perfectly grilled fish seasoned with a zesty marinade, nestled in warm tortillas, and topped with a fresh, tangy slaw. Ideal for a weeknight dinner or a casual gathering with friends, these tacos are sure to impress anyone who takes a bite.
What makes these fish tacos stand out is their balance of flavors – the combination of citrusy lime, aromatic spices, and the smoky char from the grill melds beautifully with the fresh crunch of cabbage and creamy avocado. The recipe is designed to serve 4-6 people, making it a great choice for family meals or small get-togethers.
With just a few simple ingredients and minimal cooking time, you can create a dish that feels like a special treat without the hassle of complex preparation.
Ingredients (Serves 4-6):
- 1 1/2 pounds white fish fillets (such as tilapia or cod)
- 2 tablespoons olive oil
- 2 tablespoons lime juice
- 1 teaspoon lime zest
- 2 cloves garlic, minced
- 1 teaspoon ground cumin
- 1 teaspoon smoked paprika
- Salt and pepper to taste
- 8-12 corn tortillas
- 2 cups shredded cabbage
- 1/2 cup fresh cilantro, chopped
- 1 avocado, sliced
- Lime wedges for serving
Cooking Instructions:
- Prepare the Marinade: In a small bowl, combine olive oil, lime juice, lime zest, minced garlic, ground cumin, smoked paprika, salt, and pepper. Stir until the ingredients are well mixed.
- Marinate the Fish: Place the fish fillets in a shallow dish and pour the marinade over them, ensuring they’re well coated. Cover the dish and let the fish marinate in the refrigerator for at least 15 minutes, or up to 1 hour for more intense flavor.
- Preheat the Grill: While the fish is marinating, preheat your grill to medium-high heat. Make sure the grates are clean and lightly oiled to prevent sticking.
- Grill the Fish: Once the grill is hot, place the marinated fish fillets on the grill. Cook for about 3-4 minutes on each side, or until the fish is opaque and flakes easily with a fork. Remove from the grill and let rest for a few minutes before cutting into bite-sized pieces.
- Warm the Tortillas: While the fish is resting, warm the tortillas on the grill for about 20-30 seconds on each side, until they’re pliable and slightly charred.
- Assemble the Tacos: To assemble, place a portion of grilled fish in each tortilla, top with shredded cabbage, a sprinkle of fresh cilantro, and a few slices of avocado. Serve with lime wedges on the side for squeezing over the tacos.
Extra Tips:
For an extra kick, consider adding a spicy mayo or a drizzle of hot sauce to your tacos. You can also experiment with different toppings such as pickled onions or jalapeños for added flavor and texture.
If you don’t have access to a grill, a grill pan or broiler can be a suitable alternative. Make sure to monitor the fish closely to prevent overcooking, as it can quickly go from perfectly flaky to dry.
Enjoy your Quick Zesty Grilled Fish Tacos with a side of rice or beans for a complete meal.
Smoky Grilled Portobello Mushrooms
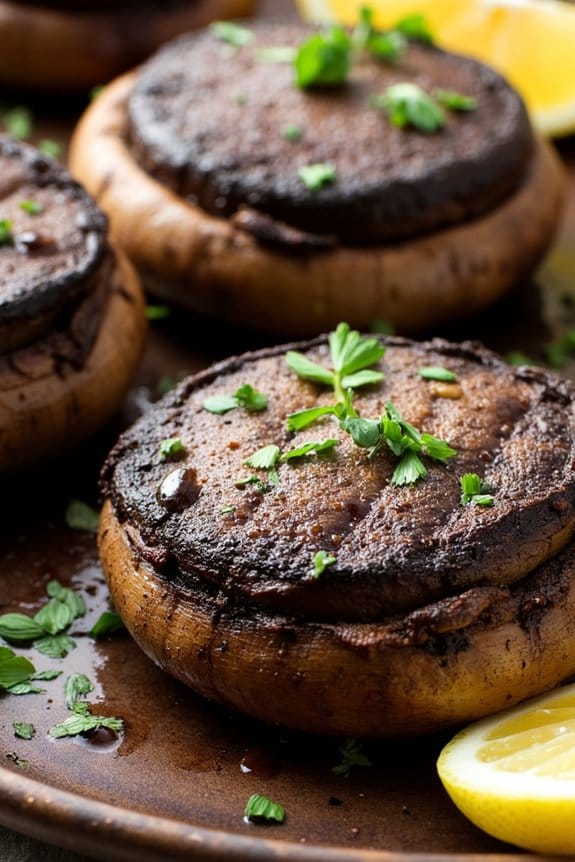
Grilling season is the perfect time to explore new and exciting ways to enjoy vegetables, and Smoky Grilled Portobello Mushrooms are a fantastic option for a delicious and satisfying meal. These mushrooms are known for their meaty texture and ability to absorb flavors beautifully, making them a great alternative for both vegetarians and meat-lovers alike.
The smoky marinade, with its combination of spices and herbs, adds depth and complexity to the dish, while grilling imparts a charred finish that enhances the mushroom’s natural umami.
Whether you’re preparing a weeknight dinner or hosting a backyard barbecue, this recipe is simple yet impressive enough to please any crowd. The mushrooms can be served as a main course, a side dish, or even as a topping for burgers.
With minimal preparation and a short cooking time, Smoky Grilled Portobello Mushrooms are perfect for those who want to enjoy a flavorful meal without spending hours in the kitchen.
Ingredients (serves 4-6 people):
- 6 large portobello mushroom caps
- 1/4 cup olive oil
- 2 tablespoons balsamic vinegar
- 2 cloves garlic, minced
- 1 teaspoon smoked paprika
- 1/2 teaspoon ground cumin
- 1/2 teaspoon dried oregano
- Salt and pepper to taste
- Fresh parsley, chopped (for garnish)
- Lemon wedges (optional, for serving)
Instructions:
1. Prepare the Marinade: In a small mixing bowl, combine olive oil, balsamic vinegar, minced garlic, smoked paprika, ground cumin, dried oregano, salt, and pepper. Whisk the ingredients together until well combined, creating a smooth marinade.
2. Marinate the Mushrooms: Clean the portobello mushroom caps by wiping them with a damp cloth to remove any dirt. Place the mushrooms in a shallow dish, gill side up, and pour the marinade over them.
Use a brush or your hands to make sure the marinade gets into all the nooks and crannies. Allow the mushrooms to marinate for at least 30 minutes, flipping them halfway through to guarantee even coating.
3. Preheat the Grill: While the mushrooms marinate, preheat your grill to medium-high heat. You want the grill to be hot enough to sear the mushrooms and create grill marks, but not so hot that they burn.
4. Grill the Mushrooms: Once the grill is ready, place the marinated mushrooms on the grill, gill side down. Grill for about 5-7 minutes on each side, or until they’re tender and have developed a nice char.
5. Serve and Garnish: Remove the mushrooms from the grill and let them rest for a couple of minutes. Serve them whole or sliced, garnished with freshly chopped parsley and a squeeze of lemon juice if desired.
Extra Tips:
For the best flavor, try to marinate the mushrooms for a longer period, such as overnight, if time allows. This will allow the flavors to penetrate deeper into the mushrooms.
When grilling, be sure not to overcrowd the grill, as this can lead to steaming instead of searing. If you don’t have access to a grill, a grill pan or even a broiler can be used as a substitute.
Finally, these mushrooms pair wonderfully with a variety of sides, such as grilled vegetables, quinoa salad, or even a light pasta dish.
Sweet and Spicy Pineapple on the Grill
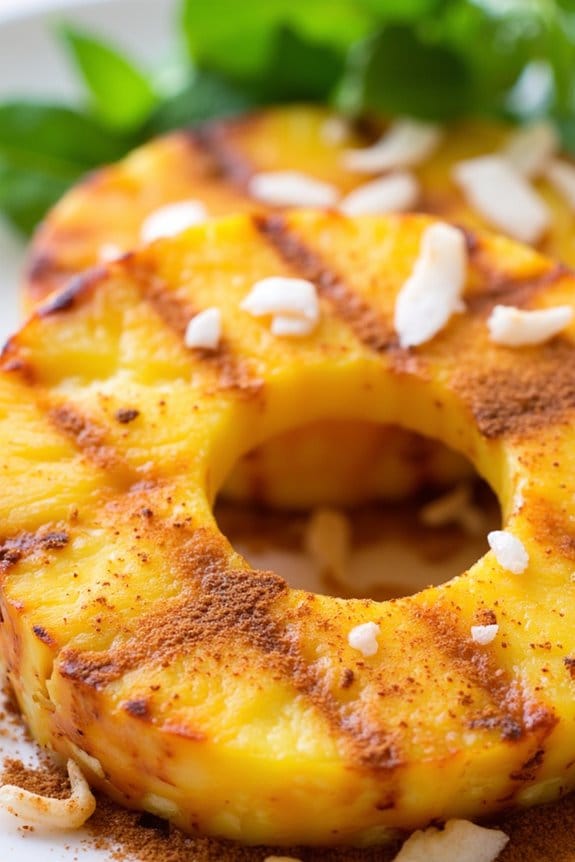
Sweet and Spicy Pineapple on the Grill is a tantalizing dish that combines the natural sweetness of pineapple with a kick of heat, making it a crowd-pleaser for any summer gathering. The caramelization process on the grill brings out the pineapple’s juicy flavor, while the spicy marinade adds a delightful contrast. This dish is perfect as a side or a dessert, and it pairs wonderfully with grilled meats or can be served on its own for a revitalizing treat.
This recipe is designed for 4-6 people, making it ideal for a small family barbecue or a casual outdoor dinner party. The preparation is quick and simple, requiring only a few key ingredients that are likely already in your pantry. With minimal fuss and maximum flavor, Sweet and Spicy Pineapple on the Grill is a must-try recipe for anyone looking to add a bit of tropical flair to their grilling repertoire.
Ingredients for 4-6 servings:
- 1 ripe pineapple
- 1/4 cup honey
- 1/4 cup brown sugar
- 1 tablespoon lime juice
- 1 teaspoon chili powder
- 1/2 teaspoon cayenne pepper
- 1/2 teaspoon salt
- 1/4 cup coconut flakes (optional, for garnish)
- Fresh mint leaves (optional, for garnish)
Cooking Instructions:
- Prepare the Pineapple: Start by cutting off the top and bottom of the pineapple. Stand it upright and carefully slice off the outer skin, making sure to remove all the “eyes.” Cut the pineapple into wedges or rings, depending on your preference.
- Mix the Marinade: In a small bowl, combine the honey, brown sugar, lime juice, chili powder, cayenne pepper, and salt. Mix until fully combined and smooth.
- Marinate the Pineapple: Place the pineapple pieces in a large bowl or a resealable plastic bag. Pour the marinade over the pineapple, guaranteeing each piece is well-coated. Let it sit for at least 15-20 minutes to absorb the flavors.
- Preheat the Grill: While the pineapple is marinating, preheat your grill to medium-high heat. If using a charcoal grill, guarantee the coals are evenly distributed for consistent heat.
- Grill the Pineapple: Once the grill is hot, place the pineapple pieces directly on the grates. Cook for 3-4 minutes on each side, or until you see nice grill marks and the pineapple has softened slightly.
- Serve: Remove the pineapple from the grill and place it on a serving platter. If desired, sprinkle with coconut flakes and garnish with fresh mint leaves before serving.
Extra Tips:
To enhance the flavor, consider soaking wooden skewers in water for 30 minutes and threading the pineapple slices onto them before grilling. This will make flipping the pieces easier and prevent them from sticking to the grill.
Additionally, for an extra layer of complexity, you can experiment with adding a splash of rum to the marinade. Be sure to adjust the chili powder and cayenne to your taste preference, especially if you’re sensitive to spice.
Herb-Infused Lamb Chops on the Grill
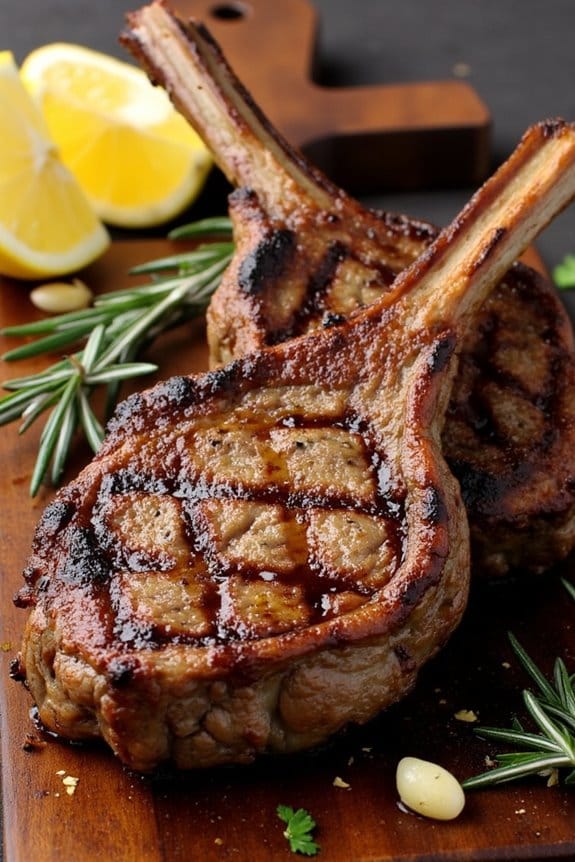
Herb-Infused Lamb Chops on the Grill are a delightful way to enjoy a flavorful and tender dinner that’s both easy to prepare and impressive to serve. Perfect for a cozy family gathering or a special occasion, these lamb chops are marinated in a blend of fresh herbs, garlic, lemon, and olive oil, infusing them with aromatic flavors that enhance the natural richness of the meat.
Grilling guarantees a beautiful char on the outside while keeping the inside juicy and succulent. This recipe serves 4-6 people and is perfect for those looking to explore new flavors on the grill. With minimal preparation time and a quick cooking process, Herb-Infused Lamb Chops on the Grill can be a go-to dish for anyone wanting to elevate their grilling game.
Pair it with a fresh salad or roasted vegetables for a well-rounded meal that will leave your guests satisfied and enthusiastic for more.
Ingredients:
- 8 lamb chops (about 1-inch thick)
- 4 cloves garlic, minced
- 2 tablespoons fresh rosemary, chopped
- 2 tablespoons fresh thyme, chopped
- 1 teaspoon fresh mint, chopped
- Zest of 1 lemon
- Juice of 1 lemon
- 1/4 cup olive oil
- Salt and pepper to taste
- Lemon wedges, for serving
Instructions:
- Prepare the Marinade: In a small bowl, combine minced garlic, rosemary, thyme, mint, lemon zest, lemon juice, olive oil, salt, and pepper. Mix well to create a herb-infused marinade.
- Marinate the Lamb Chops: Place the lamb chops in a shallow dish or a resealable plastic bag. Pour the marinade over the chops, making sure each chop is well-coated. Cover the dish with plastic wrap or seal the bag and refrigerate for at least 2 hours, or overnight for more intense flavor.
- Preheat the Grill: About 30 minutes before grilling, take the lamb chops out of the refrigerator to allow them to reach room temperature. Preheat your grill to medium-high heat, about 375-400°F (190-200°C).
- Grill the Lamb Chops: Once the grill is hot, place the lamb chops on the grill and cook for about 4-5 minutes on each side for medium-rare, or longer if you prefer your lamb more well-done. Use tongs to turn the chops, avoiding piercing the meat to retain juices.
- Rest the Chops: Remove the lamb chops from the grill and let them rest on a plate covered loosely with aluminum foil for about 5 minutes. This allows the juices to redistribute throughout the meat.
- Serve: Serve the Herb-Infused Lamb Chops with lemon wedges on the side for an extra burst of citrus flavor.
Extra Tips: To guarantee the lamb chops are grilled to perfection, use a meat thermometer to check the internal temperature. For medium-rare, aim for an internal temperature of 135°F (57°C).
Additionally, be mindful of the grill’s hot spots and move the chops around if needed to prevent burning. If fresh herbs aren’t available, dried herbs can be used in smaller quantities, but fresh herbs will provide the best flavor. Enjoy experimenting with different herb combinations to suit your taste preferences.
Grilled Peaches: An Effortless Dessert
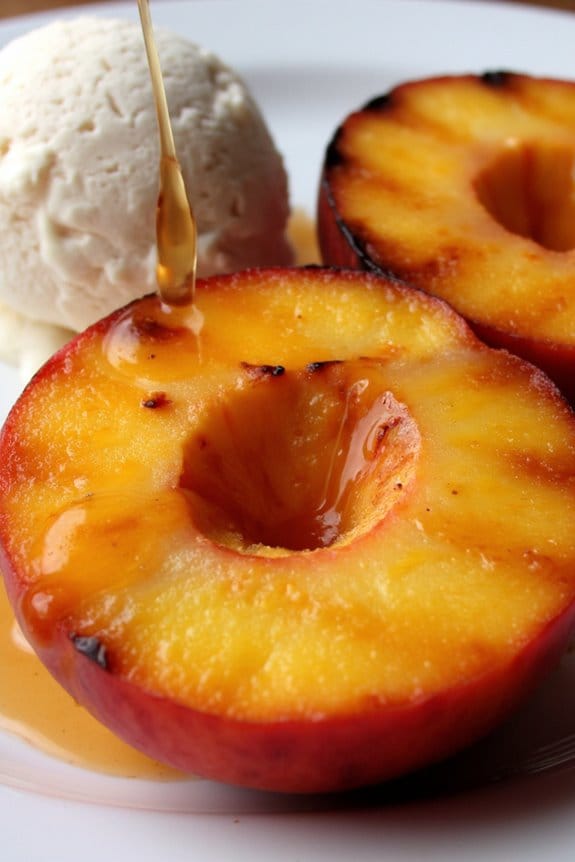
Grilled peaches are a simple yet delicious way to end any meal on a sweet note. This effortless dessert captures the natural sweetness of ripe peaches, enhancing their flavor with subtle smoky notes from the grill. Perfect for summer gatherings or any time you want a light and revitalizing treat, grilled peaches pair beautifully with a scoop of vanilla ice cream or a drizzle of honey.
This recipe is ideal for serving 4-6 people, making it a great choice for family dinners or small get-togethers. With minimal ingredients and preparation, grilled peaches can be ready in just a few minutes, allowing you to spend more time enjoying your company. The caramelization of the sugars in the peaches as they grill adds a delightful texture and depth of flavor, making this an irresistible dessert for all ages.
Ingredients:
- 4-6 ripe peaches, halved and pitted
- 2 tablespoons melted butter
- 2 tablespoons brown sugar
- 1 teaspoon cinnamon
- Vanilla ice cream or whipped cream (optional)
- Honey or balsamic glaze (optional)
Cooking Instructions:
- Preheat the Grill: Preheat your grill to medium heat, approximately 350°F (175°C). This temperature is perfect to guarantee the peaches cook evenly without burning.
- Prepare the Peaches: Rinse the peaches thoroughly to remove any dirt. Slice each peach in half and remove the pits. Brush the cut sides with melted butter to prevent sticking and promote caramelization.
- Season the Peaches: In a small bowl, mix the brown sugar and cinnamon. Sprinkle this mixture evenly over the cut sides of the peaches, allowing it to adhere to the buttered surfaces.
- Grill the Peaches: Place the peaches cut side down on the grill. Cook for about 4-5 minutes or until grill marks appear. Flip the peaches and cook for another 3-4 minutes until they’re tender but not mushy.
- Serve: Remove the peaches from the grill and let them cool slightly. Serve warm with a scoop of vanilla ice cream or a dollop of whipped cream. Drizzle with honey or balsamic glaze for added sweetness and flavor, if desired.
Extra Tips: When selecting peaches for grilling, choose ones that are firm yet slightly yielding to gentle pressure; overly ripe peaches can become too soft on the grill. If you don’t have a grill, a grill pan on the stovetop works as a great alternative.
For an added touch, consider adding a splash of bourbon or a sprinkle of fresh mint leaves before serving to elevate the flavors. Remember, the key is to watch the peaches closely to prevent overcooking, as they can quickly shift from perfectly tender to overly soft.