

Firing up the grill is one of my favorite ways to create restaurant-worthy meals at home. Picture a juicy ribeye steak with a dollop of homemade garlic butter melting perfectly. Or BBQ chicken skewers paired with charred pineapple for a taste of summer. Each recipe brings you closer to culinary perfection. Ready to discover more sizzling delights?
Grilled Ribeye Steak With Garlic Butter
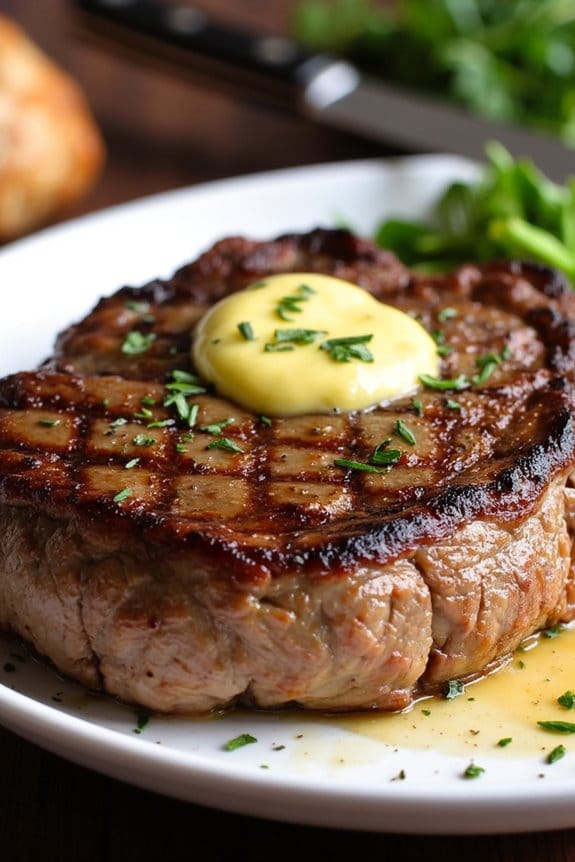
Grilled Ribeye Steak With Garlic Butter is a succulent and flavorful dish that makes for a perfect dinner, whether you’re hosting a weekend barbecue or just enjoying a special meal with family. The ribeye steak, known for its rich marbling and tenderness, becomes even more delectable when grilled to perfection and topped with a luscious garlic butter. This combination enhances the natural flavors of the meat and adds a touch of decadence with the creamy, aromatic butter melting over the hot steak.
The key to a successful Grilled Ribeye Steak With Garlic Butter lies in the preparation and careful attention to cooking times. Selecting high-quality ribeyes and allowing them to come to room temperature before grilling guarantees even cooking. Meanwhile, the garlic butter, infused with fresh herbs, adds an irresistible aroma and flavor that elevates the dish. This recipe serves 4-6 people, making it ideal for a small gathering or a family dinner.
Ingredients:
- 4 ribeye steaks, about 1 inch thick
- 4 tablespoons unsalted butter, softened
- 4 cloves garlic, minced
- 1 tablespoon fresh parsley, finely chopped
- 1 tablespoon fresh thyme, finely chopped
- 1 tablespoon olive oil
- Salt and pepper, to taste
Cooking Instructions:
- Prepare the Garlic Butter: In a small bowl, combine the softened butter, minced garlic, chopped parsley, and chopped thyme. Mix thoroughly until the ingredients are well incorporated. Set aside or refrigerate if preparing in advance.
- Prepare the Steaks: Take the ribeye steaks out of the fridge and let them sit at room temperature for about 30 minutes. This helps them cook more evenly. Pat the steaks dry with paper towels, and then rub them with olive oil. Season generously with salt and pepper on both sides.
- Preheat the Grill: Heat your grill to high heat. If using a charcoal grill, make sure the coals are ashed over and evenly distributed. For a gas grill, preheat it to around 450°F (232°C).
- Grill the Steaks: Place the steaks on the grill over direct heat. Grill for 4-5 minutes on each side for medium-rare, or adjust the time according to your preferred doneness. Use a meat thermometer to check the internal temperature; aim for 130°F (54°C) for medium-rare.
- Rest the Steaks: Once cooked to your liking, remove the steaks from the grill and let them rest on a cutting board for 5-10 minutes. Resting allows the juices to redistribute throughout the meat, guaranteeing a juicy steak.
- Serve with Garlic Butter: Just before serving, top each steak with a spoonful of the prepared garlic butter. The heat from the steak will melt the butter, creating a delicious sauce.
Extra Tips:
When grilling ribeye steaks, it’s important to maintain a high heat to achieve a perfect sear on the outside while keeping the inside tender and juicy. Avoid flipping the steaks too frequently; let them develop a nice crust before turning them.
If you like additional flavor, consider adding a few sprigs of rosemary or thyme to the grill while cooking. This will impart a subtle herbaceous aroma to the steaks. Finally, verify you have a good quality meat thermometer on hand to accurately gauge the doneness of the meat.
BBQ Chicken Skewers With Pineapple
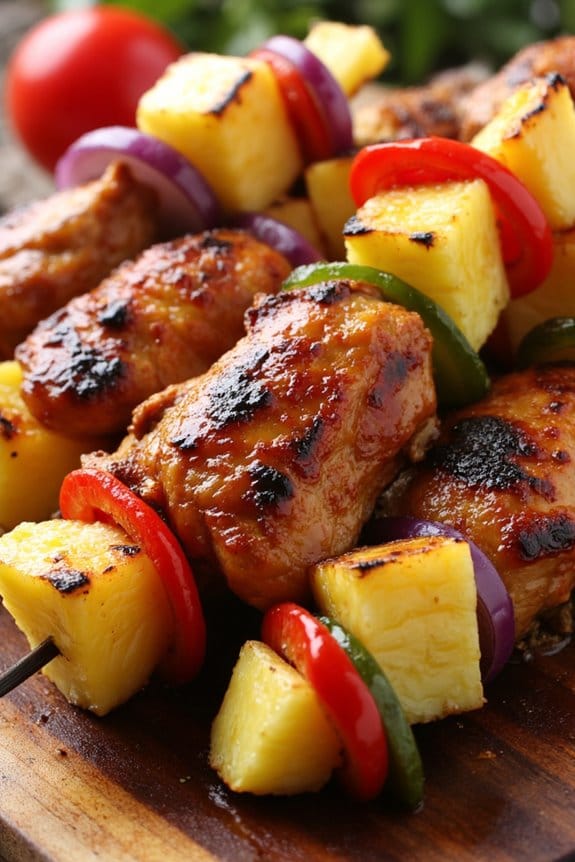
Grilled meals are a delightful choice for dinner, bringing a smoky flavor and a touch of summer to your table any time of the year. Among the various grilled dishes, BBQ Chicken Skewers with Pineapple stand out as a favorite. This dish combines the savory taste of marinated chicken with the sweet and tangy flavor of grilled pineapple, offering a balanced and vibrant meal.
Perfect for a family gathering or a casual dinner with friends, these skewers aren’t only delicious but also visually appealing, with their colorful combination of ingredients.
The preparation involves marinating the chicken to infuse it with flavors, skewering it alongside juicy pineapple chunks, and then grilling to perfection. The caramelization of the pineapple adds a sweetness that complements the savory chicken beautifully. This dish is suitable for a serving size of 4-6 people and will surely be a hit at your next dinner party.
Ingredients:
- 1.5 pounds of boneless, skinless chicken breasts
- 1 cup of pineapple chunks (fresh or canned)
- 1 red bell pepper
- 1 green bell pepper
- 1 red onion
- 2 tablespoons olive oil
- 1/4 cup soy sauce
- 2 tablespoons honey
- 1 tablespoon apple cider vinegar
- 2 cloves garlic, minced
- 1 teaspoon ground black pepper
- 1 teaspoon smoked paprika
- 1 teaspoon salt
- Wooden or metal skewers
Cooking Instructions:
- Prepare the Marinade: In a large bowl, combine the olive oil, soy sauce, honey, apple cider vinegar, minced garlic, black pepper, smoked paprika, and salt. Whisk these ingredients together until well mixed.
- Marinate the Chicken: Cut the chicken breasts into 1-inch cubes. Add the chicken pieces to the marinade, making certain they’re well coated. Cover the bowl with plastic wrap and let it marinate in the refrigerator for at least 1 hour, or overnight for more flavor.
- Prepare the Vegetables and Pineapple: Cut the red and green bell peppers into 1-inch squares and slice the red onion into similar-sized pieces. If using fresh pineapple, cut it into chunks about the same size as the chicken pieces.
- Assemble the Skewers: Thread the marinated chicken, pineapple chunks, bell pepper pieces, and onion onto the skewers, alternating them to create a colorful pattern. Leave a little space between each piece to guarantee even cooking.
- Preheat the Grill: Heat your grill to medium-high. If using a charcoal grill, wait until the coals are covered with gray ash. Brush the grill grates lightly with oil to prevent sticking.
- Grill the Skewers: Place the skewers on the grill, cooking for about 10-12 minutes. Turn them occasionally every few minutes to guarantee even cooking. The chicken should be cooked through and the edges of the pineapple should be slightly caramelized.
- Serve Hot: Once cooked, remove the skewers from the grill and serve immediately. They pair well with a side of rice or a fresh green salad.
Extra Tips:
For best results, soak wooden skewers in water for at least 30 minutes before grilling to prevent them from burning. If you prefer a bit more heat, consider adding a pinch of cayenne pepper to the marinade.
When choosing pineapple, fresh pineapple gives the best flavor, but canned can be used in a pinch. Remember to adjust the grilling time if your chicken pieces are larger or smaller than the suggested size, as cooking times may vary.
Enjoy your BBQ Chicken Skewers with Pineapple as a delightful and easy-to-make grilled meal.
Grilled Salmon With Lemon Dill Sauce
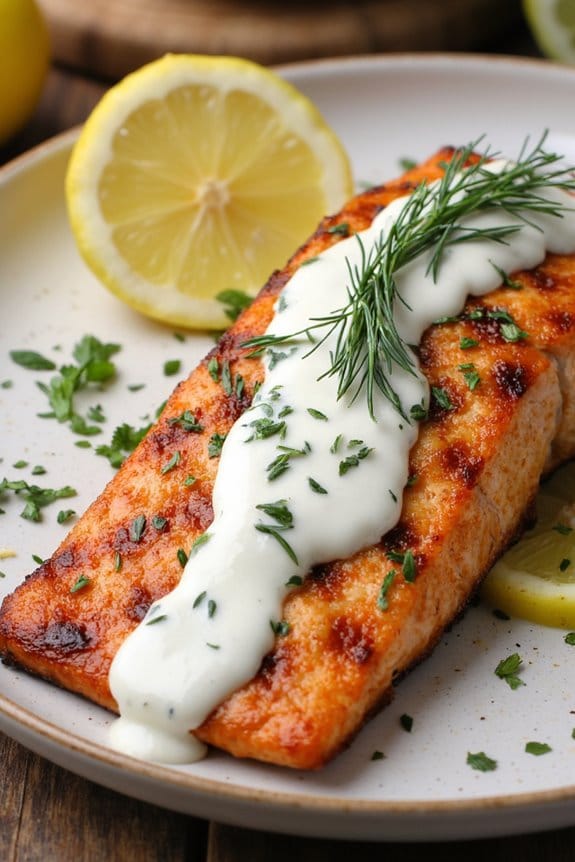
Grilled salmon is a delightful and healthy choice for dinner, and when paired with a tangy lemon dill sauce, it becomes an exceptional dish that’s sure to impress. This recipe combines the rich, buttery flavor of salmon with the fresh, zesty notes of lemon and dill, creating a harmonious blend that tantalizes the taste buds.
Whether you’re entertaining guests or simply treating yourself to a special meal, this dish offers both simplicity and sophistication.
Preparing grilled salmon with lemon dill sauce isn’t only quick but also allows the natural flavors of the fish to shine through. The key is to use fresh, high-quality salmon fillets and to grill them just until they’re perfectly cooked, maintaining their succulent texture.
The lemon dill sauce, made with fresh ingredients, complements the salmon beautifully, adding a bright and invigorating finish. This recipe serves 4-6 people, making it ideal for a family meal or a small gathering.
Ingredients:
- 4-6 salmon fillets (about 6 ounces each)
- 2 tablespoons olive oil
- Salt and pepper to taste
- 1 lemon, sliced
- Fresh dill for garnish
For the Lemon Dill Sauce:
- 1/2 cup sour cream
- 1 tablespoon fresh dill, chopped
- 1 tablespoon lemon juice
- 1 teaspoon lemon zest
- 1 teaspoon Dijon mustard
- Salt and pepper to taste
Cooking Instructions:
- Prepare the Grill: Preheat your grill to medium-high heat. Make sure the grates are clean and lightly oiled to prevent the salmon from sticking.
- Season the Salmon: Pat the salmon fillets dry with paper towels. Brush each fillet with olive oil and season with salt and pepper on both sides.
- Grill the Salmon: Place the salmon fillets skin-side down on the preheated grill. Cover and grill for about 4-5 minutes per side, depending on the thickness of the fillets, until the salmon flakes easily with a fork and has grill marks.
- Make the Lemon Dill Sauce: In a small bowl, combine sour cream, fresh dill, lemon juice, lemon zest, Dijon mustard, salt, and pepper. Mix well until smooth.
- Serve: Arrange the grilled salmon fillets on a serving platter. Drizzle with the lemon dill sauce and garnish with lemon slices and additional fresh dill. Serve immediately.
Extra Tips:
When grilling salmon, it’s important not to overcook it to maintain a moist and tender texture. A good rule of thumb is to grill the salmon for about 8-10 minutes per inch of thickness.
Additionally, allow the grilled salmon to rest for a couple of minutes before serving, as this helps the juices redistribute throughout the fish. For an extra burst of flavor, consider marinating the salmon in olive oil, lemon juice, and herbs for about 30 minutes before grilling. This step is optional but can enhance the overall taste of the dish.
Grilled Shrimp Tacos With Avocado Crema
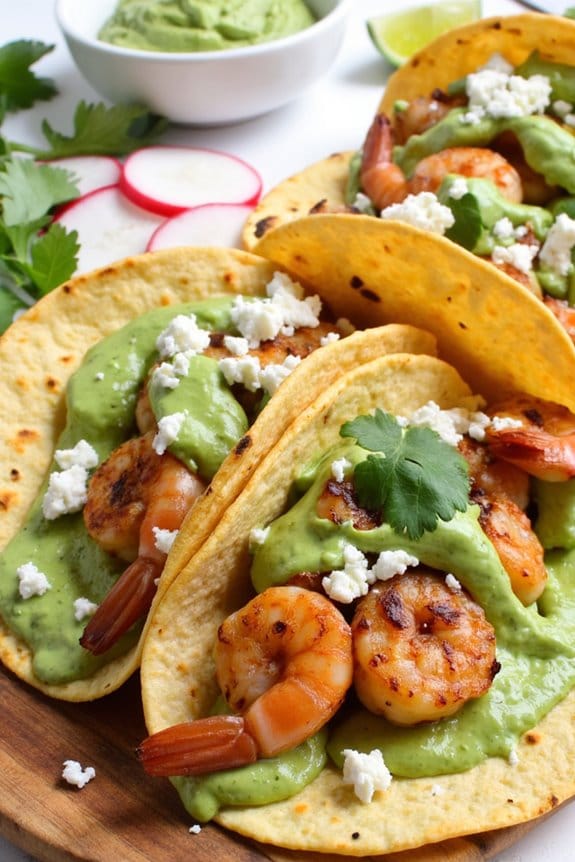
Grilled Shrimp Tacos With Avocado Crema are a delightful twist on traditional tacos that bring a new and vibrant flavor to your dinner table. The succulent shrimp are perfectly seasoned and grilled to perfection, providing a smoky and savory base for the dish. Paired with a creamy, tangy avocado crema, these tacos offer a delightful combination of textures and flavors that will leave you craving more.
Whether you’re hosting a summer barbecue or simply looking for a quick and delicious meal, these tacos are sure to impress your family and friends.
The beauty of this dish lies in its simplicity and versatility. The grilled shrimp are easy to prepare and cook in just a few minutes, making this recipe perfect for busy weeknights or a last-minute gathering. The avocado crema, with its smooth and luscious texture, adds a rejuvenating element that complements the smoky shrimp beautifully.
Topped with your choice of fresh cilantro, radishes, or queso fresco, these tacos can be customized to suit your personal taste preferences. Gather your ingredients and get ready to enjoy a delightful meal that brings the vibrant flavors of the grill to your dining table.
Ingredients (serving size: 4-6 people):
- 2 pounds large shrimp, peeled and deveined
- 2 tablespoons olive oil
- 1 teaspoon smoked paprika
- 1 teaspoon ground cumin
- 1 teaspoon garlic powder
- Salt and pepper, to taste
- 12 small corn tortillas
- 2 ripe avocados
- 1/2 cup sour cream
- 1 tablespoon lime juice
- 1/4 teaspoon salt
- 1/4 cup fresh cilantro leaves, chopped (optional)
- 1/4 cup sliced radishes (optional)
- 1/4 cup crumbled queso fresco (optional)
Cooking Instructions:
- Prepare the Shrimp Marinade: In a large bowl, combine the olive oil, smoked paprika, ground cumin, garlic powder, salt, and pepper. Add the shrimp and toss until they’re evenly coated with the marinade. Let them marinate for at least 15 minutes to absorb the flavors.
- Preheat the Grill: While the shrimp are marinating, preheat your grill to medium-high heat. Clean the grates to make sure they’re free of any debris.
- Make the Avocado Crema: In a blender or food processor, combine the avocados, sour cream, lime juice, and salt. Blend until smooth and creamy. Adjust seasoning if necessary. Transfer the crema to a bowl and set aside.
- Grill the Shrimp: Thread the marinated shrimp onto skewers to make them easier to handle on the grill. Place the shrimp skewers on the preheated grill and cook for 2-3 minutes on each side, or until they’re pink and opaque. Be careful not to overcook them, as shrimp can become rubbery if cooked too long.
- Warm the Tortillas: While the shrimp are grilling, warm the corn tortillas on the grill for about 30 seconds on each side, or until they’re pliable and have slight grill marks.
- Assemble the Tacos: Remove the shrimp from the skewers and place a few shrimp in each tortilla. Drizzle with the avocado crema and top with cilantro, radishes, and queso fresco if desired.
Extra Tips:
For an even bolder flavor, consider adding a squeeze of fresh lime juice to the shrimp just before serving. If you prefer a spicier kick, add a pinch of cayenne pepper to the marinade.
When choosing avocados for the crema, make sure they’re ripe to achieve that silky smooth texture. This dish pairs wonderfully with a side of grilled corn or a revitalizing cucumber salad. Enjoy your Grilled Shrimp Tacos With Avocado Crema with a cold beverage to complete your meal.
Zesty Fish Tacos With Slaw
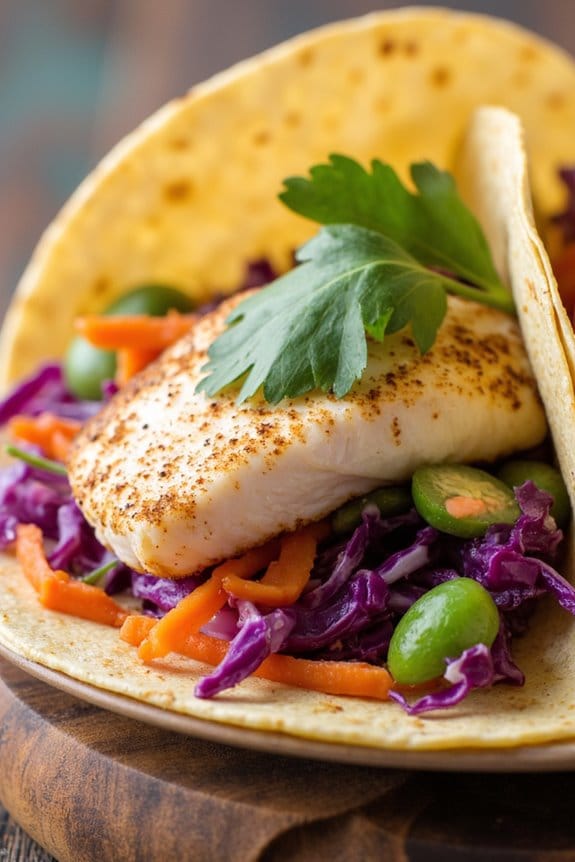
Grilled meals are a delightful option for dinner, offering a combination of smoky flavors and fresh ingredients that make for a satisfying meal. One such dish that brings the zest and tang of the coast straight to your plate is Zesty Fish Tacos With Slaw. This dish is perfect for a summer evening, combining tender, grilled fish with a crunchy, flavorful slaw. The marriage of textures and flavors will excite your palate and keep you coming back for more.
Ideal for serving a group of 4-6 people, these fish tacos are a demonstration of the beauty of simple, fresh ingredients coming together in harmony. The fish is seasoned with a blend of spices that enhance its natural flavor, while the slaw adds a revitalizing crunch and a hint of sweetness. This recipe not only promises a delightful dining experience but also delivers a nutritious meal that’s both easy to prepare and full of vibrant flavors.
Ingredients:
- 1 ½ pounds of white fish fillets (such as tilapia or cod)
- 1 tablespoon olive oil
- 2 teaspoons chili powder
- 1 teaspoon cumin
- 1 teaspoon smoked paprika
- 1 teaspoon garlic powder
- ½ teaspoon salt
- ½ teaspoon black pepper
- 1 lime, juiced
- 8-10 corn tortillas
- 1 cup shredded purple cabbage
- 1 cup shredded green cabbage
- 1 carrot, julienned
- ¼ cup fresh cilantro, chopped
- 2 tablespoons mayonnaise
- 2 tablespoons sour cream
- 1 tablespoon apple cider vinegar
- 1 tablespoon honey
- Salt and pepper to taste
Cooking Instructions:
- Prepare the Fish: Rinse the fish fillets under cold water and pat them dry with paper towels. In a small bowl, mix together the chili powder, cumin, smoked paprika, garlic powder, salt, and black pepper. Rub the spice mixture evenly over both sides of the fish fillets.
- Marinate: Drizzle olive oil and lime juice over the seasoned fish. Let it marinate for at least 15 minutes to allow the flavors to meld together while you prepare the slaw.
- Make the Slaw: In a large mixing bowl, combine the shredded purple and green cabbage, julienned carrot, and chopped cilantro. In a separate small bowl, whisk together the mayonnaise, sour cream, apple cider vinegar, honey, salt, and pepper. Pour the dressing over the cabbage mixture and toss to combine. Set aside.
- Grill the Fish: Preheat your grill to medium-high heat. Lightly oil the grill grates to prevent sticking. Place the marinated fish fillets on the grill and cook for 3-4 minutes per side, or until the fish flakes easily with a fork. Remove from the grill and let rest for a few minutes.
- Warm the Tortillas: While the fish rests, warm the corn tortillas on the grill for about 30 seconds on each side until they’re pliable and slightly charred.
- Assemble the Tacos: Break the grilled fish into bite-sized pieces. Take a warm tortilla, add a generous portion of fish, and top with a spoonful of slaw. Repeat with the remaining tortillas and ingredients.
- Serve: Arrange the tacos on a platter and serve immediately with extra lime wedges on the side for squeezing over the top.
Extra Tips:
When grilling the fish, be sure not to overcook it; fish can go from perfectly done to overdone in a matter of seconds. Keep a close eye while it’s on the grill to achieve the perfect texture.
If you prefer a bit more heat, consider adding a pinch of cayenne pepper to the spice rub. For added flavor, you can also grill some sliced jalapeños alongside the fish. Finally, experiment with different types of salsa or hot sauces as toppings to personalize your tacos even further.
Smoky Lamb Chops With Mint Chimichurri
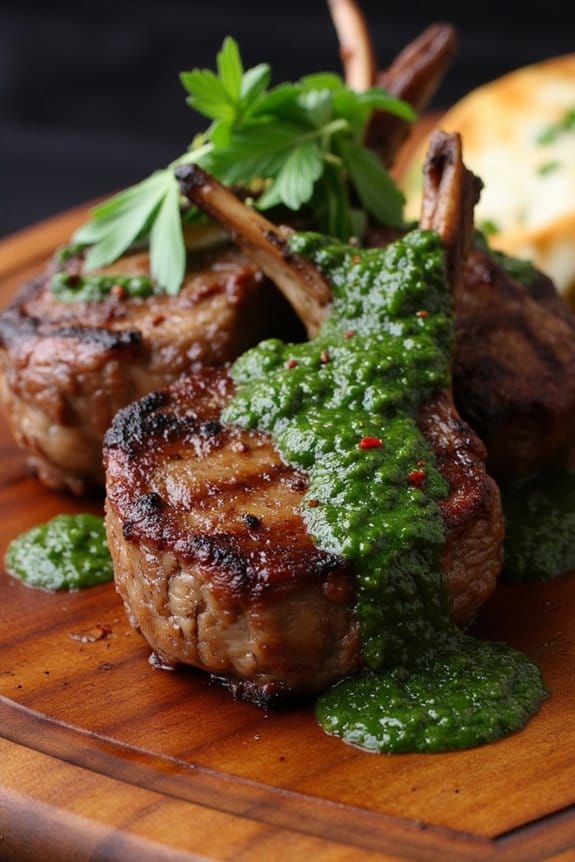
Grilled meals are a fantastic way to enjoy the great outdoors while savoring deliciously prepared dishes. One such dish that promises to delight your taste buds is Smoky Lamb Chops With Mint Chimichurri. This recipe combines the robust flavors of tender lamb chops with a revitalizing mint chimichurri sauce, delivering a perfect balance of smoky and fresh tastes.
Whether you’re hosting a backyard barbecue or simply craving a satisfying grilled meal, this dish is sure to impress your family and friends.
To create this mouthwatering meal, you’ll start by marinating lamb chops to infuse them with smoky flavors before grilling them to perfection. The mint chimichurri complements the lamb with its vibrant and zesty profile, making each bite a delightful experience.
This recipe serves 4-6 people, making it ideal for a small gathering or family dinner. With a few simple ingredients and steps, you can elevate your grilling game and enjoy a memorable meal.
Ingredients:
- 8 lamb chops
- 2 tablespoons olive oil
- 1 tablespoon smoked paprika
- 1 tablespoon ground cumin
- Salt and pepper to taste
For the Mint Chimichurri:
- 1 cup fresh mint leaves, finely chopped
- 1 cup fresh parsley leaves, finely chopped
- 3 cloves garlic, minced
- 1/2 cup olive oil
- 1/4 cup red wine vinegar
- 1 teaspoon red pepper flakes
- Salt and pepper to taste
Cooking Instructions:
- Prepare the Marinade: In a small bowl, mix the olive oil, smoked paprika, ground cumin, salt, and pepper. Rub this mixture evenly over the lamb chops, making certain they’re well-coated. Allow the lamb to marinate for at least 30 minutes at room temperature or up to 4 hours in the refrigerator.
- Make the Mint Chimichurri: While the lamb is marinating, prepare the mint chimichurri. In a medium bowl, combine the mint leaves, parsley, garlic, olive oil, red wine vinegar, and red pepper flakes. Mix well and season with salt and pepper to taste. Set aside to let the flavors meld.
- Preheat and Prepare the Grill: Preheat your grill to medium-high heat. Once hot, lightly oil the grill grates to prevent sticking.
- Grill the Lamb Chops: Place the lamb chops on the grill and cook for about 4-5 minutes on each side, depending on your desired level of doneness. Aim for an internal temperature of 145°F for medium-rare. Remove the chops from the grill and let them rest for a few minutes.
- Serve: Arrange the lamb chops on a serving platter and generously spoon the mint chimichurri over the top. Garnish with additional mint leaves if desired. Serve immediately.
Extra Tips:
For the best flavor, try to use fresh herbs for the chimichurri sauce as they provide a more vibrant taste. If you have time, let the chimichurri sit for a few hours to enhance the depth of its flavors.
When grilling, make sure that the lamb chops are at room temperature; this helps them cook more evenly. Always allow the meat to rest after grilling to retain its juices, resulting in a more tender and flavorful bite.
Grilled Pork Tenderloin With Honey Mustard
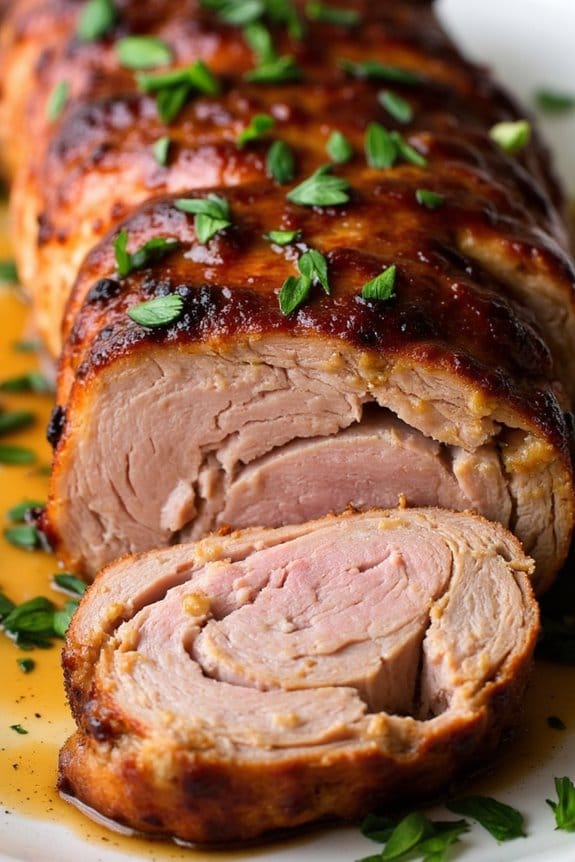
Grilled Pork Tenderloin With Honey Mustard is a delightful dish that combines the juicy flavors of pork with a tangy, sweet glaze. Perfect for a summer barbecue or a cozy dinner at home, this dish is both simple and impressive. The pork tenderloin, known for its tenderness, absorbs the flavors of the marinade beautifully, resulting in a succulent and flavorful main course.
Paired with the sweetness of honey and the sharpness of mustard, this grilled masterpiece is certain to become a favorite. The process begins with marinating the pork tenderloin to infuse it with flavor, followed by grilling it to perfection. The honey mustard glaze, brushed on during the grilling process, caramelizes and adds a delicious crust to the meat.
This recipe is perfect for serving 4-6 people, making it an excellent choice for family gatherings or dinner parties. With just a few simple ingredients and easy-to-follow instructions, you’ll be able to create a dish that’s bound to impress your guests.
Ingredients (Serves 4-6):
- 2 pork tenderloins (about 1 ½ pounds total)
- 1/4 cup honey
- 1/4 cup Dijon mustard
- 2 tablespoons olive oil
- 2 cloves garlic, minced
- 1 tablespoon apple cider vinegar
- 1 teaspoon salt
- 1/2 teaspoon black pepper
- 1 teaspoon dried thyme
Cooking Instructions:
- Prepare the Marinade: In a small bowl, whisk together the honey, Dijon mustard, olive oil, minced garlic, apple cider vinegar, salt, black pepper, and dried thyme until well combined.
- Marinate the Pork: Place the pork tenderloins in a large resealable plastic bag or a shallow dish. Pour the marinade over the pork, making sure it’s evenly coated. Seal the bag or cover the dish with plastic wrap and refrigerate for at least 1 hour, or overnight for best results.
- Preheat the Grill: Preheat your grill to medium-high heat, about 400°F (200°C). Lightly oil the grill grates to prevent sticking.
- Grill the Pork: Remove the pork from the marinade and allow any excess to drip off. Place the pork on the grill and cook for about 15-20 minutes, turning occasionally, until the internal temperature reaches 145°F (63°C) and the pork is nicely caramelized.
- Rest and Serve: Remove the pork from the grill and let it rest for 5-10 minutes before slicing. This allows the juices to redistribute, resulting in a tender and juicy pork tenderloin. Slice and serve with your favorite side dishes.
Extra Tips:
When grilling pork tenderloin, it’s important not to overcook it to maintain its tenderness. Using a meat thermometer guarantees you reach the perfect internal temperature.
If you don’t have a grill, you can also sear the pork in a hot skillet and finish it in the oven. For additional flavor, consider adding a sprinkle of fresh herbs like parsley or cilantro before serving.
This dish pairs well with roasted vegetables, a fresh salad, or creamy mashed potatoes. Enjoy your Grilled Pork Tenderloin With Honey Mustard with a glass of your favorite white wine or iced tea for a complete meal experience.
Grilled Turkey Burgers With Avocado
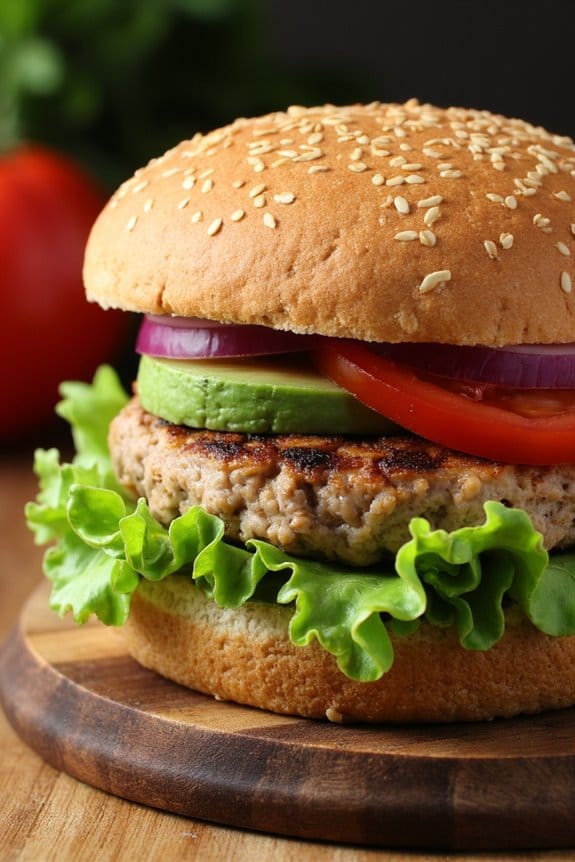
Grilled Turkey Burgers With Avocado are a delightful and healthy alternative to traditional beef burgers, offering a juicy and flavorful experience without the extra calories. Perfect for a casual family dinner or a weekend barbecue, these burgers are made with lean ground turkey and topped with creamy avocado, adding a fresh twist to your usual burger night. The combination of savory turkey and the smooth, buttery texture of avocado creates a mouthwatering balance that will leave you and your guests craving more.
These burgers aren’t only delicious but also packed with nutrients. Turkey is a great source of lean protein, while avocado provides heart-healthy fats and essential vitamins. Grilling the burgers not only enhances their flavor but also gives them a nice, smoky char that complements the richness of the avocado. Serve them on whole-grain buns with your favorite toppings and a side of grilled vegetables for a complete meal that’s both satisfying and nutritious.
Ingredients (for 4-6 servings):
- 1 ½ pounds of ground turkey
- 1 tablespoon Worcestershire sauce
- 2 cloves garlic, minced
- 1 teaspoon onion powder
- 1 teaspoon salt
- ½ teaspoon black pepper
- 1 tablespoon olive oil
- 4-6 whole-grain hamburger buns
- 2 avocados, peeled, pitted, and sliced
- Lettuce leaves
- Sliced tomatoes
- Sliced red onions
- Optional: cheese slices, ketchup, mustard, mayonnaise
Cooking Instructions:
1. Prepare the Turkey Mixture:
In a large mixing bowl, combine the ground turkey, Worcestershire sauce, minced garlic, onion powder, salt, and black pepper. Mix gently with your hands or a spatula until all ingredients are well incorporated. Avoid over-mixing, as this can make the burgers tough.
2. Shape the Patties:
Divide the mixture into 4-6 equal portions, depending on your desired patty size. Shape each portion into a patty, about ½ inch thick. Use your thumb to make a small indentation in the center of each patty, which helps them cook evenly and prevents them from puffing up on the grill.
3. Preheat the Grill:
Preheat your grill to medium-high heat. Brush the grill grates with olive oil to prevent the patties from sticking.
4. Grill the Patties:
Place the turkey patties on the grill and cook for about 5-6 minutes on each side, or until the internal temperature reaches 165°F (74°C) and the patties are no longer pink in the center. If using cheese, place a slice on each patty during the last minute of cooking to allow it to melt.
5. Toast the Buns:
While the patties are cooking, lightly toast the hamburger buns on the grill for about 1-2 minutes, until they’re golden and crispy.
6. Assemble the Burgers:
On each bun, layer lettuce leaves, a grilled turkey patty, avocado slices, tomato slices, and red onion slices. Add any additional condiments like ketchup, mustard, or mayonnaise as desired.
Extra Tips:
For the best results, aim to use fresh, high-quality ground turkey to guarantee your burgers are juicy and flavorful. When forming the patties, handle the meat as little as possible to avoid compacting it, which helps keep the burgers tender.
If you want a bit of extra flavor, consider adding a splash of soy sauce or hot sauce to the turkey mixture. Finally, letting the patties rest for a few minutes after grilling allows the juices to redistribute, making each bite more succulent.
Enjoy your Grilled Turkey Burgers With Avocado with a side of sweet potato fries or a fresh garden salad for a complete meal.
Classic Cheeseburgers With Jalapeño Relish
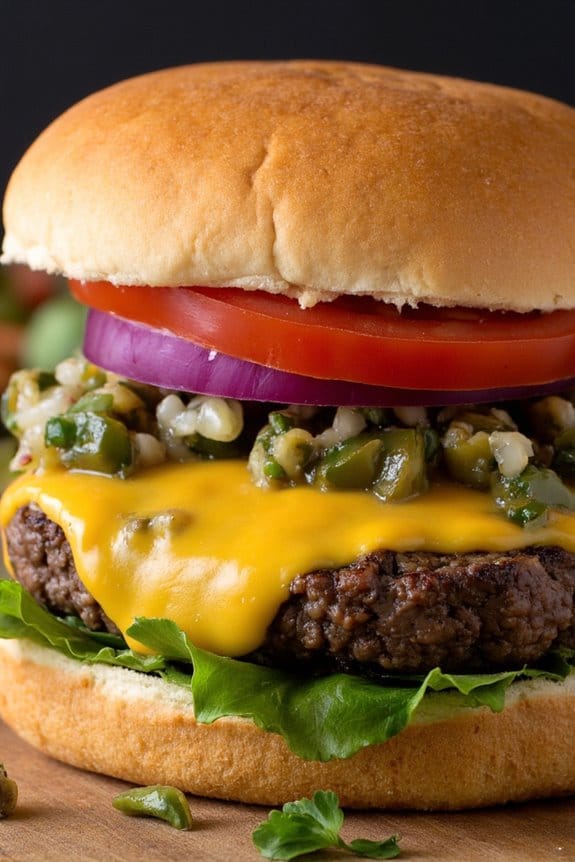
Grilling season is the perfect time to enjoy a classic cheeseburger with a twist. Adding a jalapeño relish not only gives the burger a spicy kick but also elevates its flavor profile to something truly delightful. Whether you’re hosting a backyard barbecue or simply craving a juicy burger, this recipe for Classic Cheeseburgers With Jalapeño Relish is bound to satisfy. The combination of seasoned beef patties, melted cheese, fresh toppings, and the tangy, spicy relish creates a mouthwatering experience with every bite.
To make the perfect cheeseburger, it’s important to start with high-quality ground beef. The key is to form the patties gently to avoid compacting the meat, which can lead to a tough texture. The jalapeño relish adds a zesty element that perfectly complements the richness of the beef and cheese. Depending on your spice tolerance, you can adjust the amount of jalapeño used in the relish. This recipe yields enough to serve 4-6 people, so it’s ideal for a family meal or small gathering.
Ingredients for 4-6 servings:
- 2 lbs ground beef (80% lean, 20% fat)
- Salt and freshly ground black pepper
- 6 slices of cheddar cheese
- 6 hamburger buns
- Lettuce leaves
- Tomato slices
- Red onion slices
Jalapeño Relish:
- 4 jalapeños, seeded and finely chopped
- 1/2 cup finely chopped red onion
- 1/4 cup chopped fresh cilantro
- 2 tablespoons lime juice
- 1 tablespoon sugar
- Salt to taste
Cooking Instructions:
- Prepare the Jalapeño Relish: In a small bowl, combine the finely chopped jalapeños, red onion, cilantro, lime juice, and sugar. Mix well and season with salt to taste. Set aside to allow the flavors to meld together while you prepare the burgers.
- Form the Beef Patties: Divide the ground beef into 6 equal portions and gently shape each portion into a patty about 1/2 inch thick. Make a small indentation in the center of each patty with your thumb; this helps the burgers cook evenly and prevents them from puffing up.
- Season the Patties: Sprinkle each patty with salt and freshly ground black pepper on both sides to enhance the flavor.
- Preheat the Grill: Heat your grill to medium-high heat. If using a charcoal grill, verify the coals are evenly distributed for consistent cooking.
- Grill the Patties: Place the patties on the grill and cook for about 4-5 minutes per side for medium doneness. During the last minute of cooking, place a slice of cheddar cheese on each patty and close the grill lid to melt the cheese.
- Toast the Buns: While the patties are cooking, lightly toast the hamburger buns on the grill until golden brown.
- Assemble the Burgers: On the bottom half of each bun, place a lettuce leaf, followed by a cooked cheeseburger patty, tomato slice, and red onion slice. Top with a generous spoonful of jalapeño relish and cover with the top half of the bun.
Extra Tips:
For the best flavor, allow the beef patties to reach room temperature before grilling. This guarantees even cooking throughout. If you prefer a milder relish, reduce the number of jalapeños or remove the seeds, as they contain most of the heat.
Consider using a meat thermometer to check for doneness; the internal temperature should reach 160°F (71°C) for a well-done burger. Finally, let the cooked patties rest for a few minutes before assembling to keep the juices from running out when you bite into them.
Teriyaki Chicken Thighs on the Grill
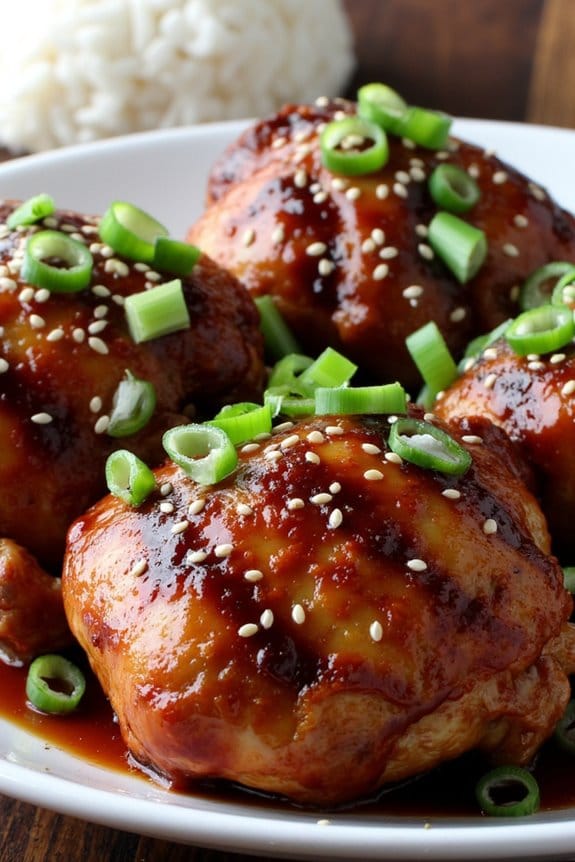
Grilled Teriyaki Chicken Thighs are a savory and slightly sweet dish perfect for a delightful dinner. This dish combines the rich flavors of soy sauce, ginger, and garlic with the smoky essence of grilled chicken, creating a mouthwatering meal that’s both satisfying and easy to prepare.
The use of chicken thighs guarantees that the meat remains juicy and tender, while the teriyaki glaze adds a delicious caramelization when grilled to perfection. Ideal for family dinners or small gatherings, this recipe is sure to become a staple in your grilling repertoire.
Preparing Grilled Teriyaki Chicken Thighs is a straightforward process that requires minimal ingredients and effort. The key to achieving the best flavor is to let the chicken marinate for a few hours, allowing the teriyaki flavors to fully penetrate the meat.
Once the chicken is marinated, simply fire up the grill and watch as the delicious aroma fills the air. This dish can be served with a simple side of steamed vegetables or rice, making it a versatile option for any meal.
Ingredients (serving size: 4-6 people):
- 8-10 boneless, skinless chicken thighs
- 1 cup soy sauce
- 1/2 cup brown sugar
- 1/4 cup honey
- 1/4 cup rice vinegar
- 2 tablespoons sesame oil
- 4 cloves garlic, minced
- 1 tablespoon fresh ginger, grated
- 1 tablespoon cornstarch
- 2 tablespoons water
- 2 tablespoons sesame seeds (optional)
- 2 green onions, chopped (optional)
Cooking Instructions:
- Prepare the Marinade: In a mixing bowl, combine soy sauce, brown sugar, honey, rice vinegar, sesame oil, minced garlic, and grated ginger. Stir until the sugar is dissolved and the ingredients are well incorporated.
- Marinate the Chicken: Place the chicken thighs in a large resealable plastic bag or a shallow dish. Pour the marinade over the chicken, making sure each piece is well coated. Seal the bag or cover the dish, and refrigerate for at least 2 hours, or overnight for maximum flavor.
- Preheat the Grill: Before grilling, preheat your grill to medium-high heat, around 375°F to 400°F. Lightly oil the grill grates to prevent the chicken from sticking.
- Grill the Chicken: Remove the chicken from the marinade, allowing any excess to drip off. Place the chicken thighs on the grill and cook for 6-8 minutes per side, or until the internal temperature reaches 165°F and the chicken is nicely charred.
- Prepare the Teriyaki Glaze: While the chicken is grilling, pour the leftover marinade into a small saucepan. Bring it to a boil over medium heat. In a separate bowl, mix the cornstarch with water to create a slurry, then add it to the boiling marinade. Stir continuously until the sauce thickens, then remove from heat.
- Glaze the Chicken: In the final few minutes of grilling, brush the thickened teriyaki glaze over the chicken thighs, turning them to guarantee an even coating. This will create a sticky, flavorful crust on the chicken.
- Garnish and Serve: Once cooked, remove the chicken from the grill and let it rest for a few minutes. Sprinkle with sesame seeds and chopped green onions if desired before serving.
Extra Tips:
For best results, make sure to marinate the chicken for at least 2 hours, or overnight if time permits, to fully absorb the flavors.
Keep a close eye on the chicken while grilling to avoid burning the glaze. If you prefer a less sweet marinade, adjust the amount of brown sugar and honey to suit your taste.
Additionally, if you don’t have a grill, this recipe can also be prepared using a grill pan on the stovetop or baked in the oven on a broiler setting.
Veggie-Packed Portobello Mushrooms

Grilled meals are a delightful option for dinner, offering a chance to gather around the grill and enjoy flavors that are both smoky and vibrant. Among the many options, Veggie-Packed Portobello Mushrooms stand out as a delicious and nutritious choice, perfect for both vegetarians and meat-lovers alike.
These mushrooms are large, meaty, and incredibly versatile, making them an ideal base for a variety of toppings. In this recipe, we’ll enhance the natural flavors of portobello mushrooms by stuffing them with a colorful medley of vegetables and cheese, creating a dish that’s both visually appealing and satisfying.
Portobello mushrooms aren’t only a great source of umami flavor but also rich in nutrients, making them a healthy choice. The earthy taste of the mushrooms pairs wonderfully with the fresh and vibrant flavors of the vegetables. This recipe is designed to serve 4-6 people, making it perfect for a family dinner or a small gathering with friends.
Whether you’re a seasoned grill master or a beginner, this recipe is straightforward and easy to follow, guaranteeing a successful meal every time.
Ingredients (Serves 4-6):
- 6 large portobello mushrooms
- 1 red bell pepper, diced
- 1 yellow bell pepper, diced
- 1 zucchini, diced
- 1 red onion, diced
- 2 cloves garlic, minced
- 1 tablespoon olive oil
- Salt and pepper to taste
- 1 cup shredded mozzarella cheese
- 1/2 cup grated Parmesan cheese
- 1 tablespoon balsamic vinegar
- Fresh basil leaves for garnish
Cooking Instructions:
- Prepare the Mushrooms: Begin by cleaning the portobello mushrooms. Gently remove the stems and use a spoon to scrape out the gills from the underside of the caps. This will create more space for the stuffing and guarantee the mushrooms grill evenly.
- Marinate the Mushrooms: In a large bowl, whisk together the olive oil, balsamic vinegar, salt, and pepper. Place the mushroom caps in the bowl and toss them to coat evenly with the marinade. Allow them to sit for at least 15 minutes to absorb the flavors.
- Prepare the Stuffing: While the mushrooms marinate, prepare the vegetable stuffing. In a medium-sized bowl, combine the diced red and yellow bell peppers, zucchini, red onion, and minced garlic. Season with a pinch of salt and pepper.
- Preheat the Grill: Preheat your grill to medium heat. This guarantees that the mushrooms cook evenly and develop a nice char without burning.
- Stuff the Mushrooms: Remove the mushrooms from the marinade and place them on a clean surface. Fill each cap with a generous amount of the vegetable mixture. Top with shredded mozzarella and grated Parmesan cheese.
- Grill the Mushrooms: Place the stuffed mushrooms directly on the grill, cap side down. Close the grill lid and cook for approximately 10-15 minutes, or until the mushrooms are tender and the cheese is melted and bubbly.
- Serve: Carefully remove the mushrooms from the grill using a spatula. Garnish with fresh basil leaves before serving. Enjoy your Veggie-Packed Portobello Mushrooms hot off the grill!
Extra Tips:
For best results, choose portobello mushrooms that are firm and large enough to hold the stuffing without collapsing. If you find that the mushrooms are drying out too quickly on the grill, you can lightly brush them with additional olive oil during cooking.
To add a bit of heat, consider incorporating some diced jalapeños into the vegetable mixture. Remember to preheat the grill to guarantee even cooking, and always monitor the mushrooms to prevent burning. Enjoy this versatile dish as a main course or as a delicious side to complement other grilled favorites!
Grilled Halloumi and Veggie Salad
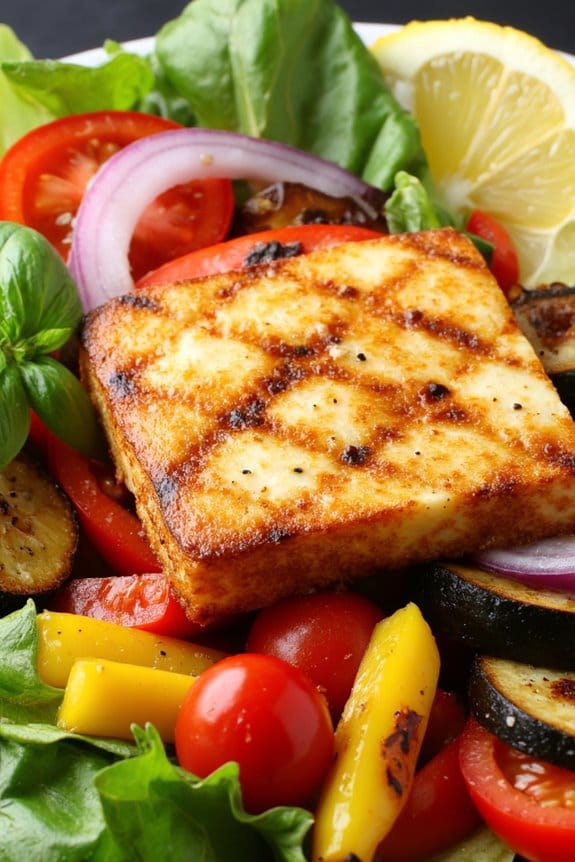
Grilled Halloumi and Veggie Salad is a delightful and healthy option for a summer dinner. This dish combines the creamy texture of halloumi cheese with the vibrant colors and fresh flavors of grilled vegetables to create a satisfying and nutritious meal. The smoky, charred edges of the cheese and veggies offer a delicious contrast to the crisp salad greens, making it a perfect dish for both vegetarians and cheese lovers alike.
Whether you’re hosting a backyard barbecue or simply want to enjoy a quick and easy meal, this salad is sure to please your taste buds.
The key to achieving the perfect Grilled Halloumi and Veggie Salad lies in selecting fresh ingredients and mastering the art of grilling. Halloumi cheese is known for its ability to hold its shape when grilled, making it an ideal candidate for this dish.
Paired with a medley of colorful vegetables such as bell peppers, zucchini, and cherry tomatoes, this salad isn’t only visually appealing but also packed with nutrients. Drizzled with a zesty lemon-olive oil dressing, it brings out the flavors of each ingredient beautifully, providing a revitalizing and satisfying dining experience.
Ingredients (Serves 4-6)
- 2 blocks of halloumi cheese, sliced into 1/2-inch thick pieces
- 2 large bell peppers (red or yellow), cut into strips
- 2 medium zucchinis, sliced into rounds
- 1 pint cherry tomatoes, halved
- 1 red onion, cut into wedges
- 4 cups mixed salad greens (e.g., arugula, spinach, or romaine)
- 1/4 cup olive oil
- 2 tablespoons fresh lemon juice
- 1 teaspoon dried oregano
- Salt and pepper to taste
- Fresh basil leaves for garnish
Cooking Instructions
- Prepare the Grill: Preheat your grill to medium-high heat. Make sure the grates are clean and lightly oiled to prevent sticking.
- Marinate the Vegetables: In a large mixing bowl, combine the bell peppers, zucchini, cherry tomatoes, and red onion. Drizzle with 2 tablespoons of olive oil, and season with salt and pepper. Toss the vegetables to coat them evenly.
- Grill the Halloumi and Vegetables: Place the halloumi slices and marinated vegetables directly onto the grill. Grill the halloumi for about 2-3 minutes on each side, or until golden brown and slightly crispy. Grill the vegetables for 4-5 minutes, turning occasionally, until they’re tender and have nice grill marks.
- Assemble the Salad: In a large serving bowl or platter, arrange the mixed salad greens. Top with the grilled halloumi and vegetables.
- Make the Dressing: In a small bowl, whisk together the remaining 2 tablespoons of olive oil, lemon juice, dried oregano, and a pinch of salt and pepper.
- Dress the Salad: Drizzle the lemon-olive oil dressing over the assembled salad. Toss gently to combine, ensuring the dressing coats all the ingredients.
- Garnish and Serve: Garnish the salad with fresh basil leaves before serving. Enjoy the salad warm or at room temperature.
Extra Tips
For the best results, make sure to use high-quality, fresh ingredients. Halloumi cheese can be quite salty, so taste the salad before adding extra salt to the dressing.
If you prefer a spicier kick, consider adding a pinch of red pepper flakes to the dressing. Also, feel free to experiment with different vegetables based on what’s in season or your personal preference.
Finally, if you don’t have access to a grill, you can use a grill pan on the stovetop to achieve similar results.
Grilled Eggplant With Tahini
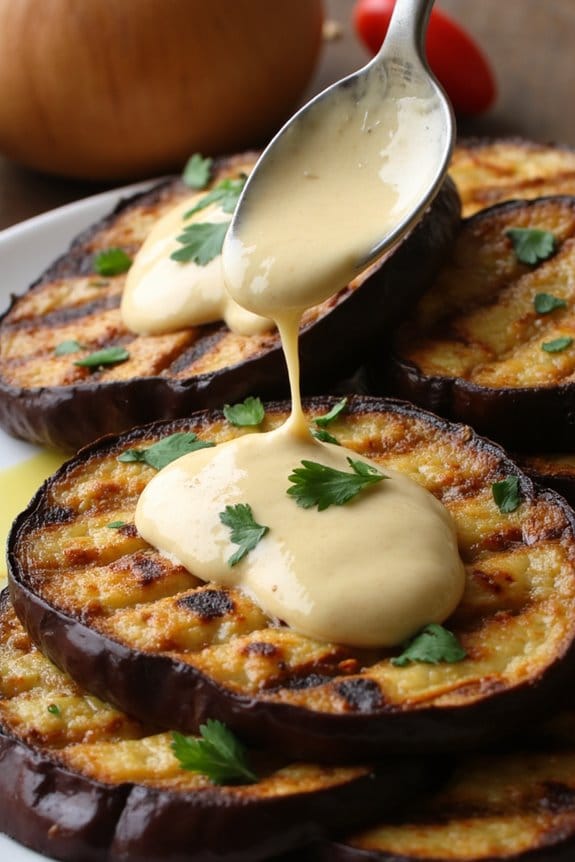
Grilled Eggplant With Tahini is a delicious and healthy option for a summer dinner. The smoky flavor of the grilled eggplant pairs perfectly with the creamy, nutty tahini sauce, creating a dish that’s both satisfying and full of flavor. This dish isn’t only vegetarian but also rich in nutrients, making it a great choice for those looking to incorporate more plant-based meals into their diet. The combination of textures and flavors in this dish will delight your taste buds and leave you feeling nourished and satisfied.
The preparation of Grilled Eggplant With Tahini is simple, yet the result is a gourmet-style meal that’s sure to impress. By grilling the eggplant, you bring out its natural sweetness while adding a delicious char. The tahini sauce, made with lemon juice, garlic, and a touch of olive oil, complements the eggplant perfectly, adding a rich and tangy element to the dish. Best of all, it can be prepared in advance, making it perfect for entertaining or for a quick weeknight dinner.
Ingredients (serves 4-6):
- 2 large eggplants
- 1/4 cup olive oil
- Salt, to taste
- Black pepper, to taste
- 1/2 cup tahini
- 1/4 cup fresh lemon juice
- 2 cloves garlic, minced
- 1/4 cup water (or more, as needed)
- 1 tablespoon fresh parsley, chopped (optional for garnish)
Cooking Instructions:
- Prepare the Eggplant: Begin by washing the eggplants and slicing them into 1/2-inch thick rounds. Lay the slices on a baking sheet and sprinkle both sides generously with salt. Let them sit for about 20 minutes to draw out excess moisture and bitterness. After 20 minutes, rinse the slices under cold water and pat them dry with paper towels.
- Preheat the Grill: While the eggplant is resting, preheat your grill to medium-high heat. If using a charcoal grill, wait until the coals are glowing red with a light layer of ash before starting to cook.
- Season the Eggplant: Brush each side of the eggplant slices with olive oil and season with black pepper.
- Grill the Eggplant: Place the eggplant slices on the grill. Cook for about 4-5 minutes on each side, or until they’re tender and have nice grill marks. Remove them from the grill and set aside.
- Prepare the Tahini Sauce: In a bowl, combine tahini, lemon juice, minced garlic, and water. Whisk until smooth and creamy. If the sauce is too thick, add more water, a tablespoon at a time, until you reach your desired consistency. Season with salt to taste.
- Assemble the Dish: Arrange the grilled eggplant slices on a serving platter. Drizzle generously with the tahini sauce and sprinkle with fresh parsley if using.
Extra Tips: To enhance the flavor of your Grilled Eggplant With Tahini, consider adding a pinch of smoked paprika or ground cumin to the tahini sauce for a bit of extra spice. If you prefer a more substantial meal, you can serve the dish over a bed of couscous or quinoa.
Remember to adjust the thickness of your tahini sauce according to your preference; it should be pourable but not too runny. Grilled Eggplant With Tahini can also be enjoyed cold, making it a versatile dish for picnics or potlucks.
Grilled Corn With Chili Lime Butter
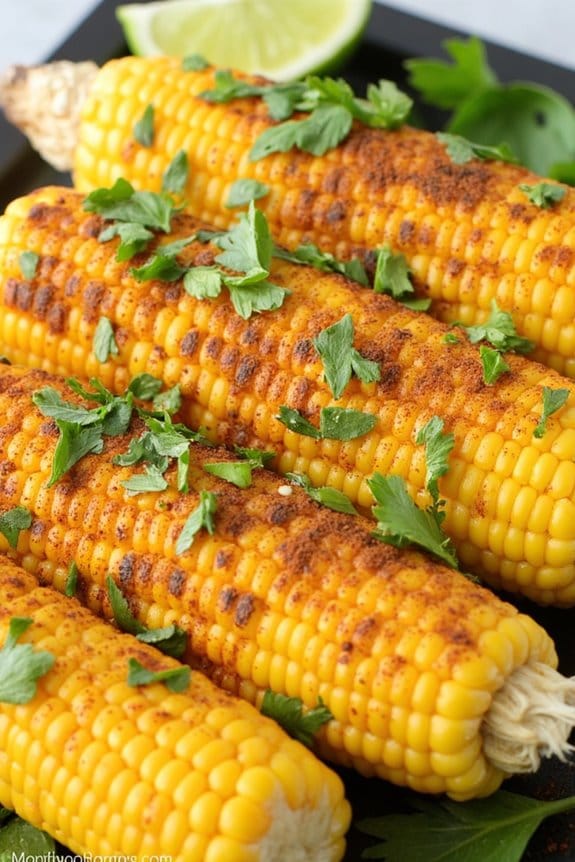
Grilled corn is a beloved staple at any barbecue or summer gathering, and when you add a zesty twist with chili lime butter, it becomes an irresistible treat. The combination of the charred, smoky flavor from the grill and the tangy, spicy butter makes this dish a standout. Perfect as a side or even a main attraction for a light meal, Grilled Corn With Chili Lime Butter is guaranteed to delight your taste buds and impress your guests.
This recipe for Grilled Corn With Chili Lime Butter is designed to serve 4-6 people, making it ideal for a family dinner or a small gathering. The preparation is simple, and the results are mouthwateringly delicious. With just a few ingredients and minimal effort, you can create a dish that highlights the natural sweetness of corn while introducing bold and exciting flavors.
Ingredients for 4-6 servings:
- 6 ears of fresh corn, husked
- 1/2 cup unsalted butter, softened
- 1 tablespoon lime zest
- 2 tablespoons lime juice
- 1 tablespoon chili powder
- 1 teaspoon smoked paprika
- 1/2 teaspoon salt
- 1/4 teaspoon black pepper
- 2 tablespoons chopped fresh cilantro
- Lime wedges, for serving
Cooking Instructions:
- Prepare the Corn: Start by preheating your grill to medium-high heat. Meanwhile, remove the husks and silk from the corn. Rinse the ears under cold water to remove any remaining silk.
- Make the Chili Lime Butter: In a medium bowl, combine the softened butter, lime zest, lime juice, chili powder, smoked paprika, salt, and black pepper. Mix until smooth and well combined. Set aside.
- Grill the Corn: Place the ears of corn directly on the grill grates. Grill the corn for about 10-12 minutes, turning occasionally. You want the corn to have a nice char and be tender. The kernels should be slightly caramelized and golden brown in places.
- Apply the Butter: Once the corn is grilled to perfection, remove it from the grill. Generously brush each ear with the prepared chili lime butter while the corn is still hot so that it melts evenly over the kernels.
- Garnish and Serve: Sprinkle the chopped fresh cilantro over the buttered corn for a pop of color and additional flavor. Serve the grilled corn with lime wedges on the side for an extra burst of citrus.
Extra Tips:
For the best results, choose fresh, sweet corn that’s in season, as it will have the most flavor and juiciness. If you prefer a spicier kick, feel free to add more chili powder or even a pinch of cayenne pepper to the butter.
When grilling, make sure to keep an eye on the corn to prevent it from burning, turning the ears regularly to guarantee even cooking. If you don’t have access to a grill, you can also cook the corn under the broiler in your oven, turning the ears until they’re nicely charred.
Finally, consider experimenting with flavored salts or adding a sprinkle of cotija cheese for an extra layer of flavor.
Margherita Pizza on the Grill With Basil

Grilled Margherita Pizza is a simple yet delicious way to enjoy the classic flavors of this beloved Italian dish while adding an extra smoky dimension from the grill. This recipe combines fresh ingredients like ripe tomatoes, creamy mozzarella, and aromatic basil, all brought together on a crisp, grilled pizza crust. Perfect for a summer evening dinner or a weekend gathering, this dish will surely become a favorite in your home.
Grilling pizza might sound unconventional, but it’s an excellent method to achieve a wonderfully charred crust and bubbling toppings. By using a grill, you can mimic the high heat of a traditional pizza oven right in your backyard. The smoky flavor from the grill complements the fresh basil and mozzarella, making this Margherita Pizza a delightful and satisfying meal for 4-6 people.
Ingredients (Serves 4-6):
- 2 pounds pizza dough
- 2 cups tomato sauce
- 1 pound fresh mozzarella cheese, sliced
- 3-4 ripe tomatoes, sliced
- 1/4 cup olive oil
- Salt and pepper to taste
- 1-2 cups fresh basil leaves
- Flour for dusting
Cooking Instructions:
- Prepare the Dough: On a lightly floured surface, roll out the pizza dough into one or two large rounds, about 1/4 inch thick. Let the dough sit for about 10 minutes to relax.
- Preheat the Grill: Preheat your grill to high heat, approximately 500°F (260°C). Make sure the grates are clean and lightly oiled to prevent sticking.
- Grill the Dough: Brush one side of the dough rounds with olive oil and place them oil-side down on the grill. Close the lid and cook for about 2-3 minutes or until the bottom is crisp and has grill marks. Brush the top side with olive oil before flipping.
- Add Toppings: Flip the dough over and quickly spread a layer of tomato sauce over the cooked side. Distribute the sliced mozzarella and tomatoes evenly over the sauce. Season with salt and pepper.
- Finish Grilling: Close the grill lid and cook for another 3-5 minutes, or until the cheese is melted and bubbly and the bottom of the crust is golden brown and crispy.
- Garnish and Serve: Remove the pizzas from the grill and immediately top with fresh basil leaves. Allow the pizzas to rest for a few minutes before slicing and serving.
Extra Tips: If you prefer a crispier crust, you can pre-bake the dough slightly longer before adding the toppings. Additionally, using a pizza stone on the grill can help distribute heat more evenly, creating a perfect crust.
Be careful when grilling to avoid burning the dough, and be sure to have all your toppings ready to go, as the process moves quickly once the dough hits the grill. This recipe is flexible, so feel free to adjust the amount of cheese or basil to your preference. Enjoy your homemade grilled Margherita Pizza!