

Hosting summer barbecues is one of my favorite ways to enjoy the season, and I’ve discovered that the right side dishes can make grilled pork truly shine.
Think about the smoky sweetness of grilled corn paired with the comforting flavors of barbecue baked beans and creamy coleslaw.
Each dish complements the main attraction, creating a delightful mix of tastes.
Curious about what else can elevate your meal?
Let’s explore some mouthwatering sides that are sure to make your barbecue unforgettable.
Grilled Corn on the Cob
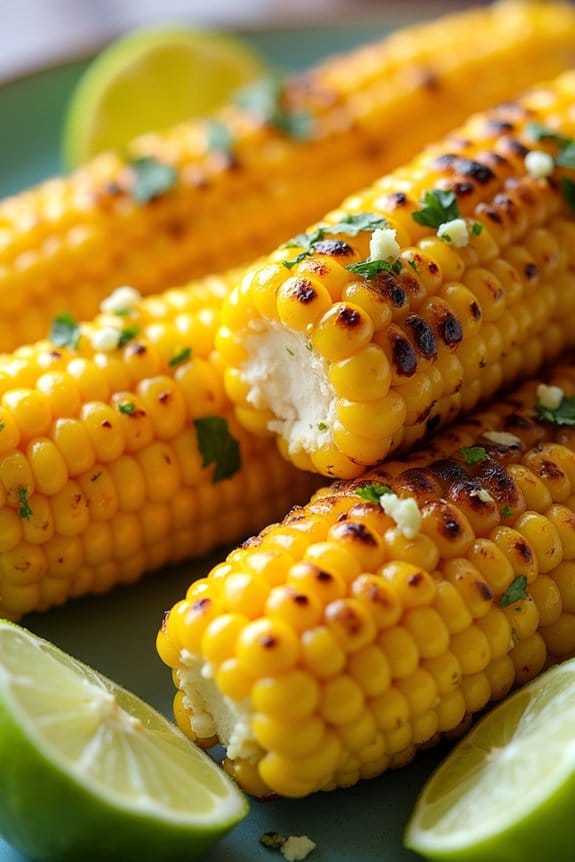
Grilled corn on the cob is a quintessential summer side dish that pairs perfectly with grilled pork. The smoky flavor from the grill enhances the natural sweetness of the corn, making it a delightful addition to any barbecue.
Whether you’re hosting a backyard cookout or a casual family dinner, grilled corn on the cob will surely impress your guests with its delicious taste and vibrant presentation.
To achieve the perfect grilled corn, it’s important to start with fresh, high-quality corn. The grilling process adds a wonderful char to the kernels, resulting in a slightly crisp and juicy texture. By brushing the corn with a flavorful herb butter before grilling, you can elevate the taste even further. This recipe is designed to serve 4-6 people, making it ideal for small gatherings or family meals.
Ingredients (Serves 4-6):
- 6 ears of fresh corn, husked
- 1/2 cup unsalted butter, softened
- 2 cloves garlic, minced
- 1 tablespoon fresh parsley, chopped
- 1 teaspoon salt
- 1/2 teaspoon black pepper
- 1 tablespoon olive oil
- 1 lime, cut into wedges
Cooking Instructions:
- Prepare the Herb Butter: In a small bowl, combine the softened butter, minced garlic, chopped parsley, salt, and black pepper. Mix well until all the ingredients are thoroughly combined. This herb butter will add a delicious flavor to the corn.
- Preheat the Grill: Preheat your grill to medium-high heat. Make sure the grates are clean and lightly oiled to prevent the corn from sticking.
- Brush Corn with Olive Oil: Lightly brush each ear of corn with olive oil. This step helps in preventing the corn from sticking to the grill and also aids in achieving a nice char.
- Grill the Corn: Place the corn directly on the grill grates. Close the lid and grill for about 10-15 minutes, turning every 2-3 minutes. You’ll want to achieve a nice char on all sides while ensuring the corn is cooked through.
- Apply Herb Butter: Once the corn is grilled, remove it from the grill and immediately brush it generously with the prepared herb butter. The heat from the corn will melt the butter, allowing it to seep into the kernels.
- Serve with Lime Wedges: Transfer the grilled corn to a serving platter and serve with lime wedges on the side. Squeezing fresh lime juice over the corn just before eating adds a revitalizing citrusy zing that complements the flavors beautifully.
Extra Tips:
For the best results, choose corn that’s fresh and in-season, as it will have the sweetest flavor. If you want to add a bit of spice, consider sprinkling a pinch of cayenne pepper over the corn along with the herb butter.
If you prefer a smokier flavor, you can soak the corn in water for 10-15 minutes before grilling; this creates steam when grilling and enhances the smoky taste. Always keep a close eye on the corn while grilling to prevent it from burning, and feel free to experiment with different herbs and spices in the butter to suit your taste preferences.
Smoky Barbecue Baked Beans
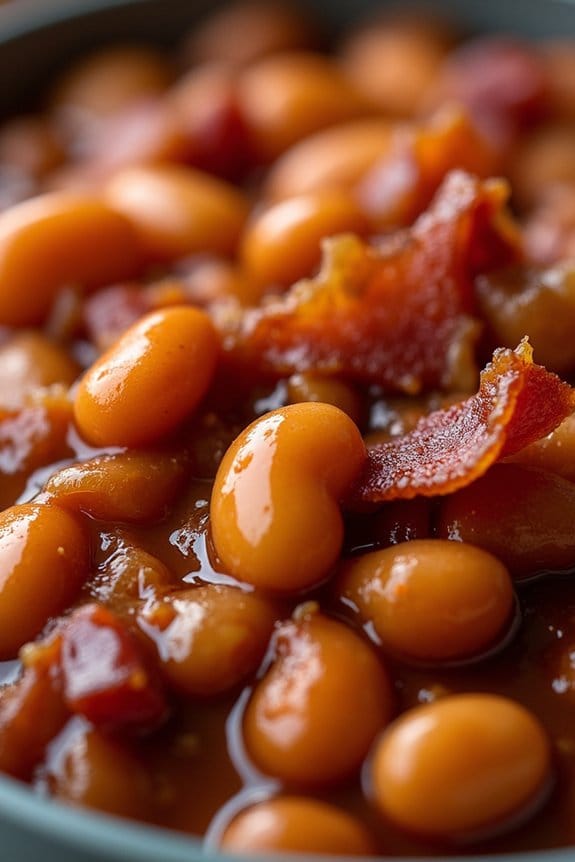
Smoky Barbecue Baked Beans is a classic side dish that pairs perfectly with grilled pork, offering a delightful blend of sweet, savory, and smoky flavors. This dish is made by slow-cooking beans in a rich barbecue sauce, enhanced with ingredients like brown sugar, smoked paprika, and bacon, which lend it a deep and satisfying taste.
It’s a crowd-pleaser at any barbecue gathering, adding a comforting and hearty element to your meal. The beans soak up all the flavors, resulting in a deliciously thick and flavorful side dish that will have everyone asking for seconds.
The beauty of Smoky Barbecue Baked Beans lies in their simplicity and versatility. They can be prepared ahead of time and simply reheated when needed, making them an excellent choice for entertaining. This version is designed for 4-6 people, ensuring there’s plenty to go around.
Whether you’re hosting a large outdoor barbecue or a small family dinner, these beans complement grilled pork perfectly, balancing the meat’s savory notes with a touch of sweetness and smokiness. Let’s explore the recipe to create this crowd-favorite dish.
Ingredients (Serves 4-6):
- 2 cans (15 ounces each) of navy beans or pinto beans, drained and rinsed
- 6 slices of bacon, chopped
- 1 medium onion, diced
- 1/2 cup barbecue sauce
- 1/4 cup ketchup
- 1/4 cup brown sugar
- 2 tablespoons molasses
- 2 teaspoons smoked paprika
- 1 teaspoon mustard powder
- 1 teaspoon garlic powder
- Salt and pepper to taste
Cooking Instructions:
- Prepare the Bacon and Onions: In a large skillet over medium heat, cook the chopped bacon until it’s crispy, about 5-7 minutes. Use a slotted spoon to remove the bacon from the skillet and set it aside on a paper towel-lined plate. Leave about 2 tablespoons of bacon grease in the skillet.
- Sauté the Onions: Add the diced onion to the skillet with the bacon grease. Sauté over medium heat until the onions are soft and translucent, approximately 5 minutes.
- Mix the Sauce: In a large mixing bowl, combine the barbecue sauce, ketchup, brown sugar, molasses, smoked paprika, mustard powder, and garlic powder. Whisk until all ingredients are well combined.
- Combine Ingredients: Add the drained and rinsed beans, cooked bacon, and sautéed onions to the mixing bowl with the sauce. Stir everything together until the beans are fully coated in the sauce.
- Bake the Beans: Preheat your oven to 350°F (175°C). Transfer the bean mixture to a baking dish and spread it out evenly. Cover the dish with aluminum foil and bake in the preheated oven for 30 minutes.
- Finish Baking: Remove the foil and bake for an additional 15 minutes, or until the sauce is bubbly and thickened to your liking. If you prefer a thicker sauce, you can bake it uncovered for a few more minutes.
- Season and Serve: Taste the beans and add salt and pepper if needed. Serve hot alongside your grilled pork for a delicious meal.
Extra Tips:
For a deeper smoky flavor, you can add a few dashes of liquid smoke to the sauce mixture before baking. If you prefer your beans to have a bit of a spicy kick, consider adding a chopped jalapeño or a pinch of cayenne pepper to the mix.
To save time, you can prepare the beans a day in advance, store them in the refrigerator, and then reheat them in the oven before serving. This allows the flavors to meld together even more, resulting in an even tastier dish.
Classic Coleslaw
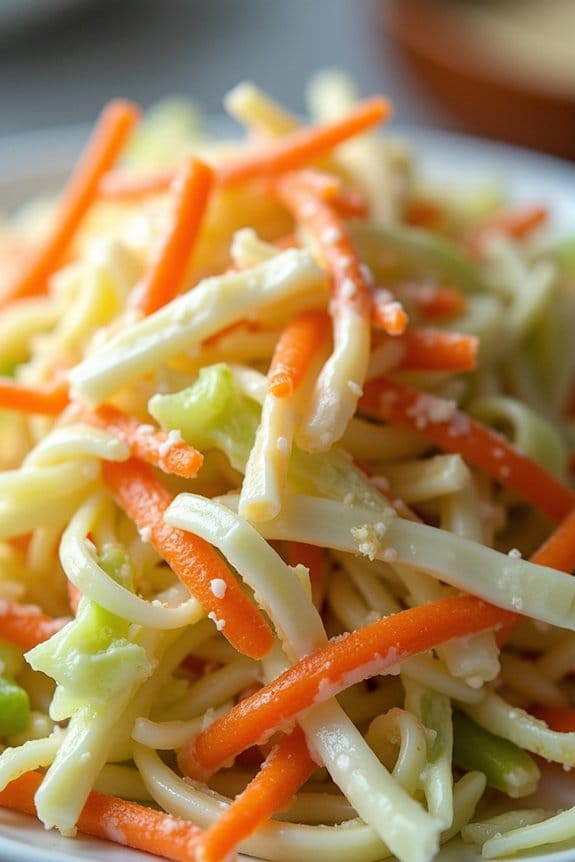
Classic coleslaw is a timeless accompaniment to grilled pork, offering a revitalizing and crunchy contrast to the rich flavors of the meat. This dish combines fresh cabbage and carrots with a creamy dressing made from mayonnaise, vinegar, sugar, and a hint of mustard. The result is a tangy, slightly sweet side dish that balances the savory notes of grilled pork, making it an ideal pairing.
With its vibrant colors and crisp texture, coleslaw not only enhances the visual appeal of your meal but also provides a burst of flavor that complements the smoky undertones of the pork.
Preparing a classic coleslaw is a straightforward process that can be completed in under 20 minutes, making it a convenient choice for any barbecue or casual dinner. This recipe serves 4-6 people, perfect for a family gathering or a small party. With just a few simple ingredients and easy-to-follow instructions, you’ll be able to create a delicious, homemade coleslaw that will delight your guests and elevate your grilled pork dishes.
Ingredients (serving size: 4-6 people):
- 1 small head of green cabbage, shredded
- 2 medium carrots, peeled and grated
- 1/2 cup mayonnaise
- 2 tablespoons apple cider vinegar
- 1 tablespoon sugar
- 1 tablespoon Dijon mustard
- Salt and pepper to taste
Cooking Instructions:
- Prepare the Vegetables: Begin by shredding the cabbage. You can use a sharp knife or a mandoline slicer to achieve thin, even slices. Next, peel and grate the carrots using a box grater. Combine the shredded cabbage and grated carrots in a large mixing bowl.
- Make the Dressing: In a separate small bowl, whisk together the mayonnaise, apple cider vinegar, sugar, and Dijon mustard until the mixture is smooth and creamy. Adjust the seasoning by adding salt and pepper to taste.
- Combine Ingredients: Pour the dressing over the cabbage and carrot mixture. Using a pair of tongs or a large fork, gently toss the ingredients until the vegetables are evenly coated with the dressing.
- Chill: Cover the bowl with plastic wrap or a lid and refrigerate the coleslaw for at least 1 hour before serving. This resting period allows the flavors to meld and the cabbage to slightly soften, enhancing the overall taste and texture of the coleslaw.
- Serve: Once chilled, give the coleslaw a final toss to redistribute any dressing that may have settled at the bottom. Serve it alongside your grilled pork for a revitalizing and flavorful side dish.
Extra Tips:
For a more colorful coleslaw, consider adding red cabbage or green onions to the mix. If you prefer a sweeter coleslaw, increase the amount of sugar slightly, or add a handful of raisins or dried cranberries.
For a lighter version, substitute some of the mayonnaise with Greek yogurt. Finally, always taste the dressing before mixing it with the vegetables to confirm the balance of flavors suits your preference. Adjust the ingredients accordingly for a perfect coleslaw tailored to your taste.
Garlic Herb Grilled Potatoes
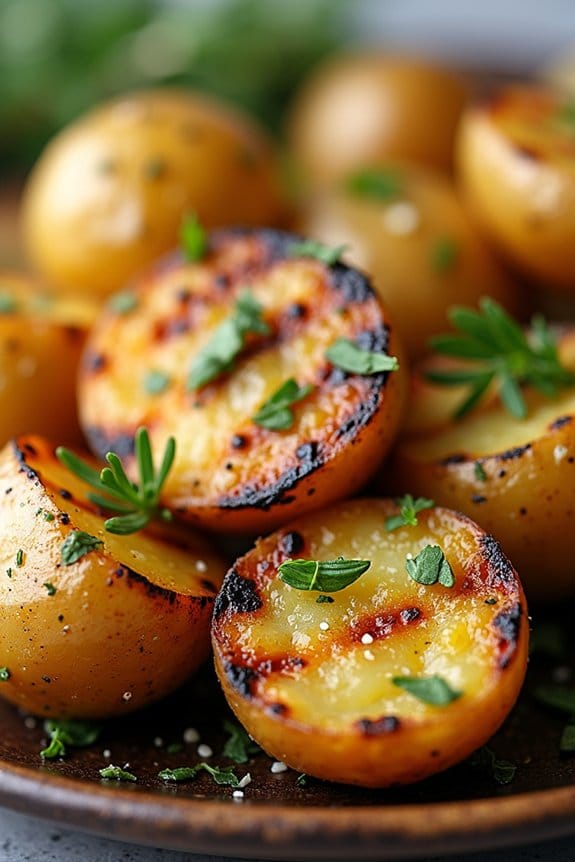
Grilled pork is a versatile and flavorful dish that can be complemented with a variety of side dishes. One standout option is Garlic Herb Grilled Potatoes. These potatoes are infused with the aromatic flavors of garlic and a medley of fresh herbs, making them a perfect accompaniment to the savory taste of grilled pork. Their crispy exterior and tender interior provide a delightful texture contrast, enhancing the overall dining experience.
The beauty of Garlic Herb Grilled Potatoes lies in their simplicity and the way they effortlessly absorb the smoky flavors from the grill. This dish isn’t only delicious but also easy to prepare, making it a go-to option for outdoor gatherings or family dinners. By following a few straightforward steps, you can create a side dish that complements the rich flavors of grilled pork, bringing a sense of harmony to your meal.
Ingredients for 4-6 people:
- 2 pounds of baby potatoes
- 3 tablespoons olive oil
- 4 cloves of garlic, minced
- 1 tablespoon fresh rosemary, chopped
- 1 tablespoon fresh thyme, chopped
- 1 tablespoon fresh parsley, chopped
- Salt and pepper to taste
Cooking Instructions:
- Prepare the Potatoes: Start by washing the baby potatoes thoroughly under running water to remove any dirt. Pat them dry with a clean kitchen towel. Slice the potatoes in half to guarantee they cook evenly and absorb the flavors better.
- Marinate the Potatoes: In a large mixing bowl, combine the olive oil, minced garlic, chopped rosemary, thyme, and parsley. Season the mixture with salt and pepper to taste. Add the potato halves to the bowl, tossing them gently to guarantee they’re evenly coated with the herb-garlic mixture.
- Preheat the Grill: Preheat your grill to medium-high heat. This temperature is ideal for achieving a nice char on the potatoes without burning them. If using a charcoal grill, ensure the coals are evenly distributed for consistent heat.
- Grill the Potatoes: Place the marinated potato halves directly on the grill grates, cut side down. Close the grill lid and let them cook for about 10-15 minutes, or until the cut sides develop a golden-brown crust. Turn the potatoes over and grill for an additional 10-15 minutes, or until they’re tender when pierced with a fork.
- Serve: Once cooked, remove the potatoes from the grill and transfer them to a serving platter. Garnish with additional fresh parsley for an extra touch of color and flavor. Serve hot alongside your grilled pork for a delicious and satisfying meal.
Extra Tips:
To guarantee even cooking, try to select potatoes of a similar size. If you have larger potatoes, you may need to cut them into smaller pieces.
Additionally, if you prefer a stronger garlic flavor, consider adding an extra clove or two to the marinade. For those who enjoy a bit of spice, a pinch of red pepper flakes can be added to the herb mix for a subtle kick.
Finally, remember to monitor the grill temperature and adjust as needed to prevent the potatoes from burning while achieving that perfect crispy exterior.
Fresh Summer Salad
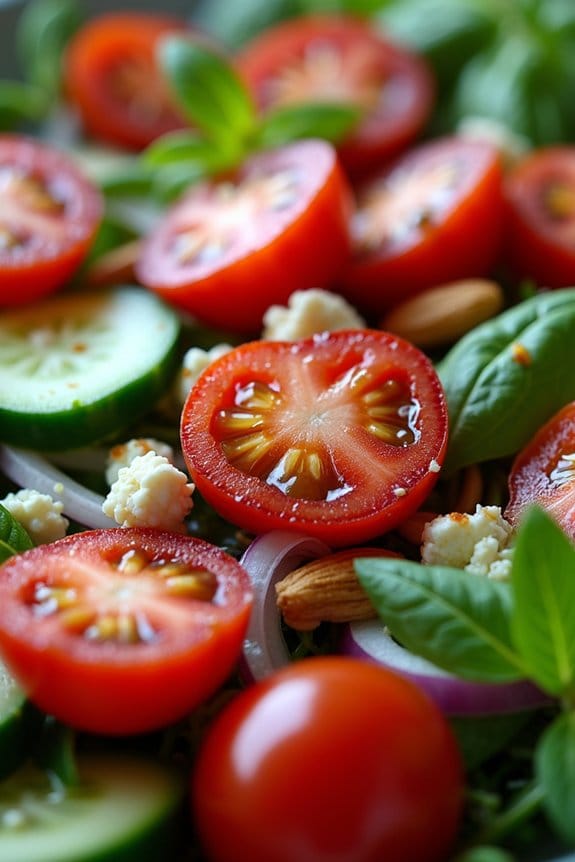
Grilling pork is a delightful way to enjoy a meal during the warmer months, and pairing it with a fresh summer salad elevates the flavors even further. This Fresh Summer Salad is bright, invigorating, and full of seasonal produce that complements the savory richness of grilled pork.
It’s quick to prepare and adds a burst of color to your plate, making it an excellent choice when you’re looking to impress guests or simply enjoy a balanced meal at home.
This salad combines a variety of textures and flavors, from the crispness of fresh greens to the sweetness of ripe fruits, creating a harmonious blend that complements the smoky notes of grilled pork. The dressing is light and tangy, enhancing the natural flavors of the salad ingredients without overpowering them.
Suitable for serving 4-6 people, this Fresh Summer Salad isn’t only a feast for the taste buds but also a visual delight, making it a perfect side dish for any grilled pork recipe.
Ingredients:
- 6 cups mixed salad greens (such as arugula, spinach, and romaine)
- 1 cup cherry tomatoes, halved
- 1 cucumber, thinly sliced
- 1 red bell pepper, thinly sliced
- 1 cup fresh strawberries, hulled and sliced
- 1/2 red onion, thinly sliced
- 1/2 cup crumbled feta cheese
- 1/4 cup toasted almonds or walnuts
- 1/4 cup fresh basil leaves, torn
- 1/4 cup olive oil
- 2 tablespoons balsamic vinegar
- 1 tablespoon honey
- Salt and pepper to taste
Instructions:
- Prepare the Salad Base: In a large salad bowl, combine the mixed salad greens, verifying they’re clean and dry. This forms the base of your salad.
- Add Vegetables: Add the halved cherry tomatoes, thinly sliced cucumber, and red bell pepper to the bowl. These vegetables add freshness and crunch to the salad.
- Incorporate Fruits: Gently toss in the sliced strawberries. The sweetness of the strawberries will contrast beautifully with the savory elements of the salad.
- Layer the Onions and Cheese: Scatter the thinly sliced red onion over the salad, followed by the crumbled feta cheese. The onion adds a mild sharpness, while the feta introduces a creamy texture.
- Sprinkle Nuts and Herbs: Add the toasted almonds or walnuts and torn basil leaves. The nuts provide a nutty crunch, and the basil offers a fragrant note.
- Prepare the Dressing: In a small bowl, whisk together the olive oil, balsamic vinegar, honey, salt, and pepper. Mix until the dressing is well emulsified.
- Dress the Salad: Pour the dressing over the salad just before serving. Toss the salad gently to verify all ingredients are evenly coated with the dressing.
- Serve Immediately: Transfer the salad to a serving platter or individual bowls and serve immediately alongside your grilled pork.
Extra Tips:
For the freshest salad, choose seasonal produce at its peak ripeness, such as strawberries and tomatoes during the summer months.
Feel free to substitute or add other favorite fruits or nuts to customize the salad to your liking. If you’re preparing the salad in advance, keep the dressing separate and add it just before serving to prevent the salad from becoming soggy.
Finally, if you prefer a different type of cheese, goat cheese or blue cheese can be excellent alternatives to feta.
Charred Asparagus With Lemon
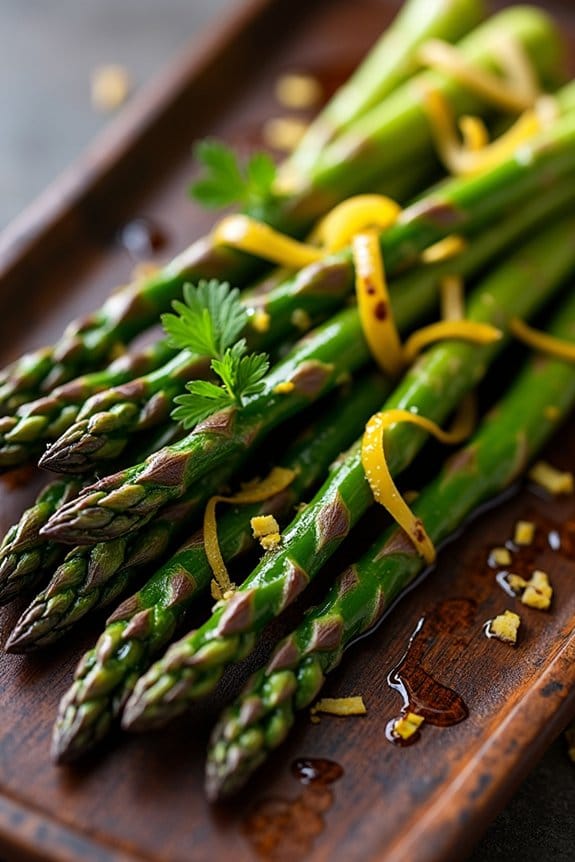
Grilled pork is a versatile and flavorful main dish, and selecting the perfect side can elevate your meal to a whole new level. One of the best companions to grilled pork is the bright and zesty Charred Asparagus With Lemon. This dish combines the smoky essence of charred asparagus with the invigorating taste of lemon, creating a side that complements the richness of pork beautifully.
The simplicity of this recipe allows the natural flavors to shine, guaranteeing that it doesn’t overpower the main dish but enhances it. Asparagus is in its prime during spring and early summer, making it an ideal choice for grilling. When cooked over high heat, asparagus takes on a delightful char that adds a subtle smokiness to its earthy flavor.
The addition of lemon not only brightens the dish but also adds a tangy note that cuts through the richness of the pork, balancing the entire meal. This Charred Asparagus With Lemon recipe is easy to prepare, requiring minimal ingredients and effort, making it a perfect choice for a quick and impressive side dish.
Ingredients for 4-6 servings:
- 2 pounds asparagus, trimmed
- 2 tablespoons olive oil
- Salt, to taste
- Black pepper, to taste
- 1 lemon, zested and juiced
- 1 tablespoon fresh parsley, chopped (optional)
Cooking Instructions:
- Prepare the Asparagus: Begin by washing the asparagus thoroughly. Trim the woody ends by snapping them off where they naturally break, usually about 1-2 inches from the base.
- Season the Asparagus: Place the trimmed asparagus in a large bowl. Drizzle with olive oil and sprinkle with salt and black pepper. Toss the asparagus spears until they’re evenly coated with the oil and seasonings.
- Preheat the Grill: Preheat your grill to medium-high heat. If using a charcoal grill, make sure the coals are white and ashy before placing the asparagus on the grill.
- Grill the Asparagus: Arrange the asparagus spears in a single layer on the grill grates. Cook for about 3-5 minutes, turning occasionally, until the asparagus is tender and has visible grill marks.
- Add Lemon Flavor: While the asparagus is grilling, zest the lemon and set the zest aside. Once the asparagus is done, remove it from the grill and place it on a serving platter. Drizzle the lemon juice over the asparagus, followed by a sprinkling of lemon zest.
- Garnish and Serve: If desired, garnish the asparagus with freshly chopped parsley for added color and flavor. Serve the charred asparagus immediately alongside your grilled pork.
Extra Tips:
For best results, choose asparagus spears that are similar in thickness to guarantee even cooking. If you prefer a deeper smoky flavor, allow the asparagus to develop more char by leaving it on the grill for an extra minute or two.
Be cautious not to overcook the asparagus, as it can become mushy. If a grill isn’t available, this recipe can also be adapted for a stovetop grill pan or oven broiler. Finally, for a bit of variation, try adding a sprinkle of grated Parmesan cheese just before serving for an extra layer of flavor.
Honey Butter Grilled Carrots
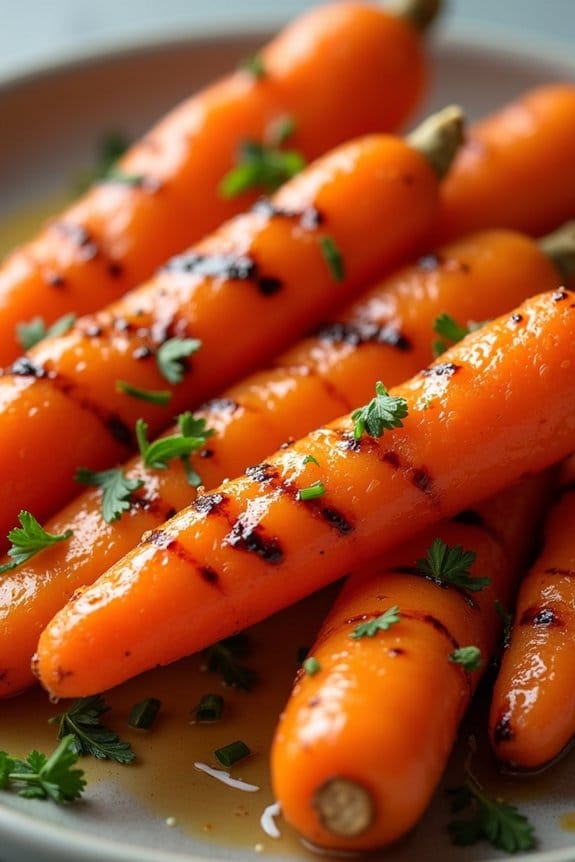
Grilled pork pairs beautifully with a variety of side dishes, and Honey Butter Grilled Carrots are a delightful choice. The natural sweetness of the carrots is enhanced by a luscious honey butter glaze, while grilling adds a subtle smoky flavor. This simple yet elegant side dish not only complements the savory notes of grilled pork but also adds a vibrant color to your plate, making it visually appealing as well. Perfect for a family dinner or a summer barbecue, these carrots are bound to become a favorite.
To achieve the perfect balance of flavors, fresh carrots are lightly coated in a mixture of honey and butter, which caramelizes during grilling. This process accentuates their sweetness and gives them a slightly crisp texture. The dish is easy to prepare and requires minimal ingredients, making it an ideal choice for those who want to impress their guests without spending too much time in the kitchen. With this recipe, you can serve a side dish that’s both nutritious and delicious, enhancing your grilled pork meal experience.
Ingredients (Serves 4-6):
- 2 pounds of fresh carrots, peeled and cut into sticks
- 3 tablespoons of unsalted butter
- 2 tablespoons of honey
- 1 tablespoon of olive oil
- 1 teaspoon of salt
- 1/2 teaspoon of black pepper
- 1 tablespoon of fresh parsley, chopped (optional, for garnish)
Cooking Instructions:
- Prepare the Grill: Preheat your grill to medium-high heat. If using a charcoal grill, wait until the coals are glowing and covered with gray ash.
- Prepare the Carrots: While the grill is heating, peel the carrots and slice them into sticks, approximately 4 inches long and 1/2 inch thick. This size guarantees even cooking and a pleasant texture.
- Make the Honey Butter Glaze: In a small saucepan over low heat, melt the butter. Once melted, stir in the honey and olive oil until well combined. Remove from heat and set aside.
- Season the Carrots: Place the carrot sticks in a large bowl. Drizzle with the honey butter mixture, then sprinkle with salt and black pepper. Toss the carrots until they’re evenly coated with the glaze and seasoning.
- Grill the Carrots: Place the carrots directly on the grill grates or use a grill basket if preferred. Grill for 10-15 minutes, turning occasionally, until the carrots are tender and lightly charred.
- Serve: Transfer the grilled carrots to a serving platter. If desired, garnish with freshly chopped parsley for an added touch of color and flavor. Serve warm alongside your grilled pork.
Extra Tips:
For best results, use fresh, firm carrots as they hold up better on the grill. If you prefer a bit of spice, add a pinch of cayenne pepper to the honey butter glaze for a sweet and spicy twist. You can also add a squeeze of lemon juice over the finished dish for a hint of acidity that balances the sweetness.
To prevent the carrots from sticking to the grill, make sure the grill grates are clean and well-oiled before cooking.
Zucchini and Squash Skewers
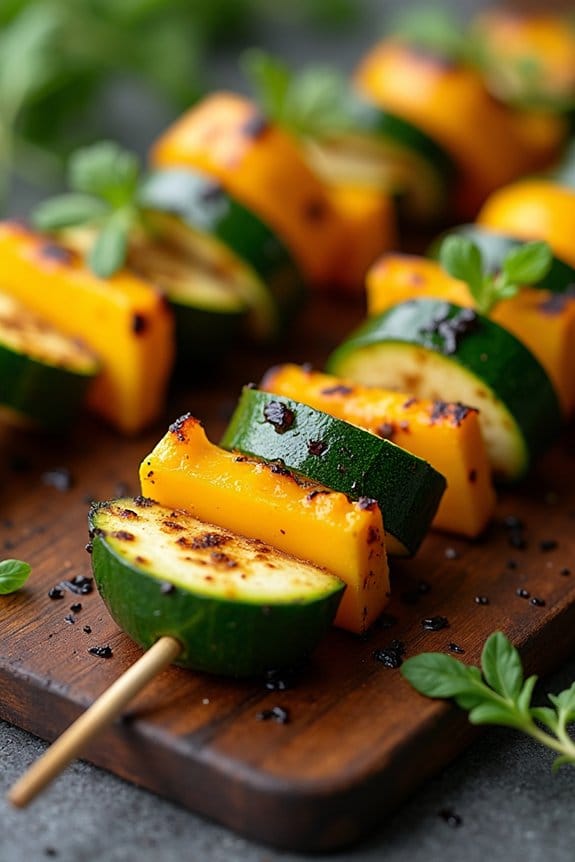
Grilled Pork Side Dishes are incomplete without a vibrant and tasty vegetable component, and Zucchini and Squash Skewers fit the bill perfectly. These skewers aren’t only colorful but also packed with flavor, providing a perfect balance to the rich taste of grilled pork. The natural sweetness of the vegetables is enhanced by a simple marinade, making them a delightful addition to any barbecue or family gathering.
With their ease of preparation and cooking, these skewers are a must-try for any grilling enthusiast looking to impress their guests. These skewers are incredibly versatile and can be prepared ahead of time, allowing the marinade’s flavors to fully penetrate the vegetables. Grilling brings out the natural sugars in the zucchini and squash, giving them a delicious charred taste that complements the smokiness of the pork.
Perfect for serving 4-6 people, this recipe guarantees that everyone at the table gets a generous share of these deliciously grilled veggies. Whether you’re an experienced griller or a newbie in the kitchen, this recipe is straightforward and rewarding.
Ingredients (Serves 4-6):
- 3 medium zucchinis, sliced into thick rounds
- 3 medium yellow squashes, sliced into thick rounds
- 2 tablespoons olive oil
- 1 tablespoon balsamic vinegar
- 2 cloves garlic, minced
- 1 teaspoon dried oregano
- 1 teaspoon dried thyme
- Salt and pepper to taste
- 8-10 wooden skewers, soaked in water for 30 minutes
Cooking Instructions:
- Prepare the Skewers: Begin by soaking the wooden skewers in water for at least 30 minutes. This prevents them from burning on the grill.
- Slice the Vegetables: Cut the zucchinis and yellow squashes into thick rounds. Uniform slices ensure even grilling and prevent smaller pieces from slipping through the grill grates.
- Make the Marinade: In a large mixing bowl, combine olive oil, balsamic vinegar, minced garlic, dried oregano, and dried thyme. Whisk together until well blended. Add salt and pepper to taste.
- Marinate the Vegetables: Add the sliced zucchini and squash to the bowl with the marinade. Toss the vegetables until they’re evenly coated. Allow them to marinate for at least 15-20 minutes, or up to an hour for more intense flavor.
- Skewer the Vegetables: Thread the marinated zucchini and squash rounds onto the soaked wooden skewers, alternating between the two for a colorful presentation.
- Preheat the Grill: Preheat your grill to medium-high heat. Lightly oil the grill grates to prevent sticking.
- Grill the Skewers: Place the vegetable skewers on the grill. Cook for about 10-12 minutes, turning occasionally, until the vegetables are tender and have nice grill marks.
- Serve: Remove the skewers from the grill and serve immediately alongside your grilled pork. Enjoy the combination of flavors and textures!
Extra Tips:
For an added kick, you can sprinkle some red pepper flakes into the marinade for a hint of spice. If you prefer a smoky flavor, consider adding a dash of smoked paprika.
When grilling, make sure the skewers are spaced out to allow even heat distribution. If you want to add more variety, feel free to include other vegetables like bell peppers or cherry tomatoes.
Make sure to keep an eye on the grill to prevent the vegetables from overcooking and becoming too soft. Enjoy your delicious and colorful grilled vegetable skewers!
Creamy Macaroni Salad
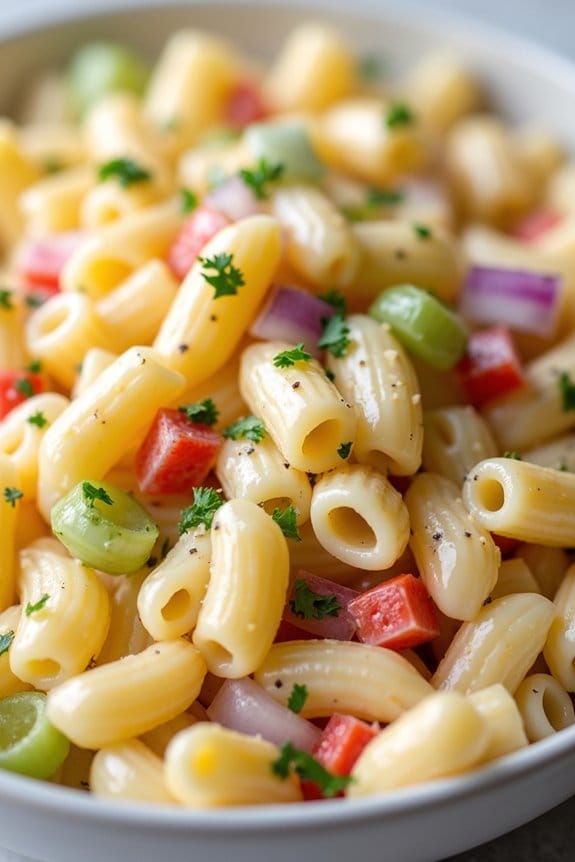
Grilled pork is a classic dish that pairs beautifully with a variety of side dishes, but one standout accompaniment is a creamy macaroni salad. This salad offers a delightful contrast to the savory and smoky flavors of grilled pork, providing a smooth and tangy touch that complements the meal perfectly.
The macaroni salad can be prepared in advance, allowing the flavors to meld together, and it brings a rejuvenating element to the overall dish, making it perfect for a summer barbecue or a casual family dinner.
Creamy macaroni salad isn’t only delicious, but it’s also straightforward to prepare. The key to a great macaroni salad is to guarantee the pasta is cooked to perfection and the dressing is flavorful and creamy. This recipe serves 4-6 people and includes a balanced mix of vegetables and seasonings that enhance the creamy dressing, making it a crowd-pleaser that will leave everyone asking for seconds.
Ingredients:
- 2 cups elbow macaroni
- 1 cup mayonnaise
- 2 tablespoons apple cider vinegar
- 1 tablespoon Dijon mustard
- 1 teaspoon sugar
- Salt and pepper to taste
- 1 cup diced celery
- 1/2 cup diced red onion
- 1/2 cup diced red bell pepper
- 1/4 cup chopped fresh parsley
Cooking Instructions:
1. Cook the Pasta: Begin by bringing a large pot of salted water to a boil. Add the 2 cups of elbow macaroni and cook according to the package instructions until al dente, usually around 7-8 minutes.
Once cooked, drain the pasta and rinse it under cold water to stop the cooking process and cool the pasta down.
2. Prepare the Dressing: In a large mixing bowl, combine 1 cup of mayonnaise, 2 tablespoons of apple cider vinegar, 1 tablespoon of Dijon mustard, 1 teaspoon of sugar, and salt and pepper to taste. Mix these ingredients well until you have a smooth and creamy dressing.
3. Mix the Salad: Add the cooled macaroni to the bowl with the dressing. Then, add 1 cup of diced celery, 1/2 cup of diced red onion, 1/2 cup of diced red bell pepper, and 1/4 cup of chopped fresh parsley.
Gently fold the ingredients together until the pasta and vegetables are evenly coated with the dressing.
4. Chill the Salad: Cover the bowl with plastic wrap or a lid and place it in the refrigerator for at least 1 hour before serving. This allows the flavors to meld and the salad to chill, enhancing its taste and texture.
Extra Tips:
For the best creamy macaroni salad, guarantee you don’t overcook the pasta; it should be firm yet tender to hold up well in the salad.
Adding a splash of vinegar to the cooking water can help prevent the pasta from sticking together. Feel free to customize the salad by adding other ingredients like hard-boiled eggs, pickles, or shredded cheese for extra flavor and texture.
Finally, taste and adjust the seasoning before serving, as chilling can sometimes mellow the flavors.
Grilled Pineapple Rings
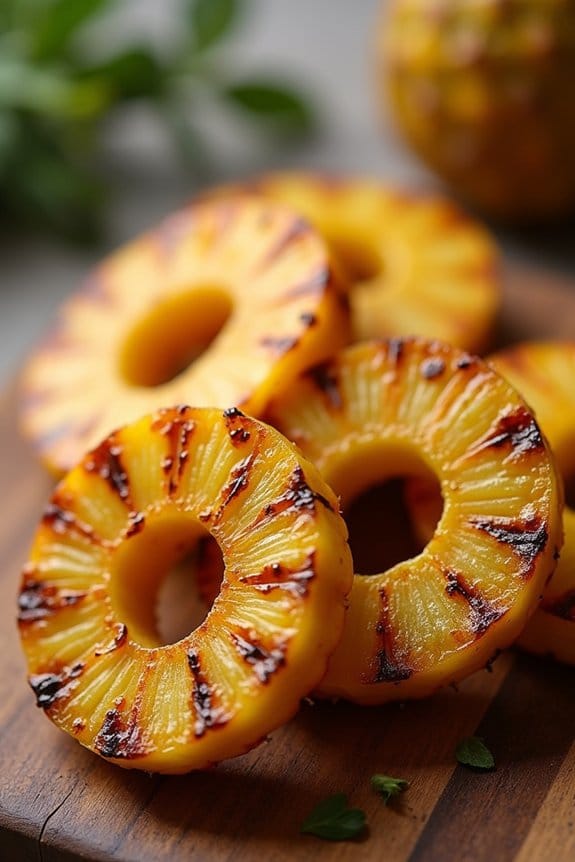
Grilled pineapple rings are a delightful and tropical side dish that pair beautifully with a variety of grilled meats, especially pork. The natural sugars in the pineapple caramelize when grilled, creating a sweet and slightly smoky flavor that’s hard to resist.
This dish isn’t only simple to prepare but also adds a reviving and exotic twist to your meal, making it perfect for summer barbecues or any outdoor gathering.
To make grilled pineapple rings, you’ll need fresh, ripe pineapples. The process involves slicing the pineapple into rings, removing the core, and grilling until they achieve a perfect char. This easy-to-make side dish can be served warm, and it complements the savory flavors of grilled pork by adding a sweet contrast.
Whether you’re hosting a backyard barbecue or a casual dinner, these grilled pineapple rings are sure to be a crowd-pleaser.
Ingredients for 4-6 servings:
- 2 medium-sized ripe pineapples
- 2 tablespoons brown sugar
- 1 tablespoon ground cinnamon
- 1 teaspoon vanilla extract
- Cooking spray or vegetable oil for grilling
Cooking Instructions:
- Prepare the Pineapples: Begin by cutting off the top and bottom of each pineapple to create a flat surface. Stand the pineapple upright and carefully slice off the outer skin, removing all the prickly parts. Cut the pineapple into 1/2-inch thick rings and use a small cookie cutter or a knife to remove the core from each ring.
- Mix the Coating: In a small bowl, combine the brown sugar, ground cinnamon, and vanilla extract. Stir the mixture until the sugar is well incorporated with the cinnamon and vanilla.
- Coat the Pineapple Rings: Lightly brush each pineapple ring with the brown sugar mixture on both sides. Make sure that the rings are evenly coated for a balanced flavor.
- Preheat the Grill: Preheat your grill to medium-high heat. If using a charcoal grill, make sure the coals are evenly distributed. Lightly grease the grill grates with cooking spray or a bit of vegetable oil to prevent sticking.
- Grill the Pineapple Rings: Place the coated pineapple rings onto the hot grill. Cook each side for about 3-4 minutes or until grill marks appear and the rings are caramelized. Use tongs to flip the rings carefully.
- Serve: Once grilled to perfection, remove the pineapple rings from the grill and allow them to cool slightly before serving. They can be served warm as an enticing side dish alongside your grilled pork.
Extra Tips:
When selecting pineapples, choose ones that are slightly soft to the touch and have a sweet aroma at the base, indicating ripeness.
If you prefer an extra kick of flavor, consider adding a pinch of cayenne pepper to the sugar mixture for a sweet and spicy twist.
Additionally, if you have leftovers, grilled pineapple rings can be stored in the refrigerator in an airtight container for up to three days and can be reheated or enjoyed cold as a reviving snack.
Spicy Black Bean and Corn Salad
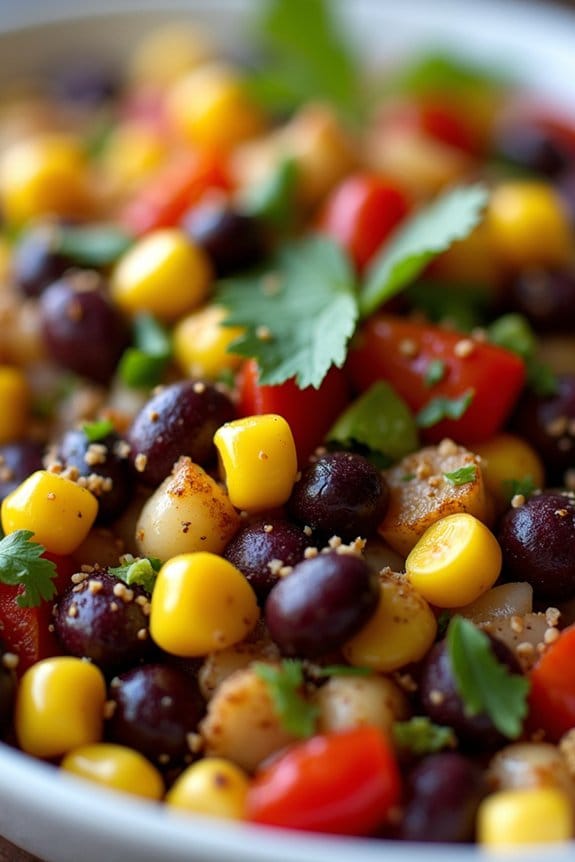
Spicy Black Bean and Corn Salad is a vibrant and zesty side dish that perfectly complements grilled pork with its bold flavors and invigorating ingredients. This dish combines the earthiness of black beans with the sweetness of corn and the heat from jalapeños, creating a harmonious balance of tastes that bring excitement to your meal.
Whether served at a summer barbecue or as a cozy winter accompaniment, this salad is sure to be a crowd-pleaser. This salad isn’t only easy to prepare but also packed with nutrients, making it a healthy choice for your family and friends. The combination of colorful vegetables, fresh herbs, and a tangy lime dressing guarantees that each bite is bursting with freshness.
Ideal for serving 4-6 people, this dish can be prepared in advance, allowing the flavors to meld together for an even more delicious experience.
Ingredients (serving size: 4-6 people):
- 2 cans (15 oz each) black beans, drained and rinsed
- 2 cups corn kernels (fresh, canned, or frozen)
- 1 red bell pepper, diced
- 1 small red onion, finely chopped
- 1-2 jalapeños, seeded and minced
- 1/4 cup fresh cilantro, chopped
- 2 tablespoons olive oil
- 3 tablespoons lime juice
- 1 teaspoon ground cumin
- Salt and pepper to taste
Cooking Instructions:
- Prepare the Ingredients: Begin by draining and rinsing the black beans thoroughly under cold water. If using frozen corn, thaw it completely. Dice the red bell pepper and finely chop the red onion. Seed and mince the jalapeños, adjusting the quantity to your preferred level of spiciness. Chop the fresh cilantro.
- Mix the Vegetables: In a large mixing bowl, combine the black beans, corn, red bell pepper, red onion, and minced jalapeños. Mix well to guarantee the ingredients are evenly distributed.
- Prepare the Dressing: In a small bowl, whisk together the olive oil, lime juice, ground cumin, salt, and pepper. Taste the dressing and adjust the seasoning if needed.
- Combine and Toss: Pour the lime dressing over the bean and vegetable mixture. Add the chopped cilantro and gently toss the salad to coat all the ingredients with the dressing. Make sure every component is well mixed.
- Chill and Serve: Cover the bowl with plastic wrap or transfer the salad to an airtight container. Refrigerate for at least 30 minutes to allow the flavors to meld. Serve chilled as a side dish alongside grilled pork.
Extra Tips:
For the best flavor, try to prepare the Spicy Black Bean and Corn Salad a few hours in advance. This will allow the ingredients to fully absorb the dressing and enhance the overall taste.
If you prefer a milder version, reduce the amount of jalapeño or substitute it with a milder pepper. For added texture, consider tossing in some diced avocado just before serving, which will also add a creamy richness to the salad.
Remember to adjust the seasoning to your taste, and don’t be afraid to experiment with additional herbs or spices for a personalized touch.
Roasted Red Pepper and Feta Couscous
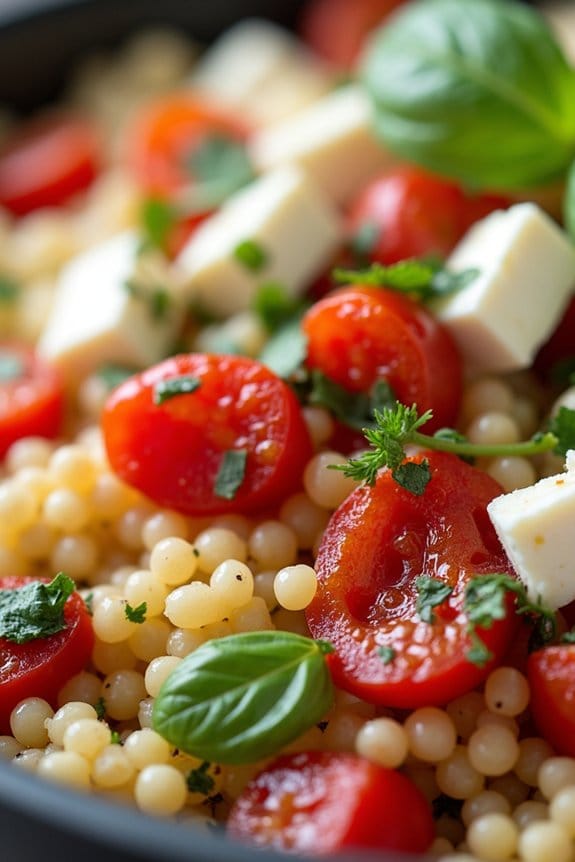
Roasted Red Pepper and Feta Couscous is a delightful side dish that pairs perfectly with grilled pork, adding a Mediterranean flair to your meal. This dish combines the nutty flavor of couscous with the sweet, smoky notes of roasted red peppers and the tanginess of feta cheese. The result is a light and fluffy couscous that’s both flavorful and satisfying, making it a great accompaniment to the rich and savory taste of grilled pork.
This recipe is perfect for a serving size of 4-6 people, making it ideal for family dinners or small gatherings. The preparation is simple and quick, requiring minimal cooking time. The combination of fresh herbs, spices, and the subtle zest of lemon juice further enhances the dish, guaranteeing that this side is both vibrant and invigorating.
Ingredients:
- 2 cups couscous
- 2 cups chicken or vegetable broth
- 1 cup roasted red peppers, chopped
- 1 cup feta cheese, crumbled
- 1/4 cup fresh parsley, chopped
- 1/4 cup fresh basil, chopped
- 2 tablespoons olive oil
- 2 tablespoons lemon juice
- Salt and pepper to taste
Instructions:
- Prepare the Couscous: Bring the chicken or vegetable broth to a boil in a medium-sized pot. Once boiling, remove the pot from heat and stir in the couscous. Cover the pot with a lid and let it sit for about 5 minutes, allowing the couscous to absorb the liquid.
- Fluff the Couscous: After 5 minutes, remove the lid and fluff the couscous with a fork to separate the grains. This will help in achieving a light and fluffy texture.
- Mix in Ingredients: Add the chopped roasted red peppers, crumbled feta cheese, chopped parsley, and chopped basil into the couscous. Gently mix everything together until all ingredients are evenly distributed.
- Add Dressing: In a small bowl, whisk together the olive oil and lemon juice. Pour this mixture over the couscous and toss to coat all the ingredients evenly. Season with salt and pepper to taste.
- Serve: Transfer the roasted red pepper and feta couscous to a serving dish. Garnish with additional parsley or basil if desired, and serve alongside your grilled pork.
Extra Tips:
When roasting your own red peppers, guarantee they’re charred evenly for the best flavor. If using jarred roasted red peppers, drain them well to prevent excess moisture in the couscous.
Couscous can be prepared ahead of time and refrigerated, but be sure to bring it to room temperature before serving. For an extra burst of flavor, consider adding a pinch of smoked paprika or a handful of toasted pine nuts. This dish is versatile and can be adjusted to suit personal tastes by incorporating different herbs or a splash of balsamic vinegar.
Tomato and Mozzarella Caprese
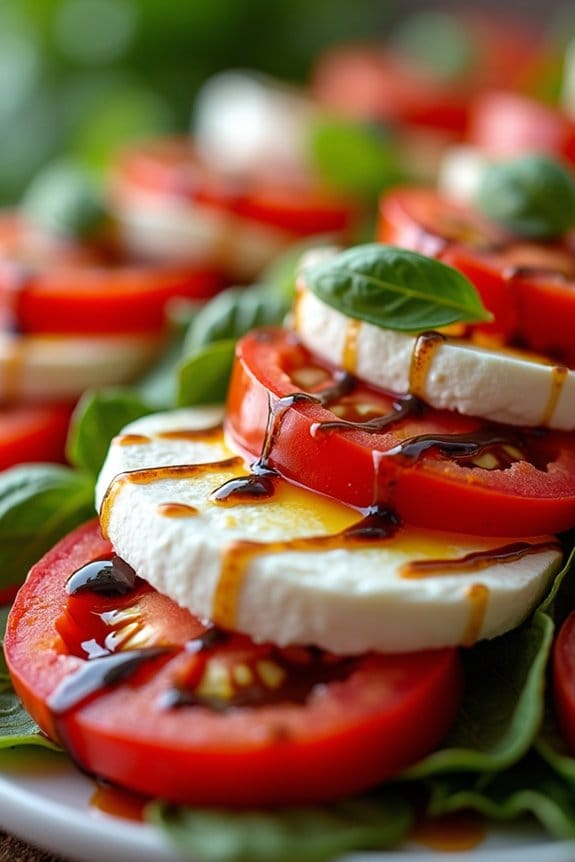
Grilling pork is a delightful way to enjoy a savory and juicy meal, and pairing it with a classic Tomato and Mozzarella Caprese salad elevates the dining experience. This dish combines the rich flavors of grilled pork with the freshness of ripe tomatoes and creamy mozzarella, drizzled with balsamic glaze and fragrant basil leaves.
The balance of savory and acidic flavors makes it a perfect side dish for any grilled pork feast, creating a harmonious blend of textures and tastes that will surely impress your family and friends.
For a serving size of 4-6 people, this recipe will guide you through preparing the Tomato and Mozzarella Caprese salad to complement your grilled pork. The simplicity of this side dish highlights the quality of the ingredients, allowing each component to shine.
Ready in just a few minutes, this Caprese salad is a fuss-free addition to your meal, bringing a touch of Italian flair to your table.
Ingredients:
- 4 large ripe tomatoes
- 16 ounces fresh mozzarella cheese
- Fresh basil leaves (about 1 cup)
- 3 tablespoons extra-virgin olive oil
- Salt and freshly ground black pepper to taste
- Balsamic glaze for drizzling
Instructions:
- Prepare the Tomatoes: Start by washing and drying the tomatoes. Slice them into 1/4-inch thick rounds, ensuring uniform thickness for even layering.
- Slice the Mozzarella: Drain the mozzarella cheese and slice it into 1/4-inch thick rounds to match the size and thickness of the tomato slices.
- Layer the Salad: On a large platter, alternate the tomato and mozzarella slices, slightly overlapping them. Create a visually appealing pattern by arranging them in a circular or linear pattern.
- Add the Basil: Tuck fresh basil leaves between the layers of tomato and mozzarella, distributing them evenly across the platter.
- Season: Drizzle the extra-virgin olive oil over the entire salad. Sprinkle salt and freshly ground black pepper to taste, enhancing the natural flavors of the tomatoes and cheese.
- Finish with Balsamic Glaze: Just before serving, drizzle balsamic glaze over the salad for a touch of sweetness and acidity. This will enhance the overall flavor profile and add a beautiful glossy finish.
- Serve: Serve immediately alongside your grilled pork, allowing the freshness of the Caprese salad to complement the savory flavors of the pork.
Extra Tips:
For the best flavor, use high-quality extra-virgin olive oil and fresh mozzarella cheese. If possible, choose heirloom tomatoes for their vibrant colors and rich taste.
If you don’t have balsamic glaze, you can reduce balsamic vinegar to a syrup consistency on the stove with a bit of honey. Remember, fresh basil is key to this dish, so avoid substituting it with dried basil.
Finally, prepare the salad just before serving to maintain the freshness and prevent the mozzarella from absorbing too much moisture from the tomatoes.
Herb Marinated Grilled Vegetables
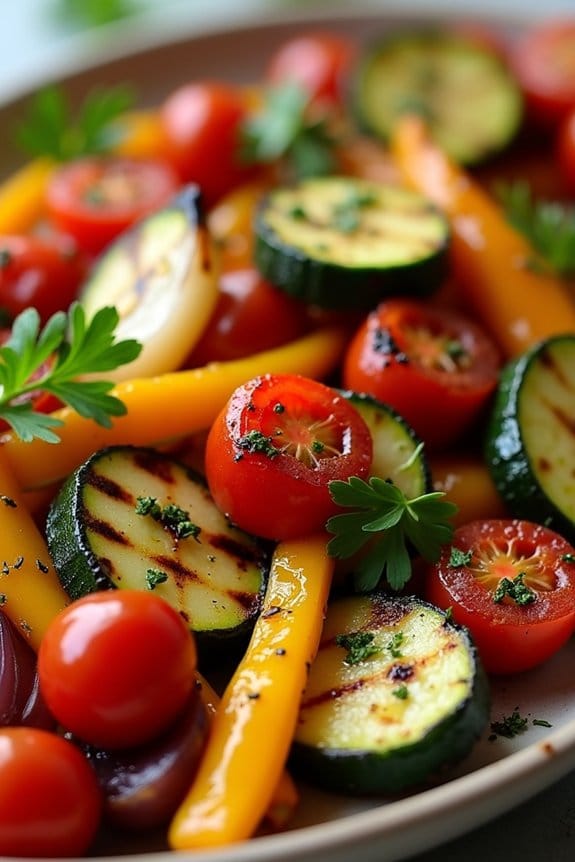
This dish is simple to prepare and can be customized with your favorite vegetables and herbs. The marinade infuses the vegetables with flavor, guaranteeing every bite is delicious. The grilling process caramelizes the natural sugars in the vegetables, enhancing their sweetness and creating a smoky, charred finish.
This dish is ideal for those who love to enjoy fresh, seasonal produce with a touch of gourmet flair.
Ingredients for 4-6 people:
- 2 medium zucchinis, sliced
- 1 red bell pepper, cut into strips
- 1 yellow bell pepper, cut into strips
- 1 red onion, cut into wedges
- 8 oz cherry tomatoes
- 3 cloves garlic, minced
- 1/4 cup olive oil
- 2 tablespoons balsamic vinegar
- 2 teaspoons dried Italian herbs (or a mix of oregano, basil, and thyme)
- Salt and pepper, to taste
- Fresh parsley, chopped for garnish
Cooking Instructions:
- Prepare the Vegetables: Begin by washing all the vegetables thoroughly. Slice the zucchinis, cut the bell peppers into strips, and wedge the red onion. Leave the cherry tomatoes whole for a burst of flavor when grilled.
- Make the Marinade: In a large mixing bowl, combine olive oil, balsamic vinegar, minced garlic, dried Italian herbs, salt, and pepper. Whisk these ingredients together until well blended.
- Marinate the Vegetables: Add the prepared vegetables to the bowl with the marinade. Toss them gently to make sure they’re evenly coated. Allow the vegetables to marinate for at least 30 minutes at room temperature, or refrigerate for a couple of hours if you have time.
- Preheat the Grill: Preheat your grill to medium-high heat. If using a charcoal grill, make certain the coals are hot and ashy before proceeding.
- Grill the Vegetables: Place the marinated vegetables on the grill, either directly or using a grill basket for smaller pieces. Cook the vegetables for about 10-15 minutes, turning occasionally, until they’re tender and have a nice char.
- Serve and Garnish: Once grilled to perfection, remove the vegetables from the grill and transfer them to a serving platter. Garnish with freshly chopped parsley for a pop of color and an extra layer of flavor.
Extra Tips:
To guarantee even cooking, try to cut your vegetables to similar sizes. This will help them cook at the same rate and prevent some from burning while others remain undercooked.
If using wooden skewers for smaller vegetables, soak them in water for at least 30 minutes before use to prevent burning.
Feel free to experiment with different herbs or add a sprinkle of your favorite cheese, like feta or parmesan, after grilling for a delicious twist.
Cheesy Garlic Bread

Cheesy Garlic Bread is an irresistible accompaniment to a grilled pork dish, adding a savory and rich flavor that perfectly complements the smoky and juicy meat. This dish features a perfect balance of crispy, buttery bread topped with a delicious blend of cheeses and garlic, creating a heavenly bite with every mouthful.
Whether you’re hosting a barbecue or a cozy family dinner, this Cheesy Garlic Bread is bound to be a crowd-pleaser, leaving your guests craving for more.
The preparation of Cheesy Garlic Bread is both simple and quick, making it an ideal choice for any home cook. The key to achieving the perfect garlic bread lies in using fresh ingredients and baking it to golden perfection.
With a soft interior and a crispy crust, the combination of melted cheese and aromatic garlic will elevate any meal, particularly when paired with grilled pork. Here’s how you can make this delectable side dish for 4-6 people:
Ingredients:
- 1 large loaf of French bread or Italian bread
- 1/2 cup (1 stick) unsalted butter, softened
- 4 cloves of garlic, minced
- 1 cup shredded mozzarella cheese
- 1/2 cup grated Parmesan cheese
- 2 tablespoons chopped fresh parsley
- 1 teaspoon dried oregano
- Salt and pepper to taste
Cooking Instructions:
- Preheat the Oven: Preheat your oven to 375°F (190°C). This temperature will guarantee your bread gets crispy on the outside while the cheese melts perfectly.
- Prepare the Bread: Slice the loaf of bread in half horizontally to create two long pieces. Place the bread cut-side up on a baking sheet lined with parchment paper for easy cleanup.
- Make the Garlic Butter: In a medium bowl, combine the softened butter, minced garlic, chopped parsley, dried oregano, salt, and pepper. Mix until all ingredients are well incorporated.
- Spread the Butter Mixture: Evenly spread the garlic butter mixture over the cut sides of the bread. Make sure to cover every inch to guarantee flavorful bites throughout.
- Add the Cheese: Sprinkle the mozzarella and Parmesan cheeses evenly over the buttered bread. Be generous to guarantee a cheesy, gooey topping.
- Bake the Bread: Place the baking sheet in the preheated oven and bake for about 10-15 minutes or until the cheese is melted and bubbly, and the edges of the bread are golden brown.
- Garnish and Serve: Once baked to perfection, remove the bread from the oven and let it cool slightly. Slice into pieces and serve warm alongside your grilled pork dish.
Extra Tips:
For the best results, use fresh garlic and high-quality cheese to enhance the flavor of your Cheesy Garlic Bread. If you prefer a spicier kick, consider adding a pinch of red pepper flakes to the garlic butter mixture.
To save time, you can prepare the garlic butter in advance and store it in the refrigerator. When you’re ready to make the bread, simply bring the butter to room temperature and proceed with the recipe.
For a more robust flavor, try adding a mix of cheeses such as cheddar or gouda. Enjoy your Cheesy Garlic Bread fresh out of the oven for the ultimate taste experience.