

When I light up the grill, I love to explore beyond the usual burgers and hot dogs. BBQ pizza with unique toppings and grilled watermelon are a must-try for something different. Smoky avocado paired with spicy salsa is truly a game-changer. And let’s not forget about the delicious depth that charred vegetables bring to any meal. Ready to shake up your grilling menu and delight your taste buds?
BBQ Pizza: Custom Grilled Pizzas With Toppings

Ever thought about combining the smoky flavor of a BBQ grill with the cheesy, savory goodness of a pizza? BBQ Pizza is the perfect way to bring a little creativity and excitement to your next backyard hangout or family dinner. This customizable dish allows you to craft pizzas tailored to your taste, with a wide array of toppings. The grill imparts a unique flavor that you can’t achieve in a traditional oven, creating a crispy crust with a delightful char.
Plus, it’s a fun and interactive way to get everyone involved in the cooking process. Grilling pizzas isn’t just about the taste; it’s about the experience of cooking outside and enjoying the fresh air. You can set up a toppings station, allowing each person to create their perfect pizza.
Whether you prefer classic pepperoni and mozzarella or a more adventurous mix of goat cheese, arugula, and figs, the choice is yours. With a few simple steps, you can transform your backyard into a gourmet pizzeria that will leave your guests talking long after the meal is over.
Ingredients (Serves 4-6):
- 4 pizza dough balls (store-bought or homemade)
- 1 cup tomato sauce
- 2 cups shredded mozzarella cheese
- 1 cup sliced pepperoni
- 1 cup sliced mushrooms
- 1 cup sliced bell peppers
- 1 cup sliced red onions
- 1 cup crumbled goat cheese (optional)
- 1 cup fresh arugula (optional)
- Olive oil
- Salt and pepper to taste
- Flour for dusting
Instructions:
1. Prepare the Grill:
Preheat your grill to medium-high heat (about 500°F). If using a charcoal grill, verify the coals are evenly distributed for consistent heat.
2. Roll Out the Dough:
Lightly dust a clean surface with flour. Take one dough ball and roll it out into a 10-12 inch round, about 1/4 inch thick. Repeat with the remaining dough balls.
3. Prepare the Toppings:
Set up a toppings station with all the ingredients laid out so they’re easily accessible. This will make the assembly process quick and efficient.
4. Grill the Dough:
Lightly brush one side of the rolled dough with olive oil. Place the oiled side down on the grill. Cook for 2-3 minutes, or until grill marks appear and the dough begins to puff up. Brush the top with olive oil before flipping.
5. Add the Sauce and Toppings:
Flip the dough using tongs. Quickly spread a thin layer of tomato sauce over the grilled side. Sprinkle mozzarella cheese evenly, then add your choice of toppings—pepperoni, mushrooms, bell peppers, and onions. Season with salt and pepper.
6. Finish Grilling:
Close the grill lid and cook for another 3-5 minutes, or until the cheese is melted and bubbly. The crust should be nicely charred and crisp.
7. Serve:
Carefully remove the pizza from the grill using a pizza peel or large spatula. Allow it to cool slightly before slicing. If desired, top with fresh arugula and crumbled goat cheese.
Extra Tips:
When grilling pizzas, keep an eye on the dough as it can cook quickly and go from perfect to burnt in seconds. It’s vital to have all your toppings prepared and ready to go before placing the dough on the grill to guarantee a smooth process.
You can also experiment with different cheeses and sauces. Try a white sauce base or a BBQ sauce for a twist. Grilling times may vary depending on the type of grill, so adjust accordingly. Enjoy the process and don’t be afraid to get creative with your toppings!
Grilled Watermelon: Sweet and Smoky Treat
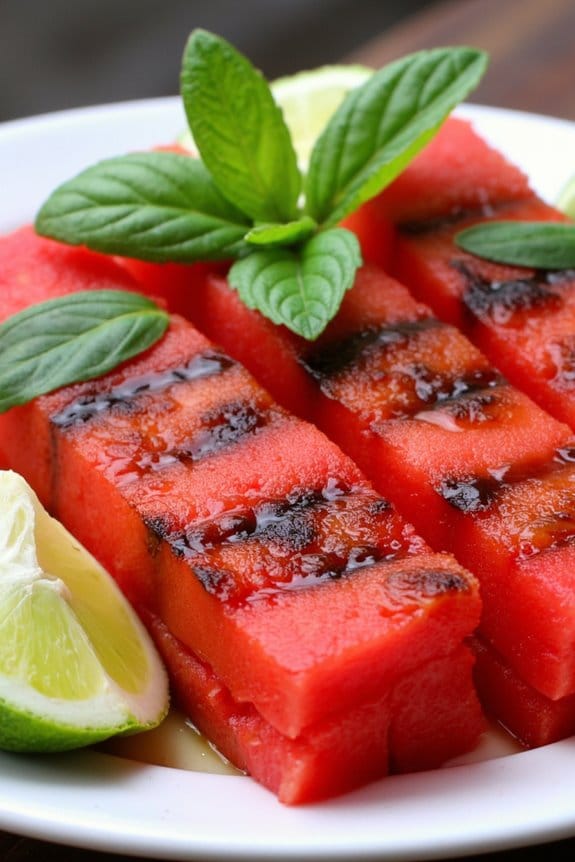
Grilled watermelon is an intriguing and delightful dish that combines the natural sweetness of watermelon with a hint of smokiness from the grill. Ideal for summer barbecues or as a unique appetizer, this dish is easy to prepare and guaranteed to surprise your guests.
Grilling the watermelon caramelizes its sugars, enhancing its flavor and giving it a slightly charred, smoky finish. This sweet and savory dish can be served on its own or as a creative addition to a salad, offering a revitalizing contrast to other grilled meats and vegetables.
To prepare grilled watermelon, begin by choosing a ripe, seedless watermelon for the best flavor and texture. This dish serves approximately 4-6 people, making it perfect for small gatherings or family dinners. The grilling process is simple and quick, allowing you to focus on other elements of your meal while creating a standout dish.
With minimal ingredients and preparation time, grilled watermelon is both an effortless and impressive choice for any occasion.
Ingredients (serving size: 4-6 people):
- 1 medium seedless watermelon
- 2 tablespoons olive oil
- 1 teaspoon sea salt
- 1 teaspoon black pepper
- 1 tablespoon honey (optional)
- Fresh mint leaves for garnish (optional)
- Lime wedges for serving (optional)
Cooking Instructions:
- Prepare the Watermelon: Begin by slicing the watermelon into 1-inch thick wedges or rounds. Remove the rind and any seeds to guarantee a smooth grilling process.
- Season the Watermelon: Lightly brush each slice with olive oil on both sides. Sprinkle with sea salt and black pepper to taste. If you prefer a sweeter flavor, drizzle a small amount of honey over the slices.
- Preheat the Grill: Preheat your grill to medium-high heat. Confirm that the grates are clean and lightly oiled to prevent sticking.
- Grill the Watermelon: Place the watermelon slices directly on the grill. Cook for about 2-3 minutes on each side, or until grill marks appear and the watermelon is slightly softened.
- Serve the Watermelon: Remove the watermelon from the grill and transfer to a serving platter. Garnish with fresh mint leaves for a burst of color and flavor, and serve with lime wedges for an optional tangy squeeze.
Extra Tips:
When grilling watermelon, it’s important not to overcook it. The goal is to achieve grill marks and slight caramelization while maintaining the fruit’s revitalizing juiciness.
Experiment with additional seasonings such as chili powder or smoked paprika for a spicier twist. If you opt to serve this dish alongside a salad, consider pairing it with arugula, feta cheese, and a balsamic reduction for a well-balanced flavor profile.
Pineapple Skewers With Zesty Glaze
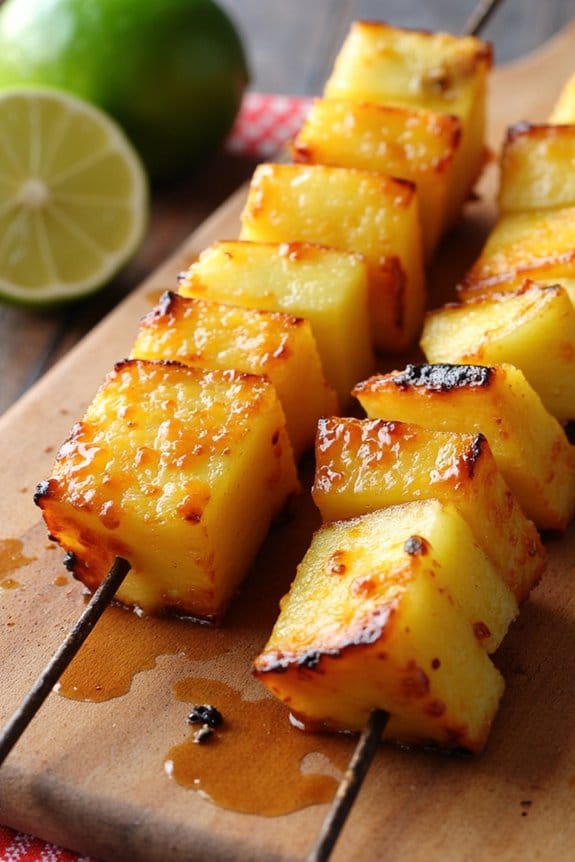
When it comes to grilling, few things can match the delightful combination of sweet and tangy flavors found in Pineapple Skewers With Zesty Glaze. This dish is perfect for those who love a touch of tropical flair in their grilled dishes. The sweetness of ripe pineapple pairs beautifully with a zesty glaze that features hints of lime, honey, and a dash of chili for an extra kick.
These skewers aren’t only a feast for the taste buds but also a colorful addition to your barbecue spread that will impress your guests.
Preparing Pineapple Skewers With Zesty Glaze is relatively simple, making it an excellent choice for both novice and experienced grillers. This recipe is designed to serve 4-6 people, making it ideal for a small gathering or family meal. The process involves marinating the pineapple in a flavorful glaze, threading them onto skewers, and grilling them to perfection. The result is a caramelized exterior with juicy, tender pineapple inside, delivering an explosion of flavors in every bite.
Ingredients (Serves 4-6):
- 2 ripe pineapples, peeled, cored, and cut into chunks
- 1/4 cup honey
- 1/4 cup freshly squeezed lime juice
- 1 tablespoon olive oil
- 1 teaspoon chili powder
- 1/2 teaspoon salt
- 1/2 teaspoon ground black pepper
- Wooden or metal skewers
Instructions:
- Prepare the Pineapple: Start by peeling, coring, and cutting the pineapples into bite-sized chunks. Make sure they’re roughly the same size to guarantee even cooking.
- Make the Zesty Glaze: In a small bowl, whisk together the honey, lime juice, olive oil, chili powder, salt, and black pepper until well combined. This glaze will both marinate the pineapple and serve as a basting sauce during grilling.
- Marinate the Pineapple: Place the pineapple chunks in a large bowl or resealable plastic bag. Pour the glaze over the pineapple, making sure all pieces are well coated. Let the pineapple marinate for at least 30 minutes, or up to 2 hours for more intense flavor, in the refrigerator.
- Preheat the Grill: While the pineapple is marinating, preheat your grill to medium-high heat. If using wooden skewers, soak them in water for at least 30 minutes to prevent burning.
- Thread the Skewers: Once marinated, thread the pineapple chunks onto the skewers, leaving a small gap between each piece to allow for even cooking.
- Grill the Skewers: Place the skewers on the preheated grill. Cook for about 8-10 minutes, turning occasionally and brushing with any leftover glaze, until the pineapple is nicely caramelized and has grill marks.
- Serve: Once grilled to your liking, remove the skewers from the grill and let them cool slightly before serving. Enjoy these skewers hot off the grill for the best flavor.
Extra Tips:
For an added layer of flavor, consider adding other fruits or vegetables to the skewers, such as bell peppers or mango slices, which complement the pineapple well.
If you prefer a spicier kick, adjust the amount of chili powder in the glaze. To prevent sticking, always make sure your grill is clean and lightly oiled before placing the skewers on it.
Finally, these skewers can be prepared ahead of time and refrigerated until you’re ready to grill, making them a convenient option for entertaining.
Grilled Peaches With Honey
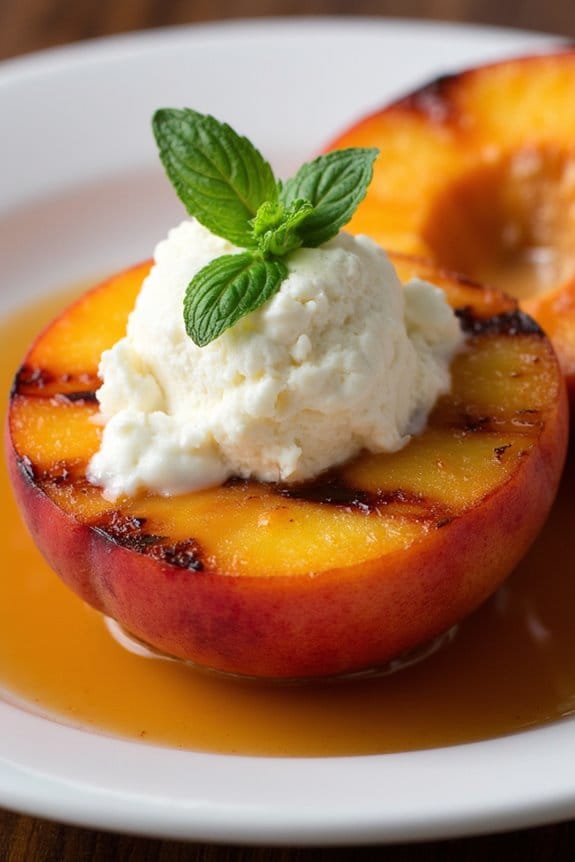
Grilled Peaches with Honey is a delightful summer dessert that combines the natural sweetness of ripe peaches with the rich, floral notes of honey. This simple yet elegant dish is perfect for outdoor gatherings or a cozy night in. The grilling process enhances the peaches’ flavor, adding a subtle smokiness that pairs beautifully with the honey. When served warm, the peaches are tender and juicy, creating a perfect contrast with a dollop of creamy mascarpone or vanilla ice cream.
This recipe is an excellent choice for those looking to impress their guests without spending too much time in the kitchen. With minimal preparation and cooking time, Grilled Peaches with Honey allows you to enjoy more time with your friends and family. The dish isn’t only delicious but also visually appealing, as the caramelized honey forms a glossy glaze over the peaches, making them irresistible.
Ingredients for 4-6 servings:
- 6 ripe peaches, halved and pitted
- 3 tablespoons olive oil
- 1/4 cup honey
- 1 teaspoon vanilla extract
- 1 teaspoon ground cinnamon
- Mascarpone or vanilla ice cream (optional, for serving)
- Fresh mint leaves (optional, for garnish)
Cooking Instructions:
- Prepare the Peaches: Begin by cutting the peaches in half and removing the pits. Brush each half with olive oil to prevent them from sticking to the grill and to enhance the caramelization process.
- Preheat the Grill: Heat your grill to medium-high. This is important to guarantee the peaches cook evenly and develop a nice char without burning.
- Mix the Honey Glaze: In a small bowl, combine the honey, vanilla extract, and ground cinnamon. Stir well to create a smooth glaze that will add flavor and a beautiful sheen to the peaches.
- Grill the Peaches: Place the peach halves on the grill, cut side down. Grill for about 3-4 minutes until grill marks appear and the peaches start to soften. Flip the peaches and brush the cut side with the honey glaze. Grill for an additional 3-4 minutes, allowing the glaze to caramelize slightly.
- Serve: Remove the peaches from the grill and serve them warm. If desired, top each peach half with a dollop of mascarpone or a scoop of vanilla ice cream. Garnish with fresh mint leaves for a burst of color and freshness.
Extra Tips:
When selecting peaches for this recipe, opt for those that are ripe but still firm to the touch—they’ll hold up better on the grill. If fresh peaches aren’t available, you can use nectarines as an alternative.
Make sure to monitor the grill closely, as the natural sugars in the honey can burn quickly. For added flavor, consider drizzling a bit of balsamic reduction over the finished dish.
Enjoy your Grilled Peaches with Honey as a delightful, sweet end to any meal!
Charred Romaine Caesar Salad
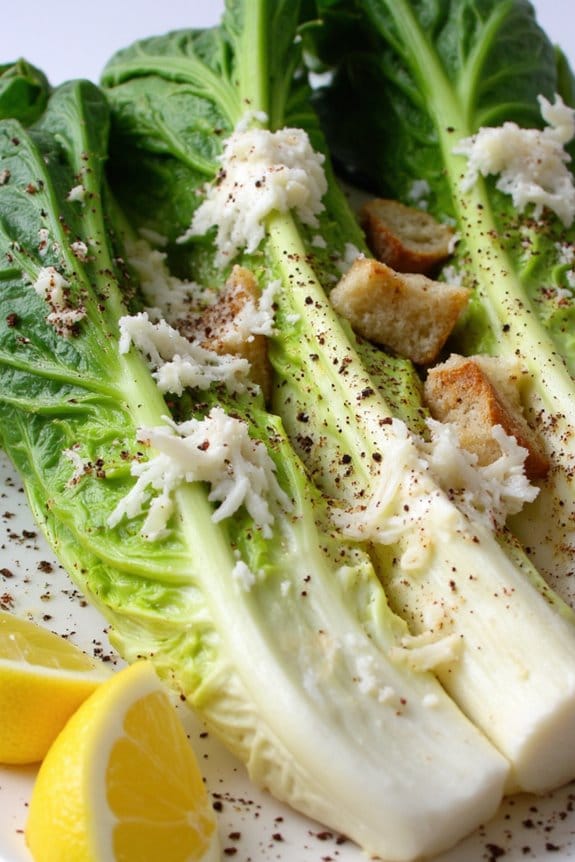
Charred Romaine Caesar Salad is a revitalizing twist on the classic Caesar salad, perfect for those who want to add a smoky flavor to their greens. Grilling the romaine adds a depth of flavor that pairs beautifully with the tangy Caesar dressing and savory toppings. This dish is ideal for a summer barbecue or a light dinner, and its unique preparation will surely impress your guests.
The salad features lightly charred romaine hearts, which are grilled just enough to achieve a smoky aroma and tender texture while retaining some crunch. The grilled romaine is then drizzled with a creamy Caesar dressing and topped with freshly grated Parmesan cheese, crunchy croutons, and a sprinkle of cracked black pepper. Serve this delightful salad as a starter or alongside grilled meats for a complete meal.
Ingredients (Serves 4-6):
- 3 heads of romaine lettuce
- 1 cup Caesar dressing
- 1 cup croutons
- 1/2 cup freshly grated Parmesan cheese
- 1 tablespoon olive oil
- Salt and pepper to taste
- Lemon wedges for garnish
Cooking Instructions:
- Prepare the Grill: Preheat your grill to medium-high heat. Make certain the grates are clean to prevent sticking.
- Prepare the Romaine: Remove any wilted outer leaves from the romaine heads. Slice each head in half lengthwise, keeping the core intact to hold the leaves together. Brush the cut sides of the romaine with olive oil and season with salt and pepper.
- Grill the Romaine: Place the romaine halves cut-side down on the grill. Grill for about 2-3 minutes until the leaves are slightly charred and have grill marks. Flip and grill for an additional 1-2 minutes on the other side. Remove from the grill and set aside.
- Assemble the Salad: Arrange the grilled romaine halves on a serving platter. Drizzle with Caesar dressing and sprinkle with Parmesan cheese and croutons.
- Garnish and Serve: Add a few cracks of black pepper over the top and garnish with lemon wedges. Serve immediately while the romaine is still warm.
Extra Tips:
For the best results, choose fresh and crisp heads of romaine. Make sure not to over-grill the romaine, as you want to preserve some of the crunch.
If you prefer a more intense smoky flavor, you can grill the romaine longer, but be cautious of burning. Homemade croutons can elevate the dish, made by toasting cubes of bread with olive oil and herbs.
Finally, for a more personalized touch, consider adding grilled chicken or shrimp to make it a more substantial meal.
Spice Up Your Corn on the Cob
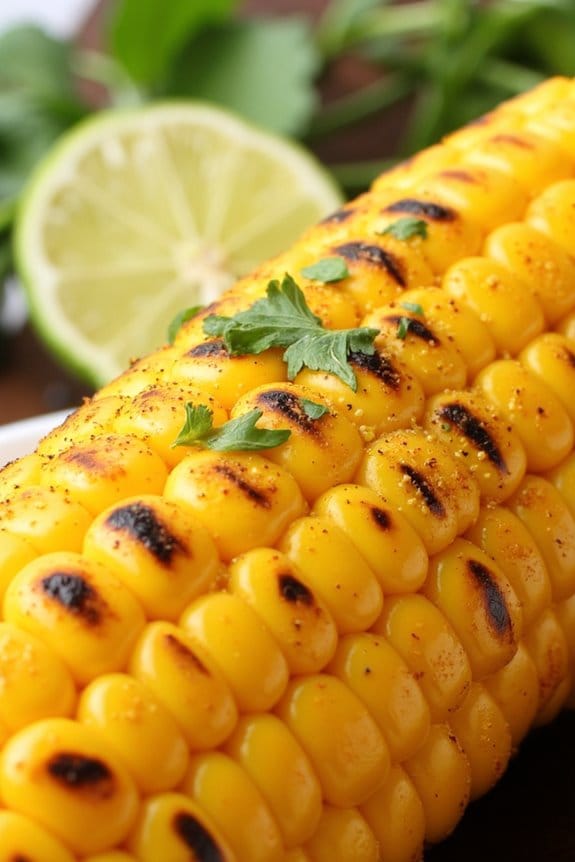
Grilled corn on the cob is a classic summertime favorite, but why not give it a flavorful twist by adding a spicy kick? This Spicy Grilled Corn on the Cob recipe is perfect for those who love a bit of heat and want to elevate their barbecue game. The combination of spicy chili powder, tangy lime, and creamy butter will make your corn the star of any cookout.
Whether you’re hosting a party or enjoying a family meal, this dish is sure to impress. The process is simple and requires minimal preparation, making it an ideal choice for outdoor cooking. The corn is first coated with an irresistible spicy butter mixture, then grilled to charred perfection. The heat from the chili powder is beautifully balanced by the sweetness of the corn and the zesty lime juice, creating a harmony of flavors that will delight your taste buds.
Let’s plunge into the recipe and get started!
Ingredients (serving size: 4-6 people):
- 6 ears of corn, husked
- 1/2 cup unsalted butter, softened
- 1 tablespoon chili powder
- 1 teaspoon smoked paprika
- 1 teaspoon garlic powder
- 1/2 teaspoon cayenne pepper (optional, for extra heat)
- 1 teaspoon salt
- 1/2 teaspoon black pepper
- 1 lime, juiced
- 1/4 cup chopped fresh cilantro
- Lime wedges, for serving
Cooking Instructions:
- Prepare the Corn: Begin by removing the husks and silk from each ear of corn. Rinse the corn under cold water to confirm all silk strands are removed, then pat dry with a clean kitchen towel.
- Make the Spicy Butter: In a mixing bowl, combine the softened butter, chili powder, smoked paprika, garlic powder, cayenne pepper (if using), salt, and black pepper. Mix until all the spices are evenly incorporated into the butter.
- Coat the Corn: Using a pastry brush or your hands, generously coat each ear of corn with the spicy butter mixture. Confirm that the butter is evenly spread over the entire surface of the corn.
- Preheat the Grill: Set your grill to medium-high heat. If you’re using a charcoal grill, confirm the coals are evenly distributed and ready for cooking.
- Grill the Corn: Place the coated corn directly on the grill grates. Grill the corn for approximately 10-12 minutes, turning occasionally. You want the corn to have a nice char on all sides while remaining tender.
- Add Lime and Cilantro: Once the corn is grilled, remove it from the grill and immediately drizzle the lime juice over the hot corn. Sprinkle the chopped cilantro on top for a burst of freshness.
- Serve: Serve the Spicy Grilled Corn on the Cob hot, with additional lime wedges on the side for those who want extra zest.
Extra Tips:
For an even richer flavor, prepare the spicy butter mixture a day in advance and let it sit in the refrigerator overnight. This will allow the flavors to meld together even more.
If you prefer a milder dish, reduce the amount of cayenne pepper or omit it altogether. Additionally, if you’re looking for an alternative to cilantro, fresh parsley can add a similar burst of freshness.
Finally, make sure to rotate the corn regularly on the grill to prevent any one side from burning, confirming an even cook throughout.
Rosemary and Thyme Chicken Skewers
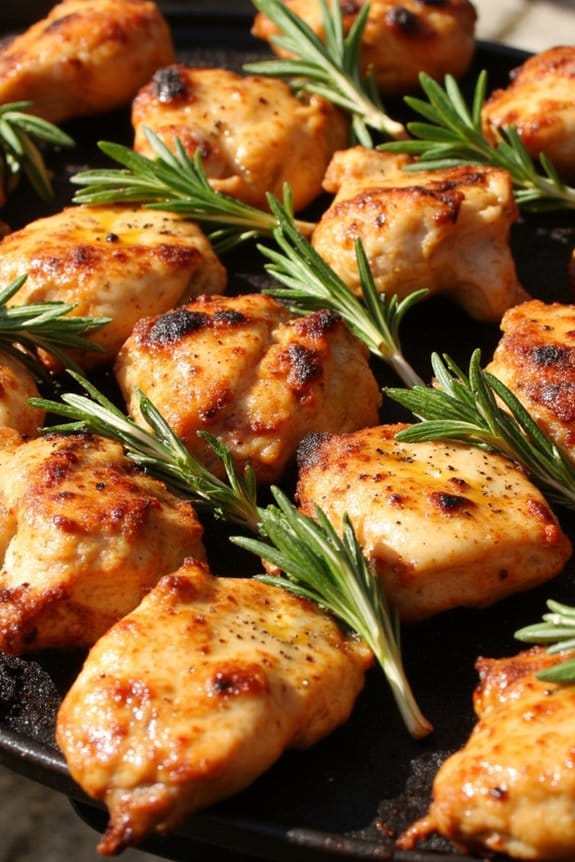
Rosemary and Thyme Chicken Skewers are a delightful and aromatic dish perfect for any grilling occasion. The combination of fresh rosemary and thyme not only adds a fragrant aroma but also imparts a rich, earthy flavor to the chicken. Skewered and grilled to perfection, these chicken bites are juicy and succulent, making them an irresistible addition to your summer barbecue menu.
Whether you’re hosting a backyard party or simply enjoying a quiet meal with family, these skewers are bound to impress.
The preparation for Rosemary and Thyme Chicken Skewers is straightforward, making it a great choice for both novice and experienced grillers. Marinating the chicken allows the flavors to meld beautifully, resulting in a dish that’s both flavorful and tender. The skewers can be served as an appetizer or a main course, and they pair wonderfully with a variety of side dishes, such as grilled vegetables or a fresh garden salad.
Ingredients for 4-6 servings:
- 1.5 pounds boneless, skinless chicken breasts
- 2 tablespoons fresh rosemary, chopped
- 2 tablespoons fresh thyme, chopped
- 3 cloves garlic, minced
- 1/4 cup olive oil
- 2 tablespoons lemon juice
- 1 teaspoon salt
- 1/2 teaspoon black pepper
- Wooden or metal skewers
Cooking Instructions:
- Prepare the Chicken: Cut the chicken breasts into 1-inch cubes. Confirm the pieces are uniform in size to promote even cooking.
- Make the Marinade: In a medium bowl, combine the olive oil, lemon juice, minced garlic, chopped rosemary, chopped thyme, salt, and black pepper. Stir the mixture well to blend all the ingredients.
- Marinate the Chicken: Add the cubed chicken to the marinade, making sure each piece is well-coated. Cover the bowl with plastic wrap and refrigerate for at least 1 hour, or up to 4 hours for more intense flavor.
- Soak the Skewers (if using wooden): If using wooden skewers, soak them in water for at least 30 minutes before grilling to prevent them from burning.
- Preheat the Grill: Preheat your grill to medium-high heat. If using a charcoal grill, confirm the coals are white and ashy for consistent heat.
- Assemble the Skewers: Thread the marinated chicken pieces onto the skewers, leaving a small gap between each piece to allow for even cooking.
- Grill the Skewers: Place the skewers on the grill and cook for 10-12 minutes, turning occasionally, until the chicken is cooked through and has nice grill marks. The internal temperature should reach 165°F (75°C).
- Serve: Remove the skewers from the grill and let them rest for a few minutes before serving. Garnish with additional fresh herbs if desired.
Extra Tips:
For the best results, try to use fresh herbs rather than dried, as they provide a more vibrant flavor and aroma. If you prefer a bit of heat, consider adding a pinch of red pepper flakes to the marinade.
Remember to monitor the grill closely to prevent the chicken from overcooking and becoming dry. Finally, always check the internal temperature with a meat thermometer to guarantee food safety.
Enjoy your flavorful Rosemary and Thyme Chicken Skewers with your favorite sides and a revitalizing beverage!
Gourmet Grilled Cheese With Unique Fillings
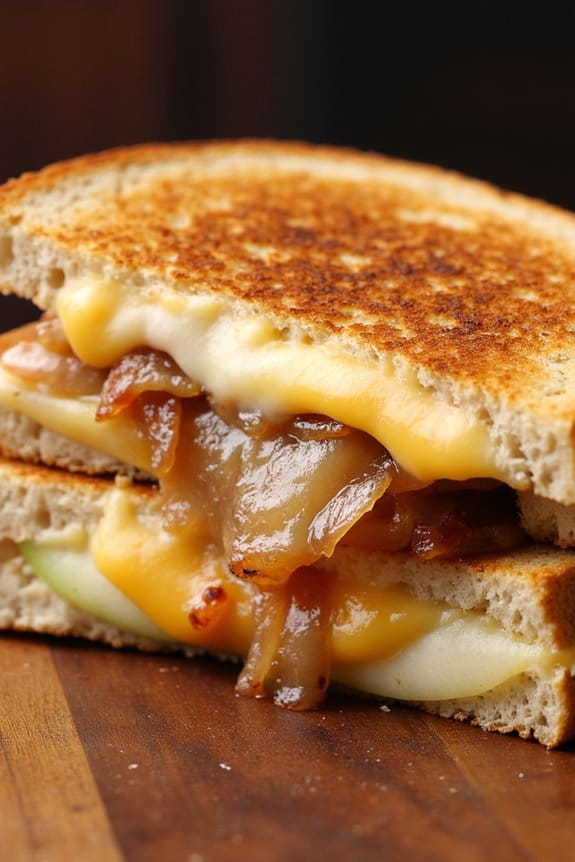
Indulge in a sophisticated twist on a classic comfort food with this Gourmet Grilled Cheese recipe. This dish elevates the traditional grilled cheese sandwich by incorporating unique fillings that create a delightful blend of flavors and textures. Caramelized onions add a rich, sweet depth, while thinly sliced apples provide a crisp, invigorating contrast. The combination of creamy cheese and the sweet-savory balance of the onions and apples makes this grilled cheese a perfect option for a luxurious lunch or a cozy dinner.
Perfectly suited for a gathering of 4-6 people, this recipe allows you to showcase your culinary prowess while still enjoying a quick and satisfying meal. The secret to achieving the ideal grilled cheese lies in the balance of flavors and the choice of ingredients. By selecting a hearty bread and a high-quality cheese, you guarantee each bite is as delicious as the final one. Follow these instructions to create a memorable gourmet experience for your friends and family.
Ingredients (Serves 4-6):
- 12 slices of sourdough bread
- 12 slices of sharp cheddar cheese
- 2 medium onions, thinly sliced
- 2 tablespoons butter (for caramelizing onions)
- 2 tablespoons olive oil (for grilling)
- 2 large apples, thinly sliced
- 4 tablespoons mayonnaise
- Salt and pepper to taste
- 2 tablespoons balsamic vinegar (optional, for caramelized onions)
Cooking Instructions:
1. Caramelize the Onions: In a large skillet, melt 2 tablespoons of butter over medium heat. Add the thinly sliced onions and a pinch of salt, stirring occasionally. Cook for about 20-25 minutes until the onions are soft and golden brown.
Add balsamic vinegar in the last 5 minutes for added depth of flavor, stirring well to combine. Remove from heat and set aside.
2. Prepare the Bread: Lay out the slices of sourdough bread. Spread a thin layer of mayonnaise on one side of each slice. This will guarantee an even, golden brown crust when grilling.
3. Assemble the Sandwiches: On the non-mayonnaise side of half the slices, place one slice of cheddar cheese, followed by a layer of caramelized onions, a few apple slices, another slice of cheddar cheese, and top with another slice of bread, mayonnaise side out.
4. Grill the Sandwiches: Heat a large skillet or griddle over medium heat and add 1 tablespoon of olive oil. Place the sandwiches in the skillet, cooking 2-3 at a time depending on the size of your pan.
Press down gently with a spatula and cook for 3-4 minutes on each side, or until the bread is golden brown and the cheese has melted.
5. Serve and Enjoy: Once cooked, remove the sandwiches from the skillet and let them rest for a minute before slicing. Serve warm with a side of salad or a bowl of soup for a complete meal.
Extra Tips:
To guarantee your gourmet grilled cheese is perfectly crispy and flavorful, consider the following tips: Use room temperature cheese for more even melting.
Experiment with different types of apples, such as Granny Smith for tartness or Honeycrisp for sweetness, to find your preferred flavor profile. Additionally, try using a mix of cheeses like Gruyère or Havarti for a more complex taste.
Finally, if you prefer a more robust flavor, consider adding a pinch of fresh herbs like thyme or rosemary to the caramelized onions before assembling the sandwiches.
Smoky Avocado With Spicy Salsa
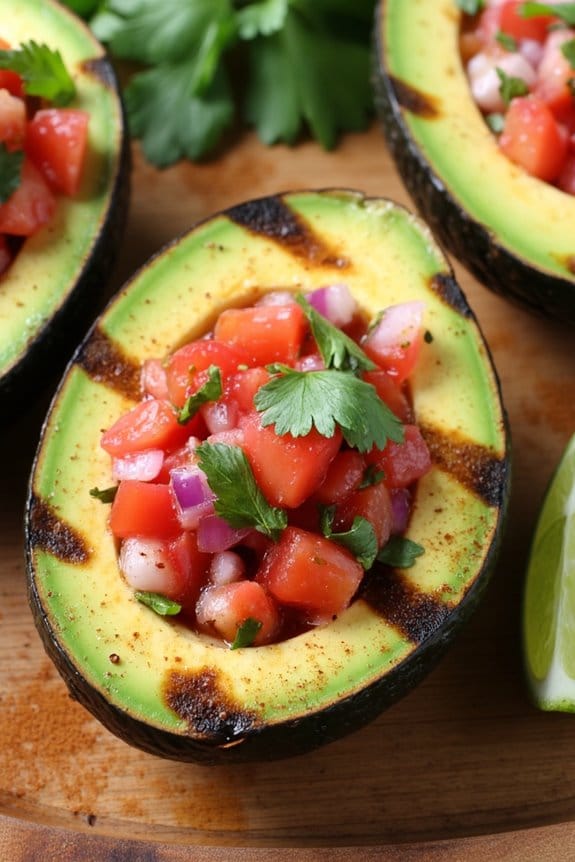
Indulge in the delightful fusion of flavors with this Smoky Avocado With Spicy Salsa recipe. This dish is a perfect blend of creamy, smoky avocado paired with a vibrant, zesty salsa that adds a spicy kick to every bite. Ideal for a summer barbecue or a casual dinner party, this recipe brings something exciting to the table with its unique taste and texture. Not only does it serve as a fantastic appetizer, but it can also be a show-stopping side dish that complements grilled meats and other mains beautifully.
The smoky avocado is achieved by grilling ripe avocados to perfection, creating a charred flavor that enhances their natural creaminess. The spicy salsa, made with fresh tomatoes, jalapeños, and cilantro, introduces a rejuvenating and fiery contrast that balances the richness of the avocado. This dish requires minimal ingredients but promises maximum flavor, making it a must-try for anyone looking to expand their grilling repertoire.
Ingredients (Serves 4-6):
- 3 ripe avocados
- 2 tablespoons olive oil
- 1 teaspoon smoked paprika
- 1 teaspoon sea salt
- 1 teaspoon black pepper
- 4 medium tomatoes, diced
- 1 red onion, finely chopped
- 2 jalapeños, seeded and diced
- 1/4 cup fresh cilantro, chopped
- 2 limes, juiced
- 1 teaspoon cumin
- 1 tablespoon honey (optional)
Cooking Instructions:
- Prepare the Avocados: Slice each avocado in half and remove the pit. Brush the flesh side of each avocado half with olive oil, then sprinkle with smoked paprika, sea salt, and black pepper.
- Grill the Avocados: Preheat your grill to medium-high heat. Place the avocados flesh side down on the grill. Allow them to grill for about 4-5 minutes until you see clear grill marks and the flesh is slightly charred. Remove from the grill and let them cool slightly.
- Make the Salsa: In a medium-sized bowl, combine diced tomatoes, chopped red onion, diced jalapeños, and cilantro. Add lime juice, cumin, and honey if you prefer a touch of sweetness. Mix well to combine all ingredients thoroughly.
- Assemble the Dish: Once the avocados have cooled slightly, spoon a generous amount of the spicy salsa into the cavity of each avocado half. Confirm each half is well-filled with the salsa to enhance the taste with every bite.
- Serve: Arrange the avocado halves on a serving platter. Garnish with additional cilantro leaves and a wedge of lime on the side for extra zest, if desired.
Extra Tips:
When selecting avocados for this recipe, choose ones that are slightly firm to the touch but yield slightly under gentle pressure. This guarantees they hold up well on the grill without becoming mushy.
The level of spiciness in the salsa can be adjusted according to your preference by adding more or fewer jalapeños. For added flavor, you can also include a dash of chipotle powder in the salsa for a smoky undertone.
Portobello Mushroom Burgers
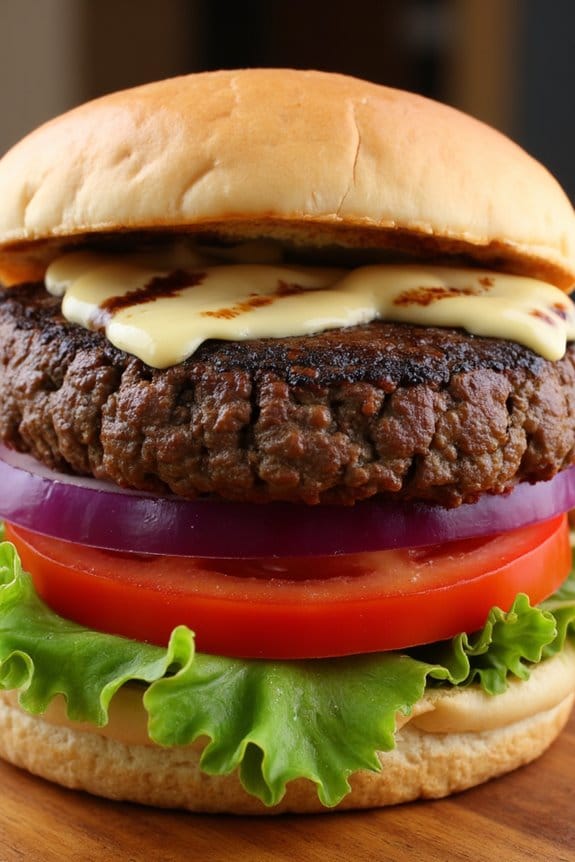
Grilled Portobello Mushroom Burgers are a delicious and hearty alternative to traditional meat burgers, offering a rich and savory taste that even meat lovers will enjoy. The large portobello caps serve as the perfect base for a burger, with their robust texture and ability to absorb flavors beautifully.
When grilled, these mushrooms develop a smoky aroma and juicy interior, making them a satisfying and flavorful dish for any barbecue or casual dinner. Ideal for vegetarians and those looking to incorporate more plant-based meals into their diet, these burgers aren’t only simple to prepare but also packed with nutrients.
The addition of a balsamic marinade enhances the natural umami flavor of the mushrooms, while toppings like fresh vegetables, cheese, and condiments can be customized to personal taste. Whether served on a classic bun or alongside a salad, Grilled Portobello Mushroom Burgers are sure to be a hit at your next gathering.
Ingredients (Serves 4-6):
- 4-6 large portobello mushroom caps
- 1/4 cup balsamic vinegar
- 2 tablespoons olive oil
- 2 tablespoons soy sauce
- 1 teaspoon garlic powder
- 1 teaspoon onion powder
- Salt and pepper to taste
- 4-6 hamburger buns
- Sliced cheese of choice (optional)
- Lettuce leaves
- Sliced tomatoes
- Sliced red onions
- Condiments (ketchup, mustard, mayonnaise)
Cooking Instructions:
1. Prepare the Marinade: In a small bowl, whisk together the balsamic vinegar, olive oil, soy sauce, garlic powder, and onion powder. Season with salt and pepper to taste.
2. Marinate the Mushrooms: Place the portobello mushroom caps in a large resealable plastic bag or shallow dish. Pour the marinade over the mushrooms, ensuring each cap is well-coated.
Seal the bag or cover the dish, then refrigerate for at least 30 minutes to allow the flavors to meld.
3. Preheat the Grill: Heat your grill to medium-high heat, around 375-400°F (190-200°C). Lightly oil the grill grates to prevent sticking.
4. Grill the Mushrooms: Remove the mushrooms from the marinade and place them on the preheated grill, gill side up. Cook for about 5-7 minutes per side, or until the mushrooms are tender and have nice grill marks.
If using cheese, add a slice to each mushroom cap during the last 2 minutes of cooking to allow it to melt.
5. Assemble the Burgers: Toast the hamburger buns on the grill until lightly golden. Place a grilled mushroom cap on each bun, then top with lettuce, tomato slices, red onion slices, and any desired condiments.
6. Serve and Enjoy: Serve the Grilled Portobello Mushroom Burgers hot, accompanied by your favorite sides or a fresh salad.
Extra Tips:
For the best results, choose portobello mushrooms that are firm and have a smooth, unblemished surface. If time permits, marinate the mushrooms for a longer period, even overnight, to enhance the flavor further.
When grilling, avoid pressing down on the mushrooms, as this can cause them to lose their juiciness. Feel free to experiment with different toppings and condiments to personalize your burger, and consider adding a slice of avocado or grilled bell peppers for extra flavor and texture.
Grilled Shrimp Tacos With Mango Salsa
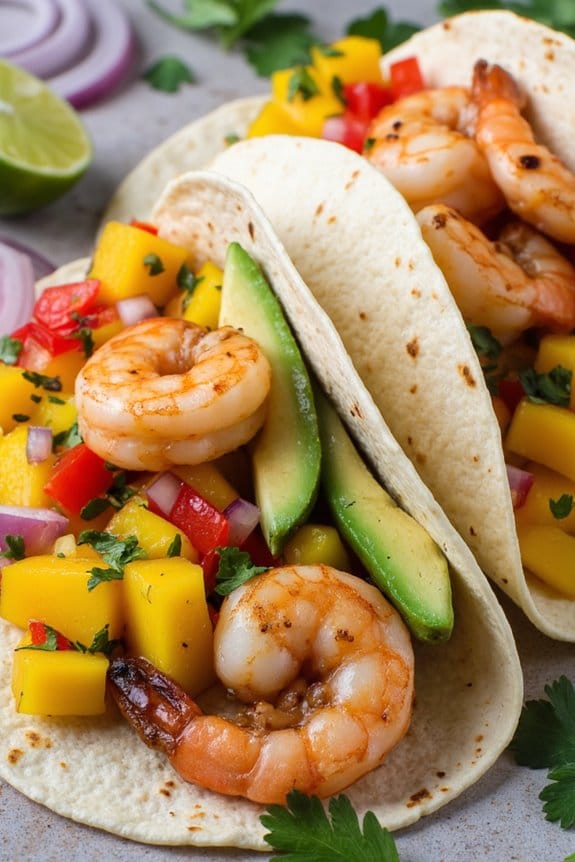
Grilled Shrimp Tacos With Mango Salsa are a delicious fusion of flavors that bring together the smoky taste of grilled shrimp with the invigorating sweetness of mango salsa. This dish is perfect for summer barbecues or any time you’re craving something light yet satisfying. The combination of tender shrimp, ripe mango, and zesty lime creates a mouthwatering experience that’s sure to impress your guests.
Whether you’re hosting a party or enjoying a family dinner, these tacos offer a tropical twist on a classic favorite. The preparation of this dish involves marinating the shrimp to enhance their flavor, grilling them to perfection, and topping them with a vibrant mango salsa that adds a burst of liveliness.
The use of corn tortillas provides a wholesome base, while the toppings of avocado, red onion, and cilantro add color and texture. This recipe serves 4-6 people, making it ideal for sharing with friends and family. With a little preparation and some simple grilling techniques, you’ll have a delightful meal ready in no time.
Ingredients:
- 1 1/2 pounds large shrimp, peeled and deveined
- 1 tablespoon olive oil
- 1 teaspoon garlic powder
- 1 teaspoon paprika
- 1/2 teaspoon salt
- 1/4 teaspoon black pepper
- 12 small corn tortillas
- 2 ripe avocados, sliced
- 1/4 cup chopped fresh cilantro
- 1/2 cup thinly sliced red onion
- Lime wedges, for serving
Mango Salsa:
- 2 ripe mangoes, diced
- 1/2 red bell pepper, diced
- 1/4 cup finely chopped red onion
- 1 jalapeño, seeded and minced
- 2 tablespoons lime juice
- 1/4 teaspoon salt
Cooking Instructions:
- Prepare the Mango Salsa: In a medium bowl, combine diced mangoes, red bell pepper, finely chopped red onion, minced jalapeño, lime juice, and salt. Mix well and set aside to let the flavors meld together.
- Marinate the Shrimp: In a large bowl, toss the shrimp with olive oil, garlic powder, paprika, salt, and black pepper until well coated. Let the shrimp marinate for about 15 minutes to absorb the flavors.
- Preheat the Grill: Preheat your grill to medium-high heat. Make sure the grates are clean and lightly oiled to prevent sticking.
- Grill the Shrimp: Thread the shrimp onto skewers or place them directly on the grill. Cook for 2-3 minutes on each side until they’re pink and opaque. Be careful not to overcook, as shrimp can become rubbery if grilled too long.
- Warm the Tortillas: While the shrimp are grilling, warm the corn tortillas on the grill for about 30 seconds on each side. This will make them pliable and slightly charred.
- Assemble the Tacos: Place a few grilled shrimp on each tortilla. Top with mango salsa, sliced avocado, chopped cilantro, and red onion. Serve with lime wedges on the side for an extra squeeze of liveliness.
Extra Tips:
When choosing shrimp, opt for fresh or frozen shrimp that are already peeled and deveined to save time. If using wooden skewers for grilling, soak them in water for at least 30 minutes to prevent them from burning.
For an additional layer of flavor, consider adding a sprinkle of crumbled queso fresco or a drizzle of sour cream to the tacos. Adjust the heat level of the mango salsa by adding more or less jalapeño, depending on your preference. Enjoy these tacos with an invigorating beverage like a cold beer or a margarita for the ultimate dining experience.
Grilled Bread and Dips
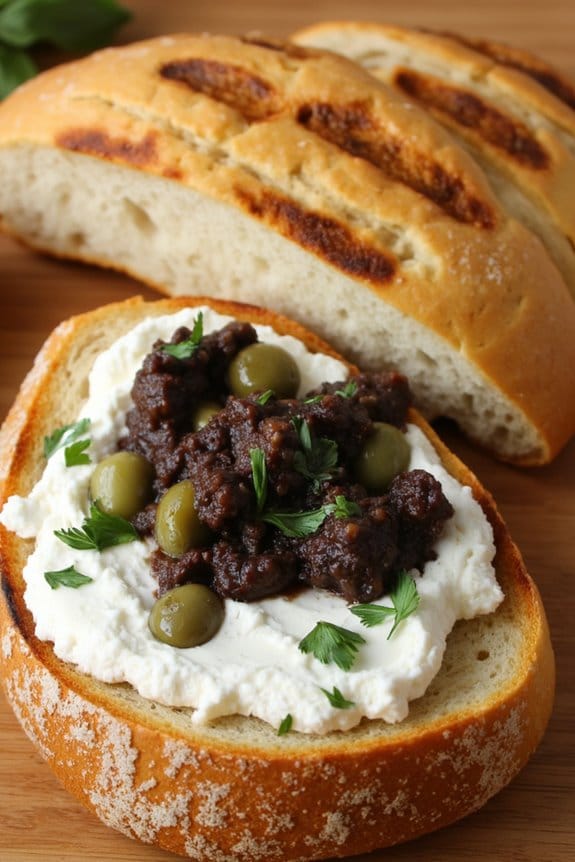
When it comes to elevating simple ingredients into a spectacular dish, Grilled Bread with Herbed Ricotta and Olive Tapenade truly stands out. This recipe combines the smoky flavor of grilled bread with the creamy texture of ricotta cheese, infused with fresh herbs, and the tangy, savory notes of an olive tapenade. Perfect for a summer gathering or a cozy dinner party, this dish provides a delightful contrast of textures and flavors that will surely impress your guests.
The beauty of this dish lies in its simplicity and versatility. The grilled bread serves as the perfect canvas for the rich and creamy herbed ricotta, while the olive tapenade adds a burst of umami and complexity. Whether served as an appetizer or a light meal, this combination is both satisfying and elegant. With a few fresh ingredients and a little bit of grilling, you can create a dish that truly embodies the essence of summer dining.
Ingredients for 4-6 servings:
- 1 large loaf of crusty artisan bread
- 2 cups ricotta cheese
- 1/4 cup fresh basil, chopped
- 1/4 cup fresh parsley, chopped
- 1 tablespoon fresh thyme leaves
- 1 tablespoon lemon zest
- 1/4 cup olive oil, plus extra for brushing
- Salt and black pepper to taste
- 1 cup pitted mixed olives (such as Kalamata and green olives)
- 2 tablespoons capers, drained
- 2 cloves garlic, minced
- 1 tablespoon red wine vinegar
Cooking Instructions:
- Prepare the Bread: Start by slicing the loaf of artisan bread into thick slices, about 1 inch each. Brush both sides of each slice with olive oil to guarantee they grill evenly and develop a nice golden crust.
- Make the Herbed Ricotta: In a medium bowl, combine the ricotta cheese, chopped basil, parsley, thyme, and lemon zest. Stir well until all the herbs are evenly incorporated into the ricotta. Season with salt and black pepper to taste, adjusting the flavors as needed.
- Prepare the Olive Tapenade: In a food processor, combine the pitted olives, capers, minced garlic, red wine vinegar, and olive oil. Pulse until the mixture is finely chopped but still has some texture. Taste and adjust the seasoning with salt and pepper if necessary.
- Grill the Bread: Preheat your grill or a grill pan over medium-high heat. Once hot, place the oiled bread slices on the grill. Grill for about 2-3 minutes on each side, or until they’re crispy and have grill marks. Remove from the grill and set aside.
- Assemble the Dish: Spread a generous layer of herbed ricotta over each slice of grilled bread. Top with a spoonful of olive tapenade, spreading it evenly across the ricotta. Garnish with additional fresh herbs if desired.
- Serve: Arrange the prepared bread slices on a serving platter and serve immediately while the bread is still warm and crispy.
Extra Tips:
For an even more flavorful experience, consider adding a pinch of crushed red pepper flakes to the herbed ricotta for a hint of heat. You can also experiment with different types of bread, such as sourdough or ciabatta, to see which texture you prefer.
If you don’t have a grill, a grill pan or even a broiler can be used to toast the bread. Remember to taste and adjust the seasoning of the ricotta and tapenade before assembling, as the flavors will develop once combined with the grilled bread. Enjoy your culinary creation with a crisp white wine or invigorating iced tea.