

When it comes to summer grilling, the fresh and rich flavor of fish on the grill can’t be beaten. Pair it with the perfect sauce, and you’ve got a meal to remember. Picture a lemon herb butter melting over a juicy salmon fillet or a spicy mango salsa adding a kick to tender mahi-mahi. These tasty combinations will surely take your grilling game to the next level. Ready to explore more mouthwatering pairings?
Zesty Lemon Herb Butter for Grilled Salmon
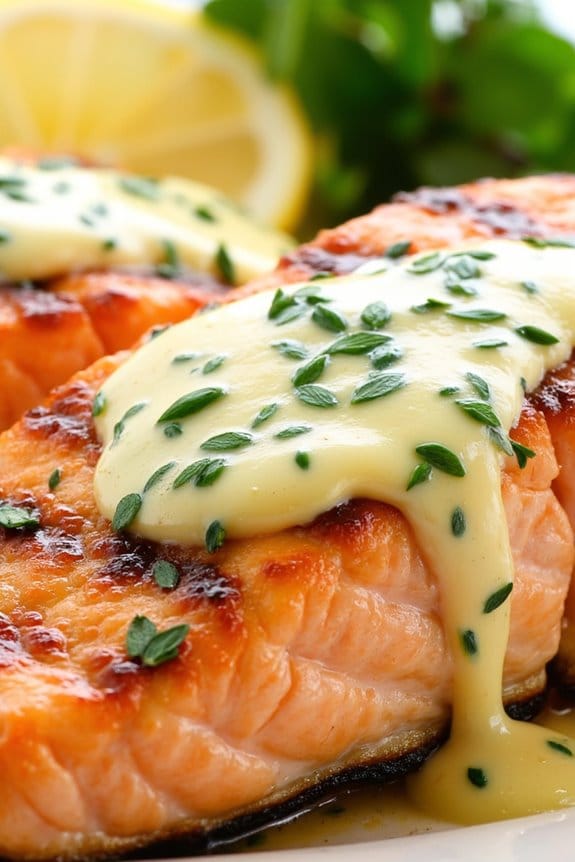
Grilled salmon is a versatile and delicious dish that pairs beautifully with a variety of flavors. One of the most delightful ways to enhance its rich, natural taste is by topping it with a zesty lemon herb butter. This simple yet flavorful sauce combines the brightness of lemon with the earthy notes of fresh herbs, creating a harmonious blend that elevates the succulent taste of grilled salmon.
Perfect for a summer barbecue or a cozy dinner with family, this recipe is sure to impress both guests and your taste buds.
The key to this dish lies in the balance of flavors and the quality of the ingredients. The lemon herb butter is made by mixing together softened butter with freshly squeezed lemon juice, lemon zest, and an assortment of fresh herbs like dill, parsley, and chives. This compound butter melts over the hot, freshly grilled salmon, infusing each bite with its aromatic essence.
When grilled to perfection, the salmon remains juicy and tender on the inside with a slightly crispy exterior, making it an irresistible treat that’s both nutritious and satisfying.
Ingredients (Serves 4-6):
- 2 lbs salmon fillets
- Salt and pepper to taste
- 1 tablespoon olive oil
- 1/2 cup unsalted butter, softened
- 1 tablespoon lemon juice
- Zest of 1 lemon
- 1 tablespoon fresh dill, chopped
- 1 tablespoon fresh parsley, chopped
- 1 tablespoon fresh chives, chopped
Cooking Instructions:
- Prepare the Lemon Herb Butter: In a small bowl, combine the softened butter, lemon juice, lemon zest, dill, parsley, and chives. Mix well until all ingredients are evenly incorporated. Spoon the mixture onto a piece of plastic wrap or parchment paper, roll it into a log shape, and refrigerate until firm.
- Prepare the Grill: Preheat your grill to medium-high heat, around 400°F (200°C). Clean the grill grates thoroughly and lightly oil them to prevent the salmon from sticking.
- Season the Salmon: Pat the salmon fillets dry with paper towels. Drizzle them with olive oil and season both sides generously with salt and pepper.
- Grill the Salmon: Place the salmon fillets skin-side down on the preheated grill. Close the lid and cook for about 6-8 minutes per side, or until the fish flakes easily with a fork. Avoid flipping too often to maintain its integrity.
- Serve with Lemon Herb Butter: Once the salmon is cooked, remove it from the grill and transfer it to a serving platter. Slice the prepared lemon herb butter log into rounds and place a few slices on top of each salmon fillet. The heat from the salmon will melt the butter, allowing it to seep into the fish.
Extra Tips:
For the best results, choose salmon fillets that are evenly thick to promote uniform cooking. If possible, opt for wild-caught salmon for a more robust flavor.
Additionally, be mindful not to overcook the salmon as it can become dry. Remember to let the lemon herb butter chill for at least 30 minutes before serving to maintain its shape when sliced. This dish pairs wonderfully with a side of grilled vegetables or a fresh salad.
Spicy Mango Salsa: Perfect With Grilled Mahi-Mahi
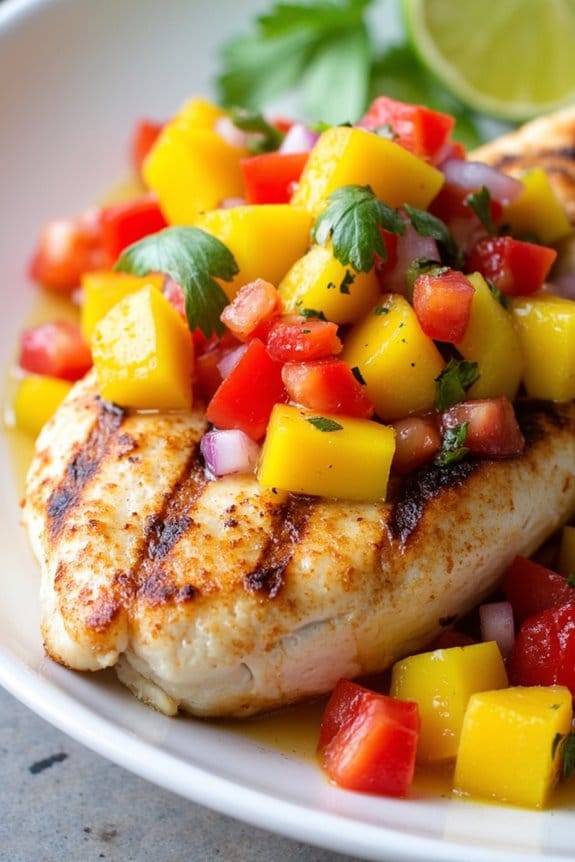
Grilled Mahi-Mahi with Spicy Mango Salsa is a delightful summer dish that brings together the mild, slightly sweet flavor of Mahi-Mahi with the vibrant, tropical zest of mango salsa. This dish is perfect for a backyard barbecue or a casual dinner with friends and family. The fish’s firm texture holds up beautifully on the grill, while the salsa adds a revitalizing burst of flavor with its combination of sweet mango, spicy jalapeños, and tangy lime juice.
This recipe serves 4-6 people and is sure to become a favorite. The key to this dish is balancing the flavors in the salsa to complement the grilled fish. The spicy mango salsa isn’t only delicious but also adds a colorful and festive touch to the plate. Prepare to impress your guests with this easy yet sophisticated dish that embodies the essence of summer dining.
Ingredients:
- 4-6 Mahi-Mahi fillets (about 6 ounces each)
- 2 tablespoons olive oil
- Salt and pepper to taste
- 3 ripe mangoes, peeled, pitted, and diced
- 1 red bell pepper, diced
- 1 small red onion, finely chopped
- 1-2 jalapeños, seeded and finely chopped
- 1/4 cup fresh cilantro, chopped
- Juice of 2 limes
- 1 tablespoon honey
- 1 tablespoon olive oil
- Salt and pepper to taste
Cooking Instructions:
- Prepare the Grill: Preheat your grill to medium-high heat. Make sure the grates are clean and lightly oiled to prevent the fish from sticking.
- Season the Fish: Pat the Mahi-Mahi fillets dry with a paper towel. Brush both sides of the fillets with olive oil and season generously with salt and pepper. This will guarantee a nice crust forms during grilling.
- Grill the Fish: Place the Mahi-Mahi fillets on the grill. Cook for about 4-5 minutes on each side, or until the fish is opaque and flakes easily with a fork. Timing may vary depending on the thickness of the fillets.
- Prepare the Mango Salsa: In a large bowl, combine the diced mangoes, red bell pepper, red onion, jalapeños, and cilantro. In a separate small bowl, whisk together the lime juice, honey, and olive oil. Pour the dressing over the mango mixture and toss gently to combine. Season with salt and pepper to taste.
- Serve: Once the fish is cooked, remove it from the grill and let it rest for a couple of minutes. Serve each fillet with a generous spoonful of spicy mango salsa on top or on the side.
Extra Tips:
When choosing mangoes for the salsa, look for ones that are slightly soft to the touch and have a sweet aroma at the stem. This indicates that they’re ripe and ready to use.
If you prefer a milder salsa, reduce the number of jalapeños or remove the seeds. For an added layer of flavor, consider marinating the Mahi-Mahi in a mixture of lime juice, olive oil, and spices for about 30 minutes before grilling. This will infuse the fish with additional flavor and keep it moist.
Classic Tartar Sauce for Grilled Cod

Grilled cod is a delightful dish known for its light, flaky texture and mild flavor, making it a perfect canvas for a variety of sauces. One classic accompaniment that truly enhances the taste of grilled cod is tartar sauce. This tangy, creamy condiment is a staple for seafood lovers, offering a perfect balance of flavors with its combination of mayonnaise, pickles, and capers.
Whether you’re planning a family dinner or hosting a small gathering, serving grilled cod with homemade tartar sauce elevates the meal to a delightful experience.
Making tartar sauce at home isn’t only simple but also allows you to adjust the flavors to your liking. This recipe provides a classic take on tartar sauce, which complements the grilled cod beautifully. By using fresh ingredients, you guarantee a vibrant and zesty sauce that perfectly accompanies the subtle flavors of the fish.
Ideal for serving 4-6 people, this tartar sauce recipe is sure to become a favorite in your culinary repertoire.
Ingredients (for 4-6 people):
- 1 cup mayonnaise
- 1 tablespoon Dijon mustard
- 2 tablespoons lemon juice
- 1 tablespoon finely chopped capers
- 2 tablespoons finely diced dill pickles
- 1 tablespoon finely chopped fresh dill
- 1 tablespoon finely chopped fresh parsley
- 1/2 teaspoon salt
- 1/4 teaspoon freshly ground black pepper
- 1 teaspoon sugar (optional)
- 1 small shallot, finely chopped
Instructions:
- Prepare the Ingredients: Start by gathering all your ingredients. Finely chop the capers, dill pickles, dill, parsley, and shallot. Having everything finely chopped guarantees a smooth texture for your tartar sauce.
- Mix the Base: In a medium-sized bowl, combine the mayonnaise and Dijon mustard. Stir until they’re well blended, guaranteeing a creamy base for your sauce.
- Add the Flavorings: Gradually mix in the lemon juice, chopped capers, and diced pickles. The lemon juice adds a zesty brightness, while the capers and pickles provide the tangy kick that’s characteristic of a classic tartar sauce.
- Incorporate the Herbs: Add the chopped dill, parsley, and shallot to the mixture. Stir well to distribute these aromatic ingredients evenly throughout the sauce.
- Season the Sauce: Add salt, black pepper, and sugar (if using) to taste. Adjust the seasoning according to your preference, keeping in mind that the sauce should have a balanced yet pronounced tangy flavor.
- Chill the Sauce: Cover the bowl with plastic wrap and refrigerate the sauce for at least 30 minutes before serving. This allows the flavors to meld together, enhancing the overall taste.
- Serve and Enjoy: Once chilled, serve the tartar sauce alongside your freshly grilled cod. The sauce can also be used as a dip for other seafood dishes or even as a sandwich spread.
Extra Tips:
For a healthier version, you can substitute part of the mayonnaise with Greek yogurt to reduce the calorie content while retaining the creamy texture.
Additionally, feel free to experiment with the proportions of the ingredients to better suit your taste preferences. If you prefer a spicier tartar sauce, consider adding a dash of hot sauce or a pinch of cayenne pepper.
Fresh Garlic Lime Marinade for Swordfish
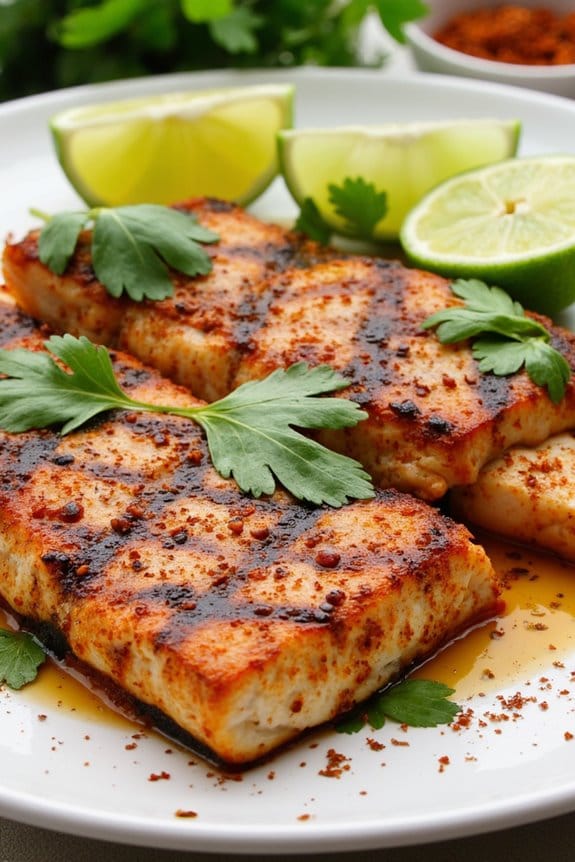
Grilled fish is a culinary delight that’s both healthy and satisfying, and when it comes to swordfish, the Fresh Garlic Lime Marinade elevates this robust fish to a whole new level. This marinade infuses the fish with a zesty and aromatic blend, creating a harmonious balance of flavors that accentuates the natural taste of swordfish. The combination of fresh garlic and lime provides a revitalizing and tangy profile, while the subtle heat from a touch of spice rounds out the marinade, making it perfect for a summer BBQ or a family dinner.
The Fresh Garlic Lime Marinade isn’t only quick and easy to prepare but also versatile enough to complement other types of fish or seafood. The key to this recipe is allowing the swordfish to soak up the marinade long enough to absorb the flavors without overpowering the delicate taste of the fish. Whether you’re a novice cook or a seasoned grill master, this recipe offers a straightforward approach to creating a delicious grilled swordfish dish that everyone will enjoy.
Ingredients (serves 4-6):
- 4 swordfish steaks (about 6 ounces each)
- 4 cloves garlic, minced
- 1/4 cup fresh lime juice
- 1/4 cup olive oil
- 2 tablespoons soy sauce
- 1 teaspoon ground cumin
- 1 teaspoon paprika
- 1/2 teaspoon red pepper flakes
- Salt and pepper to taste
- Lime wedges for serving
- Fresh cilantro for garnish
Cooking Instructions:
- Prepare the Marinade: In a medium-sized bowl, combine minced garlic, fresh lime juice, olive oil, and soy sauce. Whisk these ingredients together until they’re well-blended. Add the ground cumin, paprika, red pepper flakes, salt, and pepper, and whisk again to incorporate all the spices evenly into the marinade.
- Marinate the Swordfish: Place the swordfish steaks in a shallow dish or a large resealable plastic bag. Pour the marinade over the swordfish, making certain that each piece is well-coated. Seal the bag or cover the dish and refrigerate for at least 30 minutes to 1 hour. This allows the flavors to penetrate the fish, enhancing its taste.
- Preheat the Grill: While the swordfish is marinating, preheat your grill to medium-high heat. If using a charcoal grill, make sure the coals are white-hot before cooking.
- Grill the Swordfish: Remove the swordfish from the marinade and shake off any excess. Place the steaks on the preheated grill. Cook for 4-5 minutes on each side, or until the fish is opaque and flakes easily with a fork. Avoid overcooking, as swordfish can become dry.
- Serve: Once grilled to perfection, remove the swordfish from the grill and transfer to a serving platter. Garnish with lime wedges and fresh cilantro before serving.
Extra Tips:
When marinating the swordfish, be careful not to leave it in the marinade for too long, as the acid from the lime juice can begin to “cook” the fish, resulting in a mushy texture. If you prefer a slightly less spicy dish, reduce the amount of red pepper flakes or omit them altogether.
Additionally, for a smokier flavor, consider adding a sprinkle of smoked paprika in place of the regular paprika. Finally, always use fresh lime juice for the best taste, as it provides a more vibrant flavor compared to bottled juice.
Sweet Teriyaki Glaze for Grilled Tuna
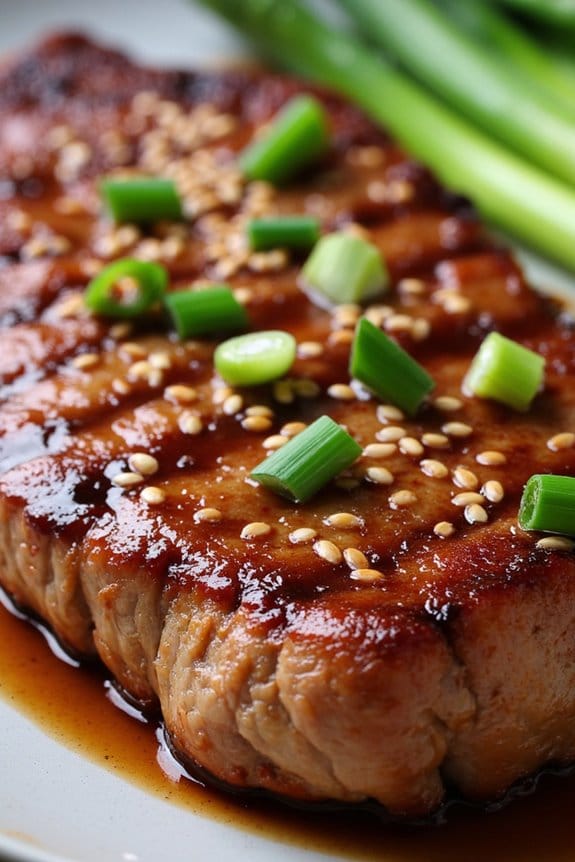
Grilled tuna is a delicious and healthy option for seafood lovers, and it becomes even more exciting when paired with a sweet teriyaki glaze. This glaze is a wonderful combination of sweet and savory flavors, perfectly complementing the natural richness of tuna.
When grilled to perfection, the tuna develops a slightly charred crust that enhances its flavor, while the teriyaki glaze adds a glossy finish that’s both visually appealing and delectable. Whether you’re planning a casual dinner or a special gathering, this dish is sure to captivate your guests with its simplicity and sophisticated taste.
To create this dish, you’ll need to prepare a batch of homemade teriyaki glaze, which is quite simple to make. The glaze consists of soy sauce, brown sugar, garlic, ginger, and a hint of honey, creating a harmonious balance of flavors that coat the tuna beautifully.
The key to achieving the perfect grilled tuna is to guarantee it remains moist and tender on the inside while the exterior is nicely seared. This recipe is perfect for serving 4-6 people, making it an ideal choice for family dinners or entertaining friends.
Ingredients (Serving size: 4-6 people):
- 4-6 tuna steaks (6-8 oz each)
- 1 cup soy sauce
- 1/2 cup brown sugar
- 3 cloves garlic, minced
- 1 tablespoon fresh ginger, grated
- 2 tablespoons honey
- 2 tablespoons rice vinegar
- 2 tablespoons sesame oil
- 1 tablespoon cornstarch
- 1 tablespoon water
- Sesame seeds for garnish
- Sliced green onions for garnish
Cooking Instructions:
- Prepare the Teriyaki Glaze: In a saucepan over medium heat, combine soy sauce, brown sugar, minced garlic, grated ginger, honey, rice vinegar, and sesame oil. Stir the mixture until the sugar dissolves and the ingredients are well combined.
- Thicken the Sauce: In a small bowl, mix the cornstarch with water to create a slurry. Slowly add the slurry to the saucepan, stirring constantly, until the glaze thickens to your desired consistency. Once thickened, remove from heat and set aside to cool slightly.
- Marinate the Tuna: Place the tuna steaks in a shallow dish. Pour half of the teriyaki glaze over the tuna, guaranteeing each steak is well coated. Cover the dish with plastic wrap and marinate in the refrigerator for at least 30 minutes, or up to 2 hours for more intense flavor.
- Preheat the Grill: Preheat an outdoor grill or a grill pan on medium-high heat. Lightly oil the grill grates to prevent the tuna from sticking.
- Grill the Tuna: Remove the tuna from the marinade, letting any excess glaze drip off. Place the tuna steaks on the hot grill. Grill each side for about 3-4 minutes, depending on the thickness of the steaks, until they develop a nice char and are cooked to your desired level of doneness.
- Apply Additional Glaze: During the last minute of grilling, brush the remaining teriyaki glaze over the tuna steaks for added flavor and a glossy finish.
- Garnish and Serve: Once cooked, remove the tuna from the grill and let it rest for a few minutes. Garnish with sesame seeds and sliced green onions before serving.
Extra Tips:
When grilling tuna, it’s important not to overcook it, as it can quickly become dry and lose its tenderness. Aim for a sear on the outside while keeping the inside slightly pink for a juicy and flavorful result.
Additionally, if you prefer a spicier kick, consider adding a pinch of red pepper flakes to the teriyaki glaze for an extra layer of flavor. Remember to always preheat your grill to guarantee a nice sear and prevent the fish from sticking.
Creamy Dill Sauce: Ideal for Grilled Trout
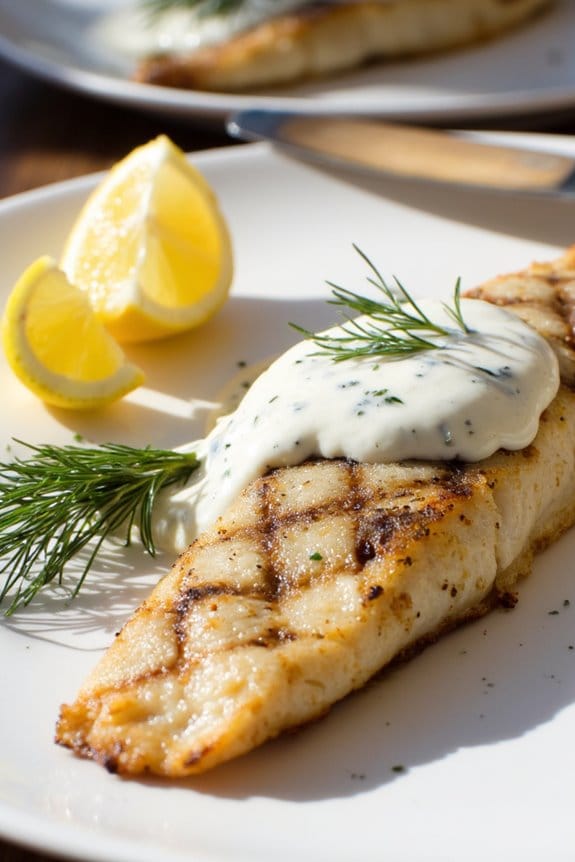
Grilled trout is a delightful and healthy choice for a summer barbecue or a family dinner. Its mild flavor pairs excellently with a variety of sauces, but one of the best pairings is a Creamy Dill Sauce. This sauce adds a fresh, tangy, and slightly herbal note to the dish, enhancing the natural flavors of the fish. The creaminess of the sauce balances the smoky and rich taste of the grilled trout, making it a perfect combination for a satisfying meal.
To create this dish, you’ll start by grilling the trout to perfection, guaranteeing a slightly crispy skin with moist, flaky meat inside. Meanwhile, you’ll prepare the Creamy Dill Sauce, which is simple yet flavorful, made with a base of sour cream and mayonnaise, accentuated with fresh dill, lemon juice, and a hint of garlic for depth. This sauce can be made ahead of time, allowing the flavors to meld beautifully, and is served generously over the grilled fish, creating a delectable and harmonious dish that will impress even the most discerning palates.
Ingredients for Grilled Trout with Creamy Dill Sauce (Serves 4-6)
For the Grilled Trout:
- 4-6 trout fillets, skin-on
- 2 tablespoons olive oil
- Salt and pepper to taste
- Lemon wedges, for serving
For the Creamy Dill Sauce:
- 1 cup sour cream
- 1/2 cup mayonnaise
- 3 tablespoons fresh dill, finely chopped
- 1 tablespoon lemon juice
- 1 garlic clove, minced
- Salt and pepper to taste
Cooking Instructions
- Prepare the Trout: Pat the trout fillets dry with paper towels. Brush both sides with olive oil and season generously with salt and pepper.
- Preheat the Grill: Preheat your grill to medium-high heat. If using a charcoal grill, verify the coals are white and hot before starting. This will guarantee a nice sear on the fish.
- Grill the Trout: Place the trout fillets on the grill, skin-side down. Close the lid and grill for about 4-5 minutes. Flip the fillets carefully using a spatula and grill for another 3-4 minutes, or until the fish is opaque and flakes easily with a fork.
- Make the Creamy Dill Sauce: In a medium bowl, combine the sour cream, mayonnaise, chopped dill, lemon juice, and minced garlic. Mix well until all ingredients are thoroughly combined. Season with salt and pepper to taste. Allow the sauce to chill in the refrigerator while the fish is grilling.
- Serve the Dish: Once the trout is cooked, remove it from the grill and place on a serving platter. Drizzle the Creamy Dill Sauce generously over the fillets or serve it on the side. Garnish with lemon wedges and additional fresh dill if desired.
Extra Tips
When grilling trout, it’s essential to verify the grill grates are clean and well-oiled to prevent the fish from sticking. If you’re concerned about the fish breaking apart, you can use a fish basket or grill mat for added support.
The Creamy Dill Sauce can be made a day in advance, which allows the flavors to intensify and meld together beautifully. Always taste and adjust the seasoning of the sauce before serving to guarantee it complements the trout perfectly.
Chimichurri Sauce for Grilled Fish: Tilapia
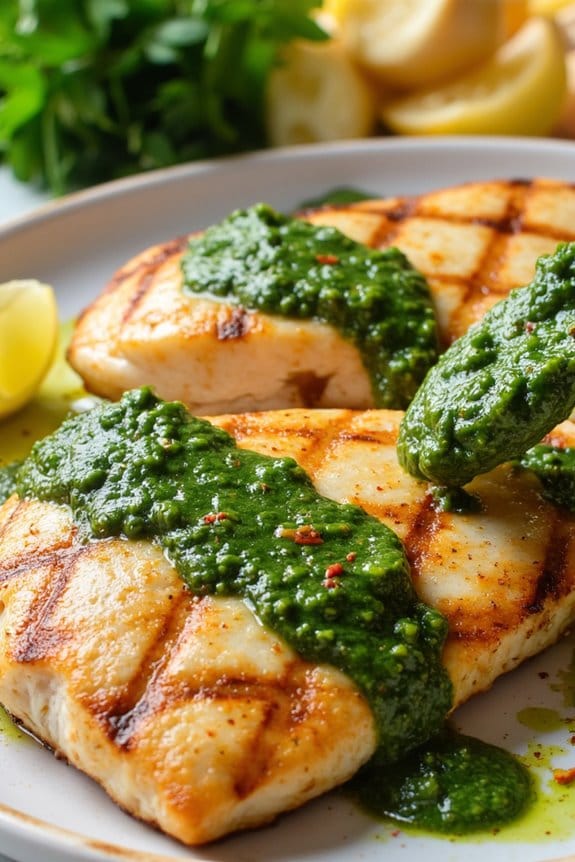
Grilled fish is a delicious and healthy choice for any meal, and when paired with a vibrant chimichurri sauce, it becomes an unforgettable dish. Chimichurri, a traditional Argentinian sauce, is made from fresh herbs, garlic, and vinegar, and its zesty and aromatic flavors complement the mild taste of tilapia perfectly. This recipe will guide you through making a delightful Grilled Tilapia with Chimichurri Sauce that can serve 4-6 people, perfect for a family meal or a small gathering with friends.
Tilapia, known for its delicate and slightly sweet flavor, grills beautifully, allowing the smokiness from the grill to enhance its taste. Paired with the bold and revitalizing chimichurri sauce, this dish isn’t only easy to prepare but also brings a burst of color and flavor to your table. The key to this dish’s success lies in the freshness of the ingredients, especially the herbs used in the chimichurri sauce, which should be vibrant and aromatic.
Ingredients (Serves 4-6):
- 4-6 tilapia fillets
- 1 teaspoon salt
- 1 teaspoon black pepper
- 2 tablespoons olive oil
Chimichurri Sauce:
- 1 cup fresh parsley, finely chopped
- 1/2 cup fresh cilantro, finely chopped
- 4 cloves garlic, minced
- 1/2 cup olive oil
- 2 tablespoons red wine vinegar
- 1 tablespoon lemon juice
- 1 teaspoon red pepper flakes (optional)
- 1/2 teaspoon salt
- 1/2 teaspoon black pepper
Cooking Instructions:
- Prepare the Chimichurri Sauce: In a medium bowl, combine the finely chopped parsley, cilantro, and minced garlic. Add in olive oil, red wine vinegar, lemon juice, red pepper flakes (if using), salt, and black pepper. Mix well until all ingredients are thoroughly combined. Set aside at room temperature for the flavors to meld.
- Season the Tilapia: Pat the tilapia fillets dry with paper towels. Season both sides of each fillet with salt and black pepper. Drizzle olive oil over the fillets, coating them lightly to prevent sticking on the grill.
- Preheat the Grill: Preheat your grill to medium-high heat. If using a charcoal grill, confirm the coals are glowing red with a light coating of ash. For a gas grill, adjust the burners to medium-high.
- Grill the Tilapia: Place the seasoned tilapia fillets on the grill. Grill each side for about 3-4 minutes or until the fish is opaque and flakes easily with a fork. Be cautious not to overcook, as tilapia cooks quickly.
- Serve: Remove the grilled tilapia from the grill and place on a serving platter. Spoon generous amounts of the chimichurri sauce over the fillets. Serve immediately with your choice of sides, like a fresh salad or grilled vegetables.
Extra Tips:
For the best results, verify your grill is clean and well-oiled before adding the fish, as this will prevent sticking and help achieve those beautiful grill marks.
When making the chimichurri sauce, feel free to adjust the quantities of garlic or red pepper flakes to suit your taste preferences. If you have time, prepare the chimichurri sauce a few hours in advance to allow the flavors to develop further.
Store any leftover sauce in an airtight container in the refrigerator for up to a week.
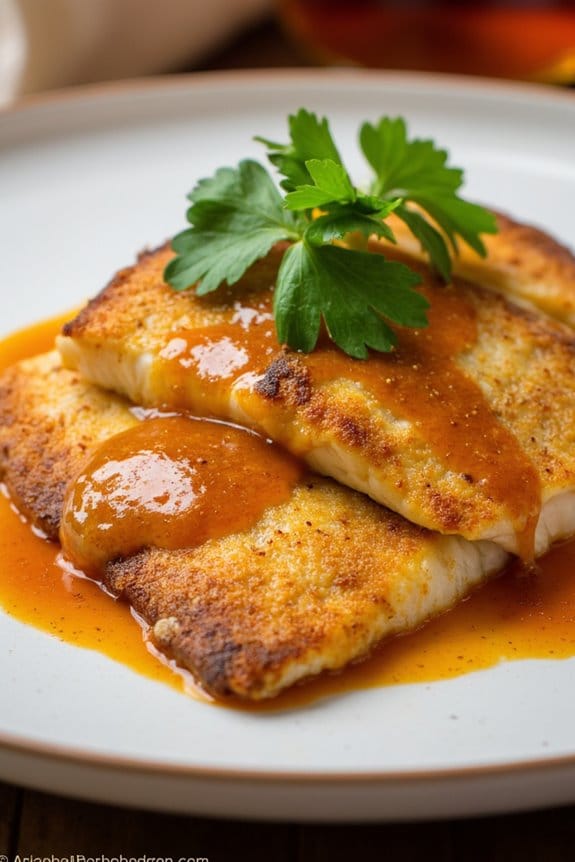
Coconut Curry Sauce to Enhance Grilled Snapper

Grilled snapper is a delightful dish that’s both flavorful and healthy, making it a perfect choice for a family gathering or a dinner party. The addition of a coconut curry sauce takes this dish to new heights, infusing it with rich, aromatic flavors that complement the natural taste of the fish. This sauce is a lovely blend of coconut milk, curry spices, and fresh herbs, creating an exotic and inviting aroma that will entice your guests before they even take their first bite.
This recipe is designed to serve 4-6 people and pairs the succulent taste of grilled snapper with a creamy, spicy coconut curry sauce. The sauce can be made ahead of time, allowing you to focus on grilling the fish to perfection. With the right balance of flavors, this dish is sure to become a staple in your culinary repertoire.
Ingredients:
- 4-6 snapper fillets
- 2 tablespoons olive oil
- Salt and pepper to taste
- 1 tablespoon lime juice
- 1 cup coconut milk
- 2 tablespoons red curry paste
- 1 tablespoon fish sauce
- 1 tablespoon brown sugar
- 1 teaspoon grated ginger
- 1 clove garlic, minced
- 1 small onion, finely chopped
- 1 red bell pepper, thinly sliced
- 1 tablespoon chopped fresh cilantro
- 1 tablespoon chopped fresh basil
- Lime wedges for serving
Instructions:
- Prepare the Snapper: Pat the snapper fillets dry with paper towels. Brush both sides with olive oil and season with salt, pepper, and lime juice. Set aside while you prepare the sauce.
- Make the Coconut Curry Sauce: In a medium saucepan, heat a little olive oil over medium heat. Add the chopped onion and sauté until translucent. Stir in the garlic and ginger, cooking for an additional minute until fragrant.
- Add Curry and Coconut Milk: Add the red curry paste to the saucepan, stirring well to combine with the onion mixture. Pour in the coconut milk, fish sauce, and brown sugar, stirring constantly until the mixture is smooth and begins to simmer.
- Incorporate Vegetables: Add the sliced red bell pepper to the sauce and cook for about 5 minutes, or until the peppers are tender. Stir in the chopped cilantro and basil, and adjust the seasoning with more salt or sugar if needed. Remove from heat and keep warm.
- Grill the Snapper: Preheat your grill to medium-high heat. Place the snapper fillets on the grill, skin side down. Grill for about 4-5 minutes per side, or until the fish is opaque and flakes easily with a fork.
- Serve: Transfer the grilled snapper to a serving platter. Spoon the coconut curry sauce over the fish, garnishing with additional cilantro and basil if desired. Serve with lime wedges on the side for an extra burst of citrus flavor.
Extra Tips:
For best results, make certain that the grill is properly preheated and the grates are well-oiled to prevent the fish from sticking.
If you prefer a milder sauce, reduce the amount of red curry paste. You can also customize the heat level by adding a pinch of chili flakes if you enjoy spicier dishes.
The sauce can be made a day in advance and reheated gently before serving, which can help to intensify the flavors.
Honey Mustard Glaze for a Sweet Grilled Halibut
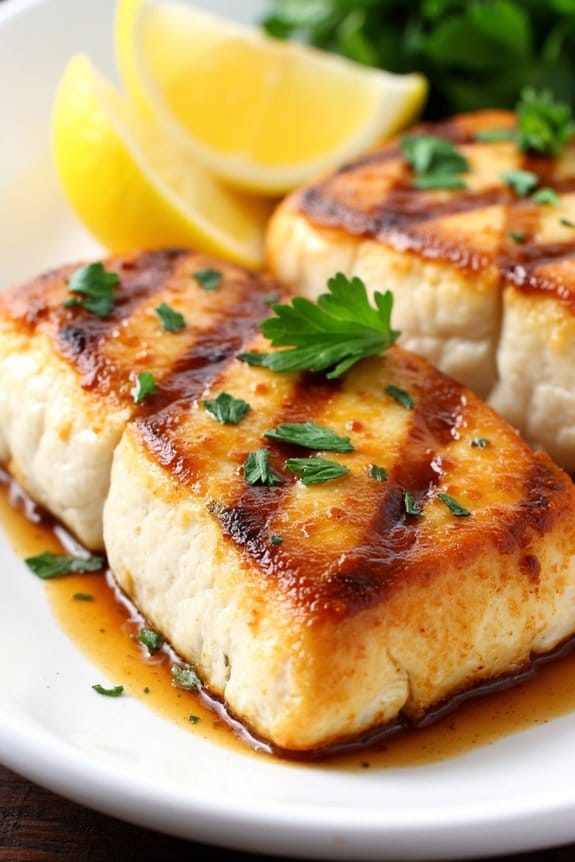
Grilled halibut is a delightful dish that brings out the natural flavors of the fish with a hint of smokiness from the grill. The Honey Mustard Glaze adds a touch of sweetness and tang that complements the mild taste of halibut perfectly. This glaze is made with simple ingredients that create a harmonious balance of flavors, turning your grilled fish into a culinary masterpiece. Perfect for a summer barbecue or a family dinner, this recipe is bound to impress both family and friends.
The key to this dish is the Honey Mustard Glaze, which caramelizes beautifully on the grill, creating a delicious crust that enhances the texture of the fish. The glaze is easy to prepare and can be made ahead of time, allowing you to focus on grilling the halibut to perfection. With minimal preparation and quick cooking time, this dish is both convenient and delectable, making it an excellent option for any occasion.
Ingredients (Serves 4-6):
- 4-6 halibut fillets (about 6 ounces each)
- 1/4 cup honey
- 1/4 cup Dijon mustard
- 2 tablespoons olive oil
- 2 tablespoons lemon juice
- 2 garlic cloves, minced
- Salt and pepper to taste
- Lemon wedges for serving
- Fresh parsley, chopped, for garnish
Cooking Instructions:
- Prepare the Honey Mustard Glaze: In a small mixing bowl, combine the honey, Dijon mustard, olive oil, lemon juice, and minced garlic. Whisk the ingredients together until you achieve a smooth and well-mixed glaze. Set aside.
- Season the Halibut: Pat the halibut fillets dry with paper towels. Season both sides of the fish with salt and pepper to taste. This step guarantees that the fish is well-flavored and allows the glaze to adhere better.
- Preheat the Grill: Preheat your grill to medium-high heat. Confirm the grates are clean and lightly oiled to prevent the fish from sticking.
- Apply the Glaze: Brush one side of each halibut fillet generously with the Honey Mustard Glaze. Place the fillets, glaze side down, onto the preheated grill.
- Grill the Halibut: Grill the halibut for 4-5 minutes on the first side, then carefully flip the fillets. Brush the second side with more glaze and continue grilling for an additional 4-5 minutes, or until the fish is opaque and flakes easily with a fork.
- Serve: Remove the grilled halibut from the grill and transfer to a serving platter. Garnish with fresh parsley and serve with lemon wedges on the side for an extra burst of flavor.
Extra Tips:
To guarantee your halibut doesn’t stick to the grill, make sure to oil the grates well and handle the fish gently when flipping. If possible, use a fish spatula designed for handling delicate fillets.
It’s also a good idea to let the fish sit at room temperature for about 10-15 minutes before grilling to ensure even cooking. If you prefer a more intense flavor, you can marinate the halibut in the glaze for about 30 minutes before grilling.
Be mindful not to overcook the halibut, as it can become dry – aim for a flaky, moist texture.
Tomato Basil Sauce: Mediterranean Sea Bass Delight
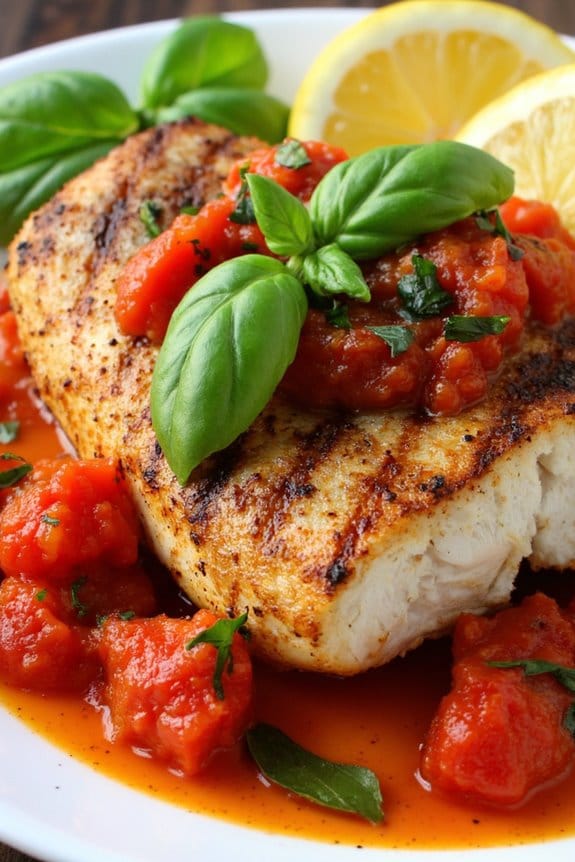
Embrace the flavors of the Mediterranean with this delightful dish that marries the subtle richness of sea bass with the vibrant, zesty essence of a tomato basil sauce. This recipe is perfect for those who love the taste of fresh ingredients and the simplicity of Mediterranean cooking.
The tender and flaky texture of the grilled sea bass, combined with the savory and aromatic tomato basil sauce, creates a culinary experience that transports you to the sun-soaked coasts of the Mediterranean Sea.
This Tomato Basil Sauce: Mediterranean Sea Bass Delight is a fantastic choice for a family dinner or a small gathering, serving 4-6 people. The fresh tomatoes, fragrant basil, and the perfectly grilled fish make for a healthy and delicious meal that’s both satisfying and easy to prepare.
The following ingredients and instructions will guide you in creating this delectable dish with ease.
Ingredients (serves 4-6):
- 4-6 sea bass fillets
- 3 tablespoons olive oil, divided
- Salt and pepper to taste
- 4 ripe tomatoes, diced
- 3 cloves garlic, minced
- 1/4 cup fresh basil leaves, chopped
- 1 tablespoon balsamic vinegar
- 1 teaspoon sugar
- Juice of 1 lemon
- Lemon wedges, for serving
- Fresh basil leaves, for garnish
Cooking Instructions:
- Prepare the Sea Bass: Rinse the sea bass fillets under cold water and pat them dry with a paper towel. Season both sides with salt and pepper to taste.
- Preheat the Grill: Preheat your grill to medium-high heat. Lightly oil the grill grates with 1 tablespoon of olive oil to prevent sticking.
- Grill the Sea Bass: Place the sea bass fillets skin-side down on the preheated grill. Grill for about 4-5 minutes per side, or until the fish is opaque and flakes easily with a fork. Remove from the grill and set aside.
- Make the Tomato Basil Sauce: In a medium saucepan, heat the remaining 2 tablespoons of olive oil over medium heat. Add the minced garlic and sauté for about 1 minute until fragrant.
- Add Tomatoes and Simmer: Stir in the diced tomatoes, balsamic vinegar, and sugar. Allow the mixture to simmer for about 10 minutes, stirring occasionally, until the tomatoes have broken down and the sauce has thickened slightly.
- Incorporate Fresh Basil: Remove the sauce from heat and stir in the chopped basil and lemon juice. Adjust seasoning with salt and pepper if needed.
- Serve: Plate the grilled sea bass and generously spoon the tomato basil sauce over each fillet. Garnish with fresh basil leaves and lemon wedges for an extra burst of flavor.
Extra Tips:
For the best results, use fresh, ripe tomatoes and basil to guarantee your sauce has the most vibrant flavor. If you don’t have a grill, you can use a grill pan or even bake the sea bass in the oven at 400°F (200°C) for about 12-15 minutes.
Be mindful of the cooking time to avoid overcooking the fish, as sea bass is best enjoyed when tender and moist. Additionally, you can prepare the tomato basil sauce in advance and store it in the refrigerator to save time on the day of cooking.
Orange Ginger Sauce for a Zesty Barramundi
Barramundi is a versatile and mild-flavored fish that pairs beautifully with a variety of sauces. For a dish that bursts with fresh, zesty flavors, try a delightful Orange Ginger Sauce. This sauce combines the tanginess of orange with the warmth of ginger, complementing the barramundi‘s delicate taste. The bright flavors not only enhance the fish but also make for a revitalizing meal that’s perfect for any occasion.
Preparing this dish involves creating a flavorful marinade and sauce that infuses the fish with citrus notes, balanced by the earthy spice of ginger. When grilled to perfection, the barramundi becomes slightly crispy on the outside while remaining tender and flaky inside. This Orange Ginger Sauce for a Zesty Barramundi is a wonderful option for a weeknight dinner that feels special or a weekend gathering that promises to impress family and friends.
Ingredients for 4-6 servings:
- 4-6 fillets of barramundi
- 1 cup freshly squeezed orange juice
- Zest of 1 orange
- 1 tablespoon fresh ginger, grated
- 2 tablespoons soy sauce
- 2 tablespoons honey
- 1 tablespoon rice vinegar
- 2 cloves garlic, minced
- 1 tablespoon olive oil
- Salt and pepper to taste
- Chopped fresh cilantro for garnish
Cooking Instructions:
- Prepare the Marinade: In a medium bowl, combine orange juice, orange zest, grated ginger, soy sauce, honey, rice vinegar, minced garlic, olive oil, salt, and pepper. Whisk together until all ingredients are well incorporated.
- Marinate the Fish: Place the barramundi fillets in a shallow dish and pour the marinade over them, making certain each fillet is well coated. Cover the dish with plastic wrap and refrigerate for at least 30 minutes to allow the flavors to penetrate the fish.
- Preheat the Grill: While the fish is marinating, preheat your grill to medium-high heat. Lightly oil the grill grates to prevent sticking.
- Grill the Barramundi: Remove the fish from the marinade, allowing excess to drip off, and place the fillets on the hot grill. Cook for about 4-5 minutes on each side, or until the fish is opaque and flakes easily with a fork.
- Prepare the Sauce: In a small saucepan, pour the remaining marinade and bring it to a gentle simmer over medium heat. Allow it to reduce slightly until it thickens into a sauce-like consistency. This should take about 5-7 minutes.
- Serve: Arrange the grilled barramundi fillets on a serving platter. Drizzle the thickened Orange Ginger Sauce over the fish and garnish with chopped fresh cilantro. Serve immediately.
Extra Tips:
For the best results, confirm that your grill is adequately preheated to achieve those desirable grill marks and slight char on the barramundi. Be mindful not to overcook the fish, as barramundi quickly becomes dry if overdone.
If you prefer a spicier kick, add a pinch of red pepper flakes to the marinade. Additionally, you can substitute barramundi with other white fish like cod or tilapia if desired. Enjoy the vibrant flavors that make this dish a standout!
Soy-Garlic Boost for Grilled Catfish
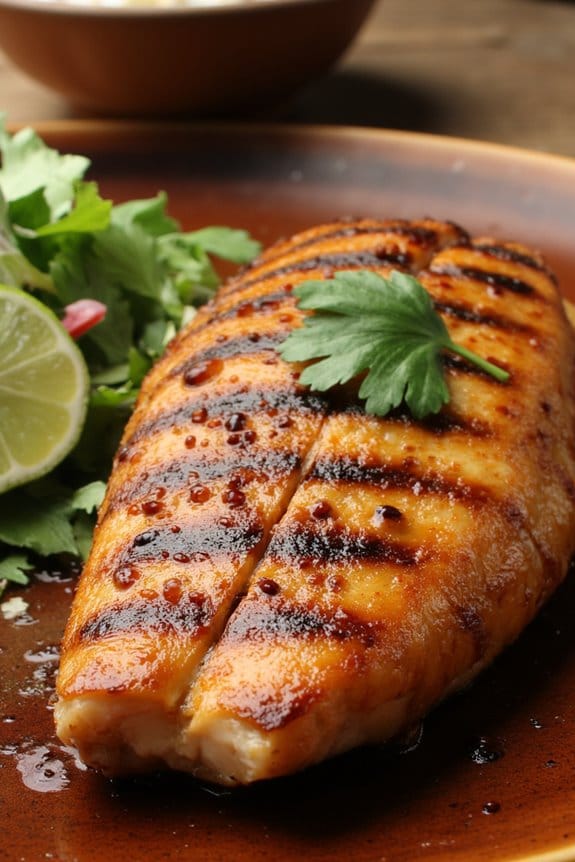
Grilled catfish is a delightful dish that brings out the best flavors of the fish with a smoky taste. When paired with a soy-garlic sauce, it takes on a whole new level of flavor, combining the savory umami of soy sauce with the aromatic kick of garlic. This dish is perfect for a family gathering or a summer barbecue, offering a flavorful twist to the traditional grilled fish experience.
The soy-garlic sauce not only amplifies the natural flavor of the catfish but also adds a delicious glaze that will have everyone coming back for seconds.
To begin, you’ll marinate the catfish in a mix of soy sauce, garlic, and a few other ingredients that will infuse the fish with rich flavors. Grilling the catfish to perfection requires attention to detail, guaranteeing the fish remains moist and tender while developing a delightful char on the outside. Served with a side of steamed rice or a fresh salad, this grilled catfish dish is sure to become a favorite in your household.
Ingredients (serving size: 4-6 people):
- 4-6 catfish fillets
- 1/2 cup soy sauce
- 4 cloves of garlic, minced
- 2 tablespoons honey
- 2 tablespoons fresh lime juice
- 1 tablespoon olive oil
- 1 teaspoon ground black pepper
- 1/2 teaspoon red pepper flakes (optional)
- 2 tablespoons chopped fresh cilantro for garnish
Cooking Instructions:
- Prepare the Marinade: In a medium-sized bowl, combine the soy sauce, minced garlic, honey, lime juice, olive oil, ground black pepper, and red pepper flakes if using. Mix well until all ingredients are thoroughly combined.
- Marinate the Catfish: Place the catfish fillets in a shallow dish or a resealable plastic bag. Pour the marinade over the fillets, guaranteeing they’re all well-coated. Cover the dish or seal the bag and refrigerate for at least 30 minutes, allowing the flavors to infuse the fish.
- Preheat the Grill: While the fish is marinating, preheat your grill to medium-high heat. If using a charcoal grill, guarantee the coals are evenly distributed to provide consistent heat.
- Grill the Catfish: Remove the catfish from the marinade and place them on the grill. Cook for about 4-5 minutes on each side, or until the fish is opaque and flakes easily with a fork. Be careful not to overcook to maintain the fish’s moisture and tenderness.
- Serve: Once cooked, transfer the grilled catfish to a serving platter. Garnish with freshly chopped cilantro for a burst of flavor and color. Serve immediately with your choice of sides.
Extra Tips:
For the best results, use fresh catfish fillets and guarantee they’re of similar thickness for even cooking. If you’re using a gas grill, keep the lid closed while cooking to maintain a consistent temperature.
To prevent sticking, you can lightly oil the grill grates before placing the fish on them. Additionally, if you prefer a bit of sweetness, you can increase the amount of honey in the marinade. Adjust the red pepper flakes according to your spice preference. Enjoy your flavorful grilled catfish with a squeeze of fresh lime juice for an extra zesty finish.
Add Smoky Chipotle to Grilled Sardines

Grilled sardines are a delightful dish, packed with flavor and perfect for a sunny afternoon cookout. When paired with a smoky chipotle sauce, these little fish become a true culinary delight. The robust, slightly spicy chipotle sauce complements the rich, oily texture of the sardines, turning them into a mouthwatering treat. This dish isn’t only delicious but also simple to prepare, making it an excellent choice for both novice and experienced grill masters.
To start, verify you have fresh sardines, which are essential for achieving the best flavor. The smoky chipotle sauce, a blend of chipotle peppers and a few other key ingredients, adds a depth of flavor that enhances the natural taste of the sardines. This recipe serves 4-6 people, making it ideal for a small gathering or family dinner.
Ingredients:
- 12 fresh sardines, cleaned and gutted
- 2 tablespoons olive oil
- Salt and pepper to taste
- 4 chipotle peppers in adobo sauce
- 2 tablespoons lime juice
- 2 cloves garlic, minced
- 1 tablespoon honey
- 1/2 teaspoon ground cumin
- 1/4 cup fresh cilantro, chopped
Instructions:
- Prepare the Sardines: Rinse the sardines under cold water and pat them dry with paper towels. Place them on a large plate or tray, brush with olive oil, and season with salt and pepper on both sides.
- Make the Chipotle Sauce: In a blender or food processor, combine the chipotle peppers, lime juice, minced garlic, honey, and ground cumin. Blend until smooth. Adjust seasoning with salt and pepper as needed.
- Preheat the Grill: Heat your grill to medium-high heat. Confirm the grates are clean and well-oiled to prevent the sardines from sticking.
- Grill the Sardines: Place the sardines on the grill and cook for about 3-4 minutes on each side, or until they’re cooked through and have nice grill marks. The skin should be crispy, and the flesh should be opaque.
- Sauce the Sardines: Once the sardines are grilled, transfer them to a serving platter. Spoon the smoky chipotle sauce over the top and sprinkle with fresh cilantro.
- Serve and Enjoy: Serve the sardines immediately, with additional lime wedges on the side for squeezing.
Extra Tips:
When grilling sardines, it’s important to handle them gently as they can be delicate. Use a fish spatula to turn them, as it provides better support than a regular spatula.
If you’re worried about the fish sticking, you can grill them in a fish basket. Also, the chipotle sauce can be made a day in advance, allowing the flavors to meld and intensify. Adjust the spice level by adding more or fewer chipotle peppers according to your taste preference.
Tangy Lemon Caper Sauce for Grilled Sole
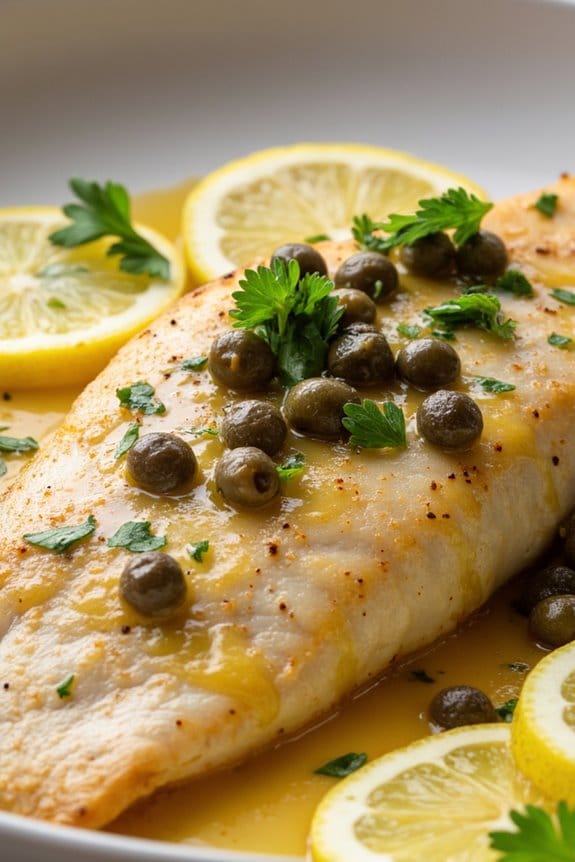
Grilled fish is a delightful and healthy choice for any meal, and when paired with a tangy lemon caper sauce, it becomes an irresistible delicacy. Tangy Lemon Caper Sauce for Grilled Sole is a perfect combination of zesty and savory flavors that enhance the natural taste of the fish. This dish not only delivers on flavor but also is easy to prepare, making it an ideal choice for both casual meals and special occasions.
The lemon adds a revitalizing brightness, while the capers bring a salty punch, perfectly complementing the mild and flaky grilled sole. Whether you’re an experienced cook or just starting out, this recipe is straightforward and rewarding. Grilled Sole with Tangy Lemon Caper Sauce is a dish that can be enjoyed by the whole family or impress guests at your next dinner party.
The preparation is simple, allowing you to focus on achieving the perfect grill on the sole while the sauce provides a sophisticated flourish. With the right balance of ingredients, you’ll create a dish that looks as good as it tastes.
Ingredients for 4-6 servings:
- 4-6 sole fillets
- Olive oil for brushing
- Salt and pepper to taste
- 1/4 cup unsalted butter
- 2 cloves garlic, minced
- 1/4 cup fresh lemon juice
- 2 tablespoons capers, drained
- 2 tablespoons chopped fresh parsley
- Lemon slices for garnish
Cooking Instructions:
- Prepare the Sole: Rinse the sole fillets under cold water and pat them dry with paper towels. Brush both sides of the fillets with olive oil and season generously with salt and pepper.
- Preheat the Grill: Heat your grill to medium-high heat. If you’re using a charcoal grill, wait until the coals are covered with white ash. For a gas grill, preheat for about 10 minutes.
- Grill the Sole: Place the sole fillets on the grill. Grill each side for about 3-4 minutes, or until the fish is opaque and flakes easily with a fork. Be careful when turning the fish to avoid breaking the fillets.
- Prepare the Sauce: While the fish is grilling, melt the butter in a small saucepan over medium heat. Add the minced garlic and sauté for about 1 minute until fragrant.
- Add Lemon and Capers: Stir in the lemon juice and capers into the melted butter. Let the sauce simmer gently for 2-3 minutes, allowing the flavors to meld together.
- Finish the Sauce: Remove the saucepan from the heat and stir in the chopped parsley. Adjust seasoning with salt and pepper if needed.
- Serve: Place the grilled sole on a serving platter. Drizzle the tangy lemon caper sauce over the fish. Garnish with lemon slices and additional parsley if desired.
Extra Tips:
When grilling fish, make certain that the grill grates are clean and well-oiled to prevent sticking. Use a fish spatula for easier handling when flipping the fillets. If possible, select fresh sole from a trusted fishmonger for the best flavor and texture.
You can also adjust the amount of lemon juice and capers in the sauce according to your taste preferences. To enhance the dish, serve it alongside a simple salad or steamed vegetables for a well-rounded meal.