

There’s something so comforting about a perfectly grilled cheese sandwich—it feels like a warm hug on a plate. While the classic cheddar version is always a winner, sometimes a little twist can make all the difference. Have you ever tried a Brie and apple combo or added a jalapeño popper flair? These combinations are absolute game-changers. Let’s explore these delicious creations that promise not just satisfaction but a delightful surprise in every bite.
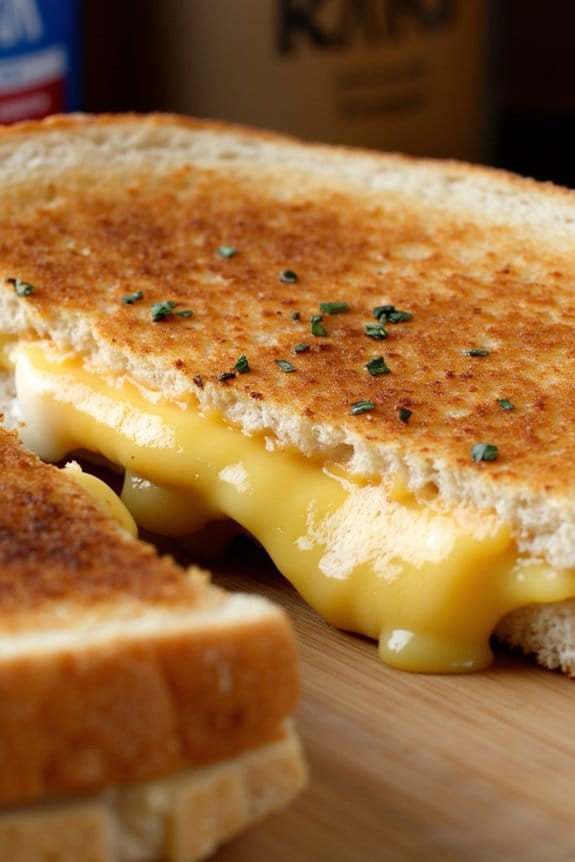
Classic Cheddar Grilled Cheese
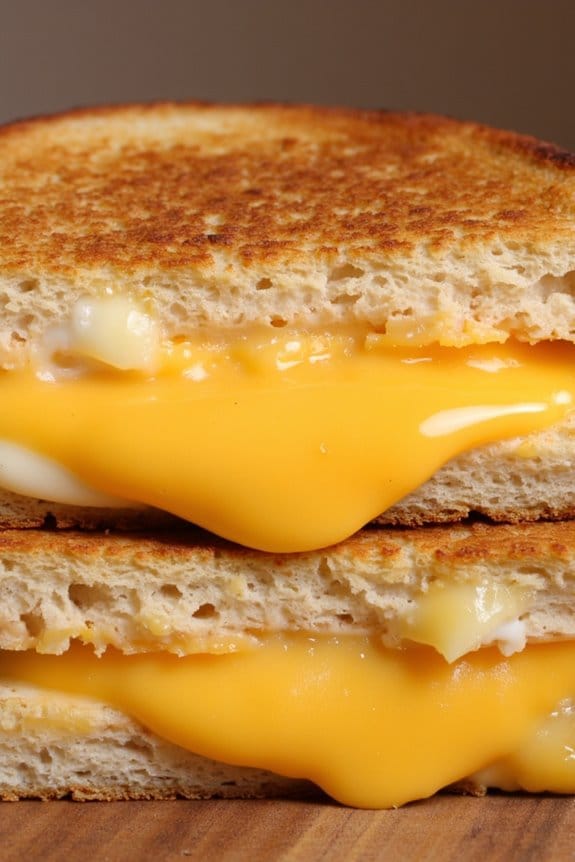
The Classic Cheddar Grilled Cheese is a timeless comfort food that combines the rich, gooey goodness of melted cheddar with the satisfying crunch of perfectly toasted bread. This simple yet delicious sandwich is perfect for a quick lunch, a cozy dinner, or even a midnight snack.
With just a few ingredients and minimal preparation, you can create a mouthwatering meal that will please both kids and adults alike. The key to achieving the perfect grilled cheese lies in selecting quality cheddar cheese and using the right technique to guarantee even browning and melting.
To make a Classic Cheddar Grilled Cheese for a serving size of 4-6 people, you’ll need the following ingredients. This recipe allows for slight variations, such as adding a slice of tomato or a sprinkle of herbs, but the focus remains on the delicious simplicity of cheddar cheese and bread.
Whether you’re hosting a casual gathering or preparing a family meal, this recipe guarantees that everyone can enjoy this beloved classic.
Ingredients:
- 8-12 slices of white or sourdough bread
- 12-18 slices of sharp cheddar cheese
- 4-6 tablespoons of unsalted butter, softened
- Optional: salt to taste
- Optional: black pepper to taste
Cooking Instructions:
- Prepare the Bread: Lay out the slices of bread on a clean surface. Spread a thin, even layer of softened butter on one side of each slice, making sure to cover the entire surface to guarantee even toasting.
- Assemble the Sandwiches: Place 2-3 slices of cheddar cheese on the unbuttered side of half of the bread slices. Top with the remaining bread slices, buttered side facing out, forming a sandwich.
- Preheat the Skillet: Heat a large non-stick skillet or griddle over medium heat. Allow it to warm up for a couple of minutes to guarantee even cooking.
- Cook the Sandwiches: Place the sandwiches in the skillet, buttered side down. Cook for 3-4 minutes on one side, pressing down gently with a spatula to encourage even browning and melting.
- Flip and Finish Cooking: Carefully flip each sandwich over and continue cooking for another 3-4 minutes, or until the bread is golden brown and the cheese is fully melted. Adjust the heat if necessary to avoid burning.
- Serve Immediately: Remove the sandwiches from the skillet and let them cool for a minute before slicing. Optionally, season with salt and black pepper to taste.
Extra Tips:
For the best results, use a good-quality sharp cheddar cheese for a bold flavor. If you prefer a different texture, try using a combination of cheeses, such as mozzarella or gouda, to complement the cheddar.
To avoid a soggy sandwich, make sure the skillet is properly preheated before cooking. If you want to experiment, consider adding ingredients like sliced tomatoes, crispy bacon, or fresh herbs for a unique twist on this classic dish.
Brie and Apple Grilled Cheese
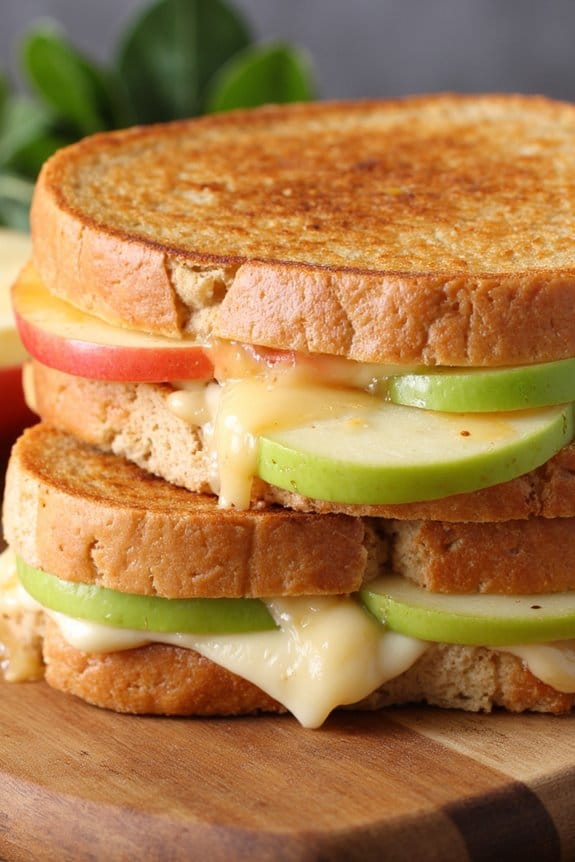
Indulge in the delightful combination of creamy brie and crisp apples with this gourmet twist on a classic comfort food: the Brie and Apple Grilled Cheese. The richness of the melted brie pairs beautifully with the sweetness of the apple, all encased in perfectly toasted bread. This dish is perfect for a cozy lunch or a simple yet elegant dinner, and it’s sure to please both kids and adults alike.
Whether you’re hosting a fall gathering or simply craving something warm and cheesy, this recipe will bring a touch of sophistication to your table.
The key to creating the perfect Brie and Apple Grilled Cheese lies in selecting the right ingredients and executing the cooking process with care. You’ll want to choose a firm, slightly tart apple that holds up well when heated, such as Granny Smith or Honeycrisp. When it comes to the bread, opt for a sturdy, rustic loaf that can support the generous fillings without becoming soggy. This recipe yields enough to serve 4-6 people, making it ideal for small gatherings or family meals.
Ingredients for 4-6 people:
- 8 slices of rustic bread (e.g., sourdough or multigrain)
- 1 pound of Brie cheese, sliced
- 2 large apples, thinly sliced
- 4 tablespoons unsalted butter, softened
- 2 tablespoons honey
- 1 teaspoon Dijon mustard
- Salt and pepper to taste
Cooking Instructions:
- Prepare the Ingredients: Begin by slicing the brie cheese and apples. Aim for uniform slices to guarantee even cooking. Set aside the slices on a clean plate.
- Mix the Spread: In a small bowl, combine the softened butter, honey, Dijon mustard, and a pinch of salt and pepper. Mix until smooth and well blended.
- Assemble the Sandwiches: Lay out the slices of bread on a flat surface. Spread a generous amount of the butter mixture on one side of each slice. On half of the slices (butter side down), layer the brie slices evenly, followed by the apple slices. Top with the remaining bread slices, butter side up, to form sandwiches.
- Heat the Pan: Preheat a large non-stick skillet or griddle over medium heat. You want the pan hot enough to toast the bread without burning it.
- Grill the Sandwiches: Place the sandwiches in the pan, working in batches if necessary to avoid overcrowding. Cook each side for about 3-4 minutes, or until the bread is golden brown and the cheese has melted. Press down gently with a spatula to help the cheese adhere to the bread.
- Serve and Enjoy: Once the sandwiches are perfectly grilled, remove them from the pan and let them rest for a minute. Slice each sandwich in half and serve warm.
Extra Tips:
To enhance the flavor of your Brie and Apple Grilled Cheese, consider adding a sprinkle of cinnamon or nutmeg to the apple slices before assembling the sandwiches. If you prefer a bit of crunch, add a handful of chopped walnuts or pecans to the filling.
To guarantee the cheese melts evenly, allow the brie to come to room temperature before assembling the sandwiches. Finally, keep an eye on the heat level to avoid burning the bread; if the sandwiches are browning too quickly, reduce the heat slightly. Enjoy your gourmet grilled cheese with a side of soup or a fresh salad for a complete meal.
Jalapeño Popper Grilled Cheese
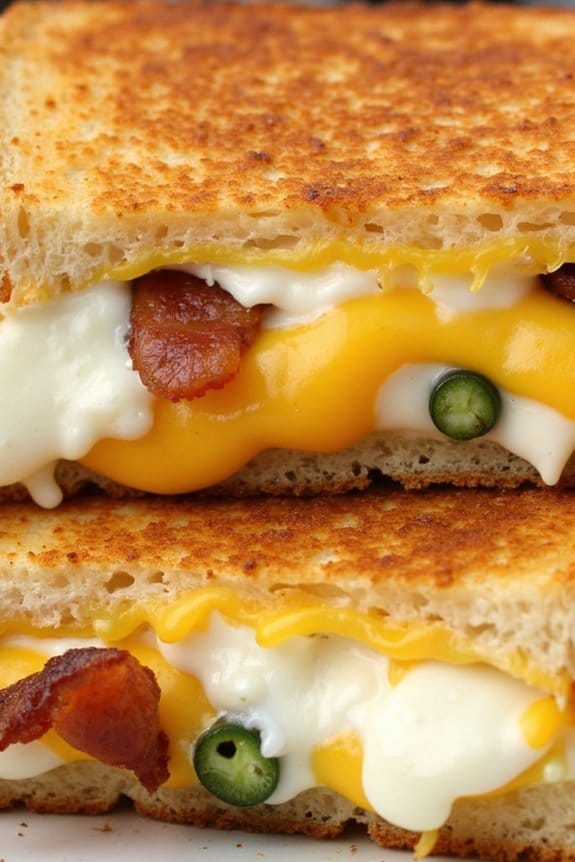
Jalapeño Popper Grilled Cheese is a delightful twist on the classic grilled cheese sandwich, combining the creamy, spicy flavors of jalapeño poppers with the crispy, gooey satisfaction of a grilled cheese. This recipe is perfect for those who love a bit of heat in their meals and are looking for a unique and tasty sandwich option.
With a crispy, buttery exterior and a rich, cheesy, spicy filling, this sandwich is sure to become a favorite in your household. This recipe will yield enough sandwiches for 4-6 people, making it perfect for a family dinner or a small gathering.
The combination of cream cheese, cheddar cheese, and jalapeños creates a mouthwatering filling, while the bacon adds a savory, smoky touch. Each bite offers a perfect balance of textures and flavors, making this Jalapeño Popper Grilled Cheese a must-try for any spicy food lover.
Ingredients (for 4-6 servings):
- 8-12 slices of bread (sourdough or your choice)
- 1 cup cream cheese, softened
- 2 cups shredded cheddar cheese
- 4 jalapeños, seeded and diced
- 8 slices of bacon, cooked and crumbled
- 4 tablespoons butter, softened
Cooking Instructions:
- Prepare the Filling: In a medium bowl, combine the softened cream cheese, shredded cheddar cheese, diced jalapeños, and crumbled bacon. Mix well until all ingredients are evenly incorporated.
- Butter the Bread: Lay out the slices of bread and spread a thin layer of softened butter on one side of each slice. This will be the outside of the sandwich that will be grilled to golden perfection.
- Assemble the Sandwiches: Take one slice of bread (butter side down) and spread a generous amount of the jalapeño popper filling on the non-buttered side. Top with another slice of bread, butter side up. Repeat this process to make 4-6 sandwiches, depending on your serving needs.
- Heat the Pan: Preheat a large skillet or griddle over medium heat. Once heated, place the sandwiches onto the skillet, being careful not to overcrowd the pan.
- Grill the Sandwiches: Cook the sandwiches for 3-4 minutes on each side or until the bread is golden brown and crispy, and the cheese inside is melted. If needed, press down gently with a spatula to guarantee even grilling.
- Serve and Enjoy: Once the sandwiches are grilled to perfection, remove them from the skillet and let them cool for a minute. Slice each sandwich in half and serve immediately for the best taste and texture.
Extra Tips:
For an even spicier version, consider leaving some jalapeño seeds in the filling or adding a sprinkle of crushed red pepper flakes. If you’re not a fan of bacon, feel free to skip it or substitute with turkey bacon or a vegetarian alternative.
To make sure the cheese melts evenly, consider covering the skillet with a lid while grilling. This will trap the heat and help the cheese melt faster. Enjoy your Jalapeño Popper Grilled Cheese with a side of tomato soup for a comforting, flavorful meal.
Bacon and Avocado Grilled Cheese
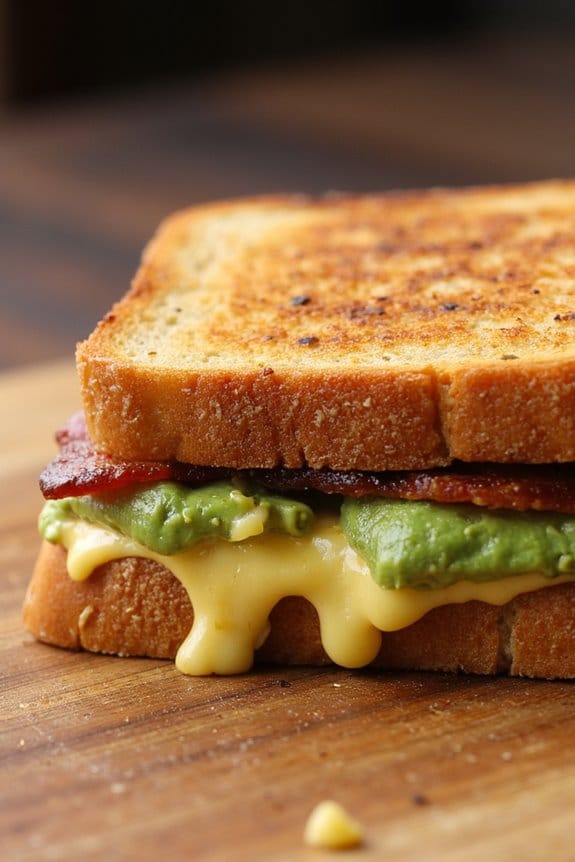
Bacon and Avocado Grilled Cheese is a delightful twist on the classic comfort food that combines the creamy richness of avocado with the smoky, savory flavor of bacon. This recipe transforms a simple grilled cheese sandwich into a gourmet experience that’s perfect for lunch or a light dinner.
The crispy, golden-brown bread encases a melty cheese filling, complemented by the crispness of bacon and the smooth texture of avocado, creating a symphony of flavors with every bite.
This recipe is designed to serve 4-6 people, making it a great option for family meals or casual gatherings with friends. The combination of ingredients not only elevates the traditional grilled cheese but also adds a layer of nutritional benefits from the avocado, which is high in healthy fats and vitamins.
Whether you’re a grilled cheese aficionado or just looking to explore new culinary combinations, this Bacon and Avocado Grilled Cheese is sure to become a favorite.
Ingredients (for 4-6 servings):
- 8-12 slices of bread (such as sourdough or your preferred type)
- 8-12 slices of bacon
- 2 ripe avocados
- 16-24 slices of cheese (such as cheddar, mozzarella, or a mix)
- Butter, softened (for spreading on bread)
- Salt and pepper to taste
Cooking Instructions:
- Prepare the Bacon: Cook the bacon slices in a skillet over medium heat until crispy, about 5-7 minutes. Remove the bacon from the skillet and place it on a plate lined with paper towels to drain excess fat.
- Prepare the Avocado: While the bacon is cooking, cut the avocados in half, remove the pits, and scoop the flesh into a bowl. Mash the avocado with a fork until smooth and season with salt and pepper to taste.
- Assemble the Sandwiches: Spread a thin layer of butter on one side of each slice of bread. On the non-buttered side, spread a generous amount of mashed avocado. Layer 2-3 slices of cheese over the avocado, followed by 2 slices of bacon. Top with another slice of bread, buttered side facing out.
- Grill the Sandwiches: Heat a large skillet or griddle over medium heat. Place the assembled sandwiches in the skillet, cooking in batches if necessary. Grill each sandwich for 3-4 minutes on each side, pressing down gently with a spatula, until the bread is golden brown and the cheese is melted.
- Serve: Remove the sandwiches from the skillet and let them cool for a minute before slicing them in half. Serve warm and enjoy!
Extra Tips:
For the best results, use bread that’s thick enough to hold the ingredients but not so thick that it overwhelms the sandwich. Sourdough or country-style bread works particularly well.
Make sure the avocados are ripe for the creamiest texture, and feel free to experiment with different types of cheese to find your favorite flavor combination. Additionally, consider adding a splash of lime juice to the avocado for an invigorating twist.
Blueberry Grilled Cheese Delight
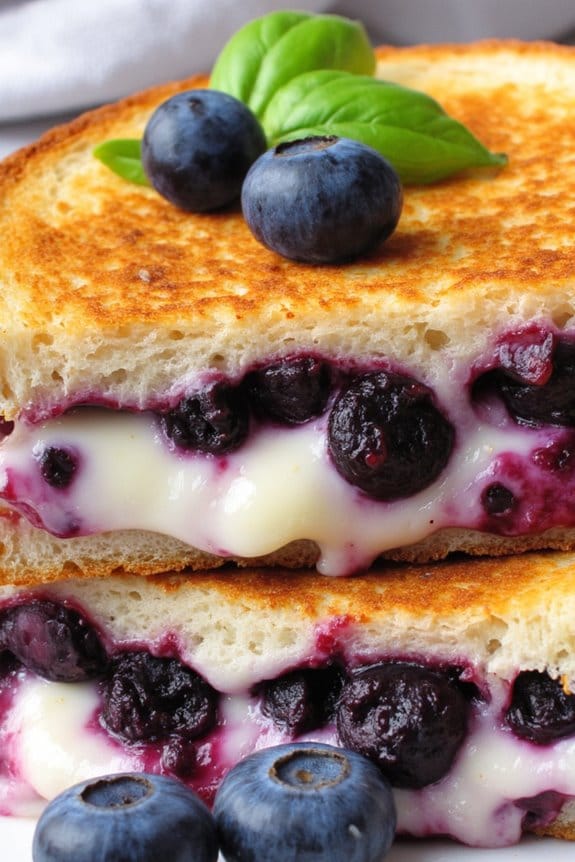
Indulge in a delightful twist on the classic grilled cheese with this Blueberry Grilled Cheese Delight. Perfect for a brunch or a unique take on lunch, this recipe combines the creamy, gooey texture of melted cheese with the sweet and tart burst of fresh blueberries. The result is a flavor fusion that dances on your palate, offering a gourmet experience that’s both sophisticated and comforting.
Whether you’re a fan of sweet-savory combinations or simply looking to elevate a traditional favorite, this dish is sure to impress both family and friends. Crafted to serve 4-6 people, this recipe uses a harmonious blend of ingredients to create a memorable meal.
The preparation process is simple, yet the outcome is remarkably complex in flavor. Expect golden, crispy bread encasing a luscious filling that will have everyone reaching for seconds. Ready to make your kitchen smell heavenly and delight your taste buds? Let’s plunge into the creation of this fantastic dish.
Ingredients (for 4-6 servings):
- 12 slices of sourdough bread
- 1 cup fresh blueberries
- 2 tablespoons honey
- 1 tablespoon balsamic vinegar
- 12 slices of Havarti cheese
- 12 slices of Brie cheese
- 1/2 cup unsalted butter, softened
- 1/4 cup fresh basil leaves, chopped
Cooking Instructions:
- Prepare the Blueberry Mixture: In a small saucepan, combine the fresh blueberries, honey, and balsamic vinegar. Cook over medium heat, stirring occasionally, until the blueberries begin to soften and release their juices, about 5-7 minutes. Remove from heat and set aside to cool slightly.
- Assemble the Sandwiches: Lay out the slices of sourdough bread on a clean surface. Spread each slice with a thin layer of softened butter on one side. On the unbuttered side of half the slices, layer one slice of Havarti cheese and one slice of Brie cheese. Spoon a generous amount of the blueberry mixture over the cheese, then sprinkle with chopped basil. Top with another slice of Havarti and Brie cheese. Place another slice of bread on top, buttered side facing out.
- Preheat the Pan: Heat a large skillet or griddle over medium heat. You want it hot enough to toast the bread to a golden brown while slowly melting the cheese inside.
- Grill the Sandwiches: Place the assembled sandwiches on the preheated skillet. Cook for about 3-4 minutes on one side, pressing gently with a spatula to guarantee even toasting. Carefully flip the sandwiches and grill for another 3-4 minutes, or until the bread is golden and crispy and the cheese has fully melted.
- Serve and Enjoy: Remove the sandwiches from the skillet. Allow them to cool for a minute before cutting them in half. Serve immediately for the best gooey texture.
Extra Tips:
For an extra kick of flavor, consider adding a sprinkle of freshly cracked black pepper to the blueberry mixture as it cooks. If you find your bread browning too quickly, reduce the heat slightly to make certain the cheese has enough time to melt completely.
Using a mix of cheeses like Havarti and Brie provides both creaminess and a slight tang, but feel free to experiment with your favorite cheese combinations. Finally, if fresh basil isn’t available, arugula can be a wonderful substitute, adding a peppery note to the sandwich. Enjoy this gourmet twist on a classic favorite!
Gouda and Caramelized Onion Grilled Cheese
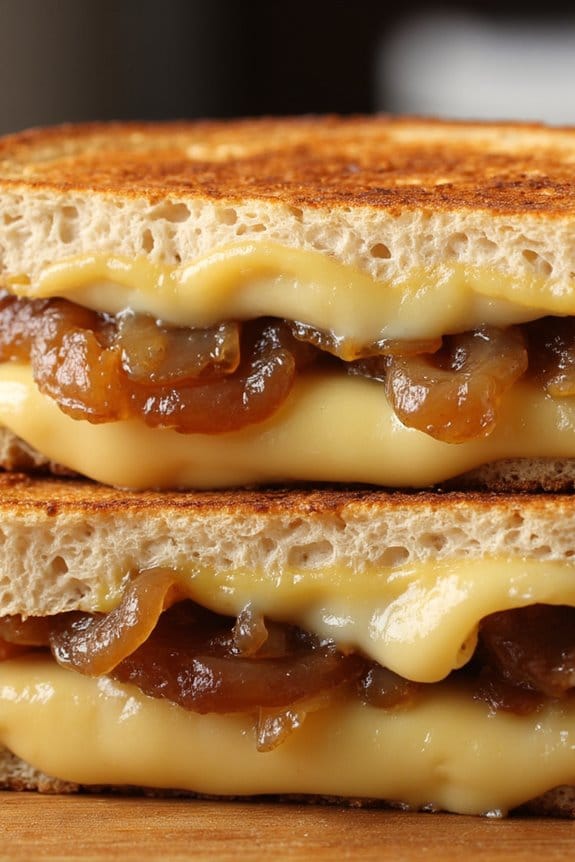
Gouda and Caramelized Onion Grilled Cheese is a delightful twist on the classic grilled cheese sandwich, combining the rich creaminess of Gouda cheese with the sweet, savory depth of caramelized onions. This sandwich is perfect for a cozy lunch or dinner, offering a gourmet touch with minimal effort. The caramelized onions take the spotlight, adding a sophisticated flavor profile that perfectly complements the smooth and slightly nutty Gouda.
Serve this dish alongside a simple green salad or a bowl of tomato soup for a comforting and satisfying meal. The key to this recipe is patience, as caramelizing onions requires a slow cooking process to achieve their sweet, golden perfection. The Gouda cheese melts beautifully, binding the sandwich together with its luscious, gooey texture.
Using a hearty bread like sourdough or a rustic country loaf adds a satisfying crunch and holds up well to the rich fillings. This recipe makes enough for 4-6 people, ensuring there’s plenty to go around for family or friends.
Ingredients (Serves 4-6):
- 12 slices of sourdough bread
- 1 1/2 cups shredded Gouda cheese
- 2 large onions, thinly sliced
- 4 tablespoons unsalted butter
- 2 tablespoons olive oil
- Salt and pepper to taste
- 1 teaspoon sugar (optional)
- 1/2 cup mayonnaise
Instructions:
- Caramelize the Onions: Heat olive oil and 2 tablespoons of butter in a large skillet over medium heat. Add the sliced onions, a pinch of salt, and sugar if using. Cook, stirring occasionally, for about 30-40 minutes until the onions are soft and golden brown. Reduce heat if onions start to brown too quickly. Once caramelized, remove from heat and set aside.
- Prepare the Bread: Spread a thin layer of mayonnaise on one side of each slice of bread. The mayonnaise will help create a crisp, golden crust when grilled.
- Assemble the Sandwiches: Place half of the bread slices, mayonnaise side down, on a clean work surface. Evenly distribute the shredded Gouda cheese over the bread slices. Top with a generous amount of caramelized onions. Place the remaining bread slices on top, mayonnaise side up.
- Grill the Sandwiches: Heat a large skillet or griddle over medium heat. Add 1 tablespoon of butter. Once melted, place the sandwiches in the skillet. Cook for about 3-4 minutes per side, pressing down gently with a spatula, until the bread is golden brown and the cheese has melted. Work in batches if necessary, adding more butter as needed.
- Serve: Once all sandwiches are grilled, slice each in half and serve immediately while warm and gooey.
Extra Tips: To achieve perfectly caramelized onions, be sure to cook them slowly over medium heat, stirring occasionally, to prevent burning. If you’re short on time, you can prepare the onions ahead of time and store them in the refrigerator.
Bringing your cheese to room temperature before assembling the sandwiches will help it melt more evenly. Additionally, using a cast-iron skillet for grilling can enhance the sandwiches’ crust, providing even heat distribution for a perfectly toasted exterior.
Pesto and Mozzarella Grilled Cheese
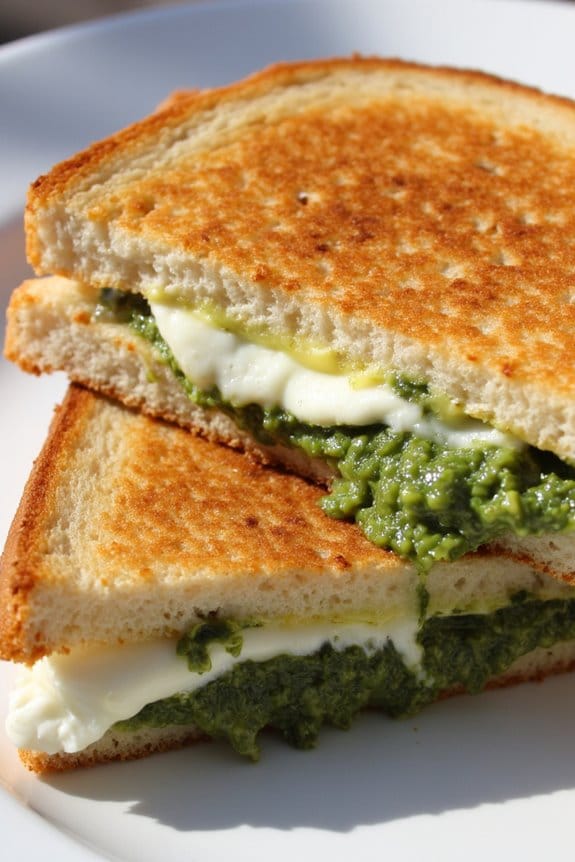
Pesto and Mozzarella Grilled Cheese is a flavorful twist on the classic comfort food that combines the rich, aromatic taste of basil pesto with the creamy, stretchy goodness of mozzarella cheese. This grilled cheese variant is perfect for a quick lunch or a cozy dinner, offering a delightful combination of flavors and textures. The pesto adds a herby, garlicky kick, while the mozzarella melts into a luscious, gooey layer that harmonizes beautifully with the crisp, golden-brown bread.
To make this delicious dish, you’ll need fresh ingredients to bring out the best in each bite. Choose a good quality bread, such as sourdough or ciabatta, to complement the flavors of the pesto and mozzarella. The bread’s crusty exterior and soft interior create the perfect vessel for this cheesy delight. Serving 4-6 people, this recipe will satisfy everyone’s appetite while being surprisingly easy to prepare.
Ingredients for 4-6 people:
- 12 slices of sourdough or ciabatta bread
- 1 cup of basil pesto
- 12 slices of fresh mozzarella cheese
- 2 tablespoons of butter, softened
- Salt and pepper to taste
Cooking Instructions:
- Prepare the Bread: Lay out the slices of bread on a clean surface. Spread a thin layer of butter on one side of each slice. This will help the bread achieve a golden-brown, crispy texture when grilled.
- Add the Pesto: Flip the bread over so the non-buttered side is facing up. Spread approximately 1-2 tablespoons of basil pesto on each slice. Verify the pesto is evenly distributed for consistent flavor in every bite.
- Layer the Cheese: Place two slices of fresh mozzarella on top of the pesto on half of the bread slices. Season the cheese lightly with salt and pepper to enhance its flavor.
- Assemble the Sandwich: Top each mozzarella-covered slice with a second slice of bread, buttered side facing out. Press down gently to secure the sandwich.
- Heat the Pan: Preheat a large skillet or griddle over medium heat. You want the pan hot enough to create a nice crust but not so hot that it burns the bread before the cheese melts.
- Grill the Sandwiches: Place the sandwiches in the skillet, working in batches if necessary to avoid overcrowding. Cook for about 3-4 minutes on each side, or until the bread is golden brown and the cheese is fully melted.
- Serve: Remove the sandwiches from the pan and let them rest for a minute before cutting them in half. This brief resting period allows the cheese to settle slightly, preventing it from oozing out too much when sliced.
Extra Tips:
For an added layer of flavor, consider adding sun-dried tomatoes or a handful of fresh spinach inside each sandwich before grilling.
If you want a bit of a crunch, you can sprinkle a little grated Parmesan cheese on the outer side of the bread before grilling. This will create a crispy, cheesy crust that complements the flavors inside.
Make sure to use fresh mozzarella for the best melting quality, and if you have a panini press, it can also be used to grill the sandwiches for an even, pressed finish.
Mediterranean Feta Grilled Cheese

The Mediterranean Feta Grilled Cheese is a delightful twist on the classic comfort food, combining the rich and tangy flavors of the Mediterranean with the creamy, gooey nature of melted cheese. This recipe is perfect for a quick lunch or a light dinner, offering a satisfying blend of textures and tastes. The key ingredients include tangy feta cheese, fresh vegetables, and a hint of herbs, all sandwiched between slices of crusty bread.
Whether you’re a vegetarian looking for a filling meal or just someone who loves cheese, this grilled cheese will certainly become a household favorite. This recipe serves 4-6 people and is ideal for a casual gathering or a family meal. The combination of feta cheese with sun-dried tomatoes, olives, and fresh spinach creates a burst of Mediterranean flavors in each bite.
The feta cheese not only brings a unique taste but also pairs beautifully with the other ingredients, making each sandwich a flavor-packed experience. The preparation is simple and straightforward, making it a perfect choice for both novice and experienced cooks.
Ingredients:
- 8 slices of crusty bread (such as sourdough or ciabatta)
- 1 cup crumbled feta cheese
- 1 cup shredded mozzarella cheese
- 1/2 cup sun-dried tomatoes, chopped
- 1/2 cup Kalamata olives, pitted and sliced
- 1 cup fresh spinach leaves
- 1 tablespoon fresh oregano, chopped
- 2 tablespoons olive oil
- Butter, for grilling
Cooking Instructions:
- Prepare the Filling: In a medium bowl, combine the crumbled feta cheese, shredded mozzarella, chopped sun-dried tomatoes, sliced olives, fresh spinach leaves, and chopped oregano. Mix well to guarantee the ingredients are evenly distributed.
- Assemble the Sandwiches: Lay out the slices of bread on a clean surface. Divide the cheese and vegetable mixture evenly among four slices of bread. Top with the remaining slices of bread to form sandwiches.
- Preheat the Pan: Heat a large skillet or griddle over medium heat. Add olive oil and a small amount of butter to the pan, allowing it to melt and coat the surface evenly.
- Grill the Sandwiches: Place the sandwiches in the skillet, pressing down gently with a spatula. Grill for 3-4 minutes on one side, or until the bread is golden brown and crispy. Flip the sandwiches carefully and grill the other side for an additional 3-4 minutes, ensuring the cheese is fully melted.
- Serve: Remove the sandwiches from the pan and let them cool for a minute before slicing in half. Serve warm and enjoy the delightful combination of flavors.
Extra Tips:
For the best results, choose a high-quality crusty bread that can hold up to the filling without becoming soggy. If you prefer a spicier kick, consider adding a pinch of red pepper flakes to the cheese mixture.
Additionally, you can experiment by adding other Mediterranean ingredients like roasted red peppers or artichoke hearts to customize the sandwiches to your taste. Make sure the skillet is well-heated before adding the sandwiches to guarantee a perfect, crispy crust. Enjoy your Mediterranean Feta Grilled Cheese with a side salad or a cup of soup for a complete meal.
Havarti and Pear Grilled Cheese
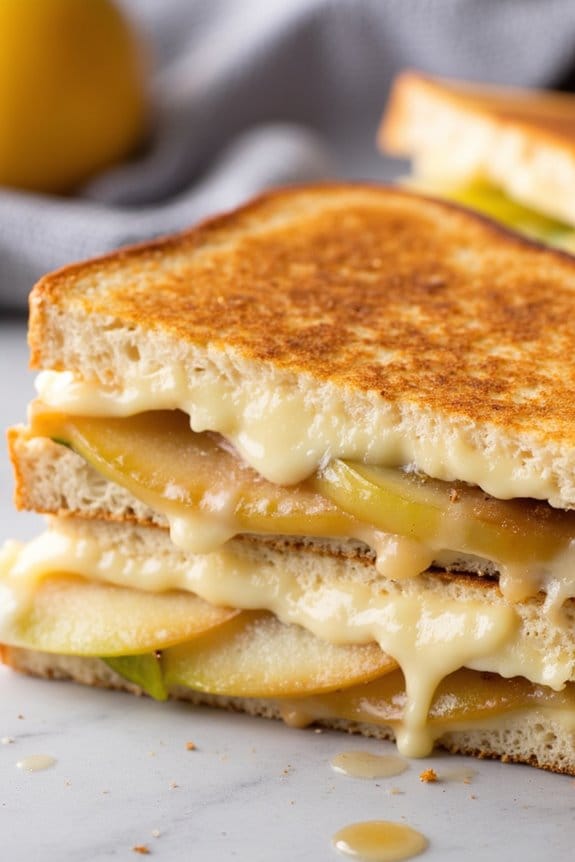
Indulge in the perfect blend of sweet and savory with this delightful Havarti and Pear Grilled Cheese. The creaminess of the Havarti cheese pairs beautifully with the subtle sweetness of ripe pears, creating a unique twist on the classic grilled cheese sandwich. This recipe is perfect for a cozy lunch or a light dinner, offering a sophisticated touch to a beloved comfort food.
The combination of flavors and textures will surely please your palate and leave you longing for more. This Havarti and Pear Grilled Cheese isn’t only delicious but also simple to prepare. With minimal ingredients and straightforward instructions, you can easily whip up this gourmet sandwich for your family and friends.
The ripe pears add a rejuvenating element, while the Havarti cheese melts to perfection, creating a luscious and satisfying bite. Ideal for serving 4-6 people, this recipe is sure to become a favorite in your culinary repertoire.
Ingredients (Serves 4-6):
- 8 slices of sourdough bread
- 12 oz Havarti cheese, sliced
- 2 ripe pears, thinly sliced
- 4 tablespoons butter, softened
- 2 tablespoons honey
- 1 teaspoon ground cinnamon
- A pinch of salt
Cooking Instructions:
- Prepare the Ingredients: Start by slicing the Havarti cheese and pears. Aim for thin, even slices to promote uniform melting and distribution of flavors in your sandwich.
- Mix Honey and Cinnamon: In a small bowl, combine the honey, ground cinnamon, and a pinch of salt. Stir well until the mixture is smooth and set aside.
- Assemble the Sandwiches: Lay out the slices of sourdough bread on a clean surface. Spread a thin layer of the honey-cinnamon mixture on each slice. Layer the Havarti cheese slices and pear slices on half of the bread slices, then top with the remaining slices of bread, honey mixture side down.
- Butter the Bread: Spread a generous amount of softened butter on the outside of each sandwich. This will help achieve a golden, crispy crust when grilling.
- Grill the Sandwiches: Preheat a large skillet or griddle over medium heat. Place the sandwiches, buttered side down, onto the hot surface. Grill for 3-5 minutes on each side, or until the bread is golden brown and the cheese has melted.
- Serve and Enjoy: Remove the sandwiches from the skillet and let them cool for a minute before slicing each in half. Serve warm and enjoy the delightful combination of flavors.
Extra Tips:
For the best results, choose ripe but firm pears to guarantee they hold their shape during cooking. If you prefer a bit of a crunch, consider adding a handful of arugula or spinach for an extra layer of flavor and texture.
To prevent the cheese from oozing out, make sure the cheese and pear slices are well-contained within the bread edges. Adjust the amount of honey to suit your taste preference, and feel free to experiment with different types of bread or cheese for a personalized touch.
Philly Cheesesteak Grilled Cheese
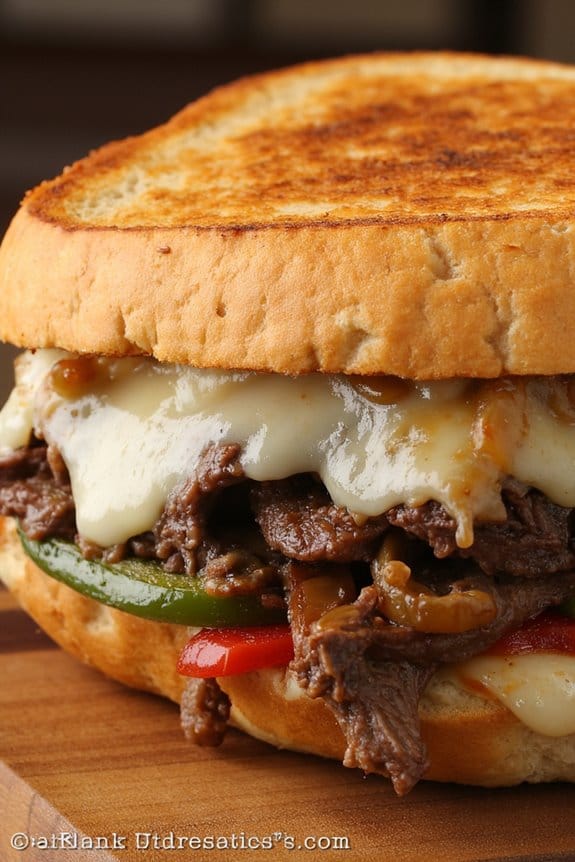
Philly Cheesesteak Grilled Cheese combines the irresistible flavors of the classic Philly cheesesteak sandwich with the comforting warmth of a grilled cheese. This dish is perfect for those who crave a heartier version of the traditional grilled cheese, packed with savory beef, melty cheese, and sautéed vegetables.
Whether it’s for a casual family dinner or a cozy gathering with friends, this recipe delivers a satisfying meal that’s sure to impress.
The key to a successful Philly Cheesesteak Grilled Cheese is balancing the flavors and textures of the ingredients. Tender, thinly sliced beef is cooked alongside onions and bell peppers, infusing every bite with mouthwatering flavor.
These are then layered with provolone cheese between slices of your favorite bread, toasted to golden perfection. The result is a gooey, savory sandwich that captures the essence of a Philly cheesesteak in every bite.
Ingredients (Serves 4-6):
- 1 pound thinly sliced beef (such as ribeye or sirloin)
- Salt and pepper to taste
- 1 tablespoon olive oil
- 1 large onion, sliced
- 1 green bell pepper, sliced
- 1 red bell pepper, sliced
- 8 slices provolone cheese
- 8-12 slices of bread (such as sourdough or Italian bread)
- Butter, softened for spreading
Cooking Instructions:
- Prepare the Beef: Season the thinly sliced beef with salt and pepper. In a large skillet over medium-high heat, add olive oil and cook the beef until browned and cooked through, about 4-5 minutes. Remove from skillet and set aside.
- Sauté Vegetables: In the same skillet, add the sliced onions and bell peppers. Sauté over medium heat until the onions are translucent and the peppers are tender, about 5-7 minutes. Remove from heat.
- Assemble the Sandwiches: Butter one side of each slice of bread. On the unbuttered side, layer slices of provolone cheese, followed by the cooked beef and sautéed vegetables. Top with another slice of cheese and a piece of bread, buttered side facing out.
- Grill the Sandwiches: Heat a clean skillet or griddle over medium heat. Place the assembled sandwiches onto the skillet and cook until the bread is golden brown and the cheese has melted, about 3-4 minutes per side. Press down gently with a spatula for even cooking.
- Serve: Remove the sandwiches from the skillet and let them cool for a minute. Slice in half and serve warm, enjoying the melted cheese and savory filling.
Extra Tips:
For the best flavor, try to use high-quality beef and cheese. If you prefer a spicier kick, add a dash of hot sauce or a few slices of jalapeño peppers to the vegetable mix.
Additionally, using a panini press can help achieve a perfectly even crust, but a regular skillet works just as well. Finally, make sure to keep the heat at medium to prevent the bread from burning before the cheese fully melts.
Ricotta and Fig Grilled Cheese
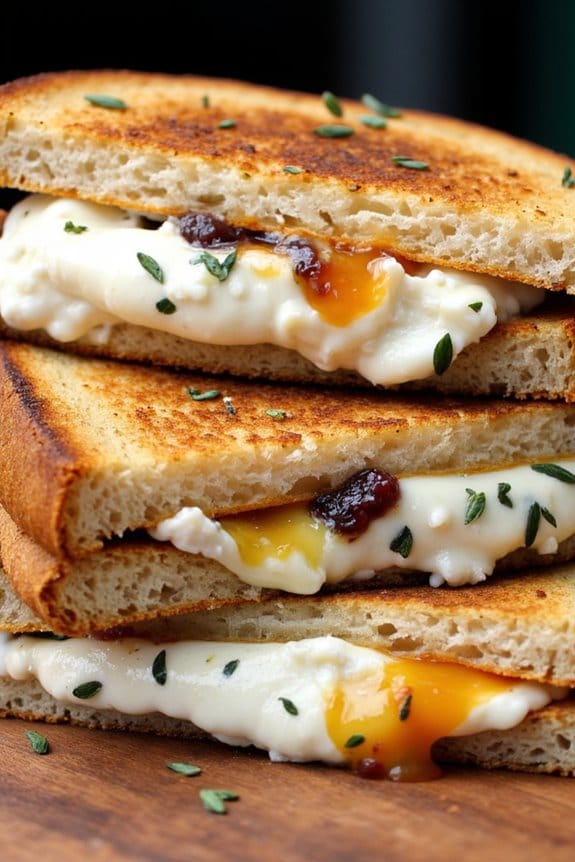
Indulge in the delightful combination of sweet and savory with this Ricotta and Fig Grilled Cheese. This recipe elevates the classic grilled cheese sandwich by incorporating creamy ricotta cheese and sweet fig jam, creating a perfect balance of flavors. The addition of fresh thyme and a hint of honey further enhances the taste, making it a sophisticated yet simple dish suitable for any occasion, whether it’s a casual lunch or a dinner party appetizer.
This Ricotta and Fig Grilled Cheese is a treat for the senses, offering a creamy, tangy, and slightly sweet experience with every bite. The gooey, melted cheese pairs wonderfully with the crispiness of the bread, while the fig jam adds a unique twist that’s sure to impress your guests. Prepare this dish for a serving size of 4-6 people and watch it disappear in minutes.
Ingredients for 4-6 People:
- 8 slices of sourdough bread
- 1 cup ricotta cheese
- 1/2 cup fig jam
- 1 tablespoon honey
- 1 tablespoon fresh thyme leaves
- 12 slices of provolone cheese
- 4 tablespoons unsalted butter, softened
Cooking Instructions:
- Prepare the Ricotta Mixture: In a medium bowl, combine the ricotta cheese, honey, and fresh thyme leaves. Mix well until all ingredients are thoroughly incorporated and set aside.
- Assemble the Sandwiches: Lay out 8 slices of sourdough bread on a clean surface. Spread a generous layer of the ricotta mixture on one side of each slice. On four of these slices, spread a layer of fig jam on top of the ricotta mixture. Place three slices of provolone cheese on each of the four fig jam-covered slices.
- Complete the Assembly: Top each fig jam and cheese-covered slice with the remaining slices of bread, ricotta side down, to form a sandwich.
- Butter the Bread: Spread softened butter evenly over the outside of each sandwich, making sure of full coverage for a golden, crispy finish.
- Grill the Sandwiches: Heat a large non-stick skillet or griddle over medium heat. Place the sandwiches in the skillet and cook for about 3-4 minutes on each side, or until the bread is golden brown and the cheese has melted.
- Serve: Remove the sandwiches from the skillet, let them cool slightly, then slice each sandwich in half. Serve warm and enjoy the delightful flavors.
Extra Tips:
For an added layer of flavor, consider using a combination of ricotta and mascarpone cheese for extra creaminess. If you prefer a bit of crunch, add a handful of chopped walnuts or pecans to the ricotta mixture.
Ascertain the skillet isn’t too hot, as this could burn the bread before the cheese has a chance to melt. Adjust the sweetness of the sandwich by varying the amount of honey and fig jam to your taste. Enjoy this dish with a side salad for a complete meal.
BBQ Chicken and Cheddar Grilled Cheese
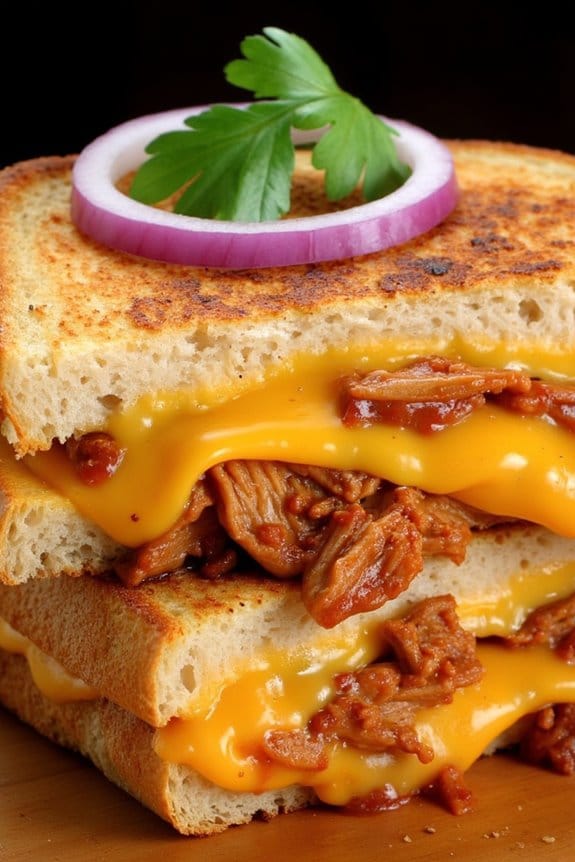
Indulge in the ultimate comfort food with a twist — the BBQ Chicken and Cheddar Grilled Cheese. This mouthwatering sandwich combines the smoky, tangy flavors of barbecue chicken with the creamy richness of melted cheddar cheese, all encased in perfectly toasted bread. Ideal for a quick lunch or a satisfying dinner, this recipe is designed to please a crowd, offering a delightful balance of savory and cheesy goodness.
Whether you’re entertaining guests or craving a gourmet grilled cheese at home, this recipe is bound to become a favorite. To craft the perfect BBQ Chicken and Cheddar Grilled Cheese, you need the right ingredients and a bit of patience to guarantee that each element is cooked to perfection.
The key lies in the harmonious blend of flavors, where the barbecue sauce complements the sharpness of the cheddar and the tender juiciness of shredded chicken. With the following ingredients and a few simple steps, you can create a grilled cheese masterpiece that serves 4-6 people, perfect for sharing with family and friends.
Ingredients (serves 4-6):
- 8 slices of sourdough or whole grain bread
- 2 cups cooked and shredded chicken
- 1 cup barbecue sauce
- 2 cups shredded sharp cheddar cheese
- 4 tablespoons unsalted butter, softened
- 1/2 cup thinly sliced red onion (optional)
- 1/4 cup chopped fresh cilantro (optional)
Cooking Instructions:
- Prepare the Chicken: In a medium bowl, combine the shredded chicken with the barbecue sauce. Stir until the chicken is thoroughly coated. If using, mix in the sliced red onion for added flavor and texture.
- Butter the Bread: Spread a thin layer of softened butter on one side of each slice of bread. This will help achieve a golden, crispy exterior when grilled.
- Assemble the Sandwiches: Place 4 slices of bread, buttered side down, on a clean surface. Evenly distribute the BBQ chicken mixture over each slice. Sprinkle a generous amount of shredded cheddar cheese over the chicken. Top with the remaining slices of bread, buttered side up.
- Preheat the Pan: Heat a large skillet or griddle over medium heat. Allow it to warm up for a minute or two to guarantee even cooking.
- Grill the Sandwiches: Place the assembled sandwiches in the hot skillet. Cook for about 3-4 minutes on each side, pressing down gently with a spatula, until the bread is golden brown and the cheese has melted.
- Serve and Garnish: Remove the grilled cheese sandwiches from the skillet. If desired, garnish with chopped fresh cilantro for a fresh, herbal note. Slice each sandwich in half and serve immediately.
Extra Tips: For a smoky, spicy kick, consider adding a few slices of jalapeño peppers to the BBQ chicken mixture. If you prefer a tangier taste, opt for a vinegar-based barbecue sauce.
Make sure the skillet isn’t too hot to avoid burning the bread before the cheese melts. For an ultra-crispy sandwich, try using mayonnaise instead of butter on the outside of the bread. Enjoy your BBQ Chicken and Cheddar Grilled Cheese with a side of crunchy coleslaw or a fresh green salad for a complete meal.
Caprese Grilled Cheese Twist
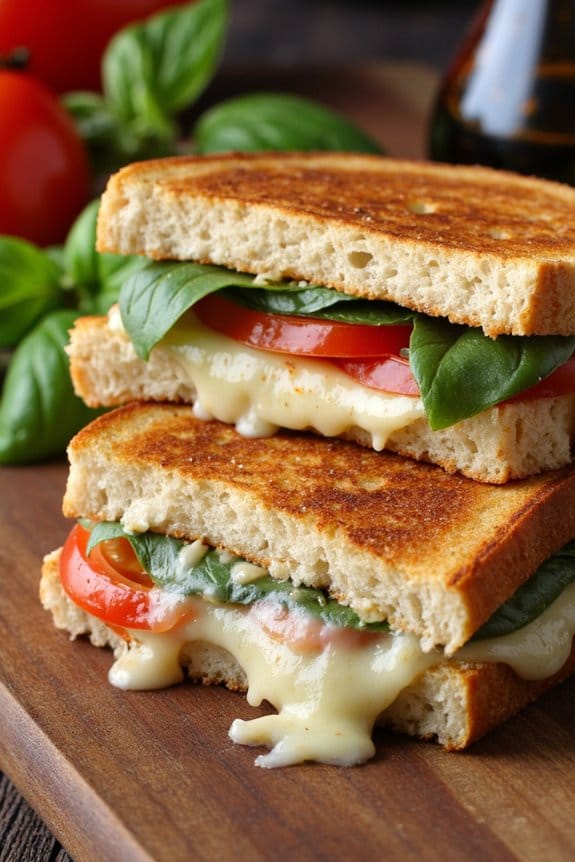
Caprese Grilled Cheese Twist is a delightful fusion of the classic grilled cheese sandwich and the beloved Caprese salad. This mouthwatering dish combines the creamy goodness of melted cheese with the fresh and bright flavors of tomatoes and basil, all encased in buttery, golden-brown bread.
It’s perfect for a casual lunch, a quick dinner, or even an indulgent snack. The Caprese Grilled Cheese Twist not only satisfies your comfort food cravings but also brings a touch of elegance and freshness to your table with its vibrant ingredients.
The twist in this recipe comes from using a variety of cheeses to complement the traditional mozzarella found in Caprese salads. This combination enhances the gooey texture and rich flavor profile, elevating the sandwich to new heights. Fresh tomatoes and basil are layered between slices of perfectly toasted bread, creating a balanced harmony of taste and texture.
This dish is easy to prepare and requires minimal ingredients, making it a favorite for both seasoned cooks and kitchen novices alike.
Ingredients for 4-6 people:
- 8-12 slices of sourdough or ciabatta bread
- 2 cups shredded mozzarella cheese
- 1 cup shredded fontina cheese
- 1 cup shredded provolone cheese
- 3-4 medium ripe tomatoes, sliced
- 1/2 cup fresh basil leaves
- 1/2 cup balsamic glaze
- 4-6 tablespoons unsalted butter, softened
- Salt and pepper to taste
Cooking Instructions:
- Prepare the Ingredients: Start by slicing the tomatoes into even slices and patting them dry with a paper towel to remove excess moisture. This step prevents the sandwiches from becoming soggy. Wash the basil leaves and pat them dry as well.
- Mix the Cheeses: In a bowl, combine the shredded mozzarella, fontina, and provolone cheeses. Mix them thoroughly to guarantee an even distribution of flavors in every bite.
- Assemble the Sandwiches: Lay out the slices of bread and spread a thin layer of softened butter on one side of each slice. This will be the side that gets grilled. On the unbuttered side, layer a generous amount of the cheese mixture, followed by slices of tomato and a few basil leaves. Drizzle a small amount of balsamic glaze over the toppings and season with salt and pepper. Top with another slice of bread, buttered side facing out.
- Grill the Sandwiches: Heat a large skillet or griddle over medium heat. Place the sandwiches, buttered side down, onto the skillet. Cook for about 3-4 minutes on each side, or until the bread is golden brown and crispy and the cheese is melted and gooey. Press down gently with a spatula to help the cheese bind the sandwich together.
- Serve: Once cooked, remove the sandwiches from the skillet and let them rest for a minute. Cut each sandwich in half and arrange them on a serving platter. Serve immediately with extra balsamic glaze on the side for dipping.
Extra Tips:
For the best results, use fresh, high-quality ingredients, especially when it comes to the tomatoes and basil. Opt for heirloom tomatoes if available, as they offer a robust flavor and attractive color.
Keep an eye on the heat while grilling; if the heat is too high, the bread might burn before the cheese gets a chance to melt. If you prefer a spicier kick, consider adding a pinch of red pepper flakes to the cheese mixture. Enjoy experimenting with different types of bread or cheeses to suit your personal taste preferences.
Nutella and Banana Grilled Cheese
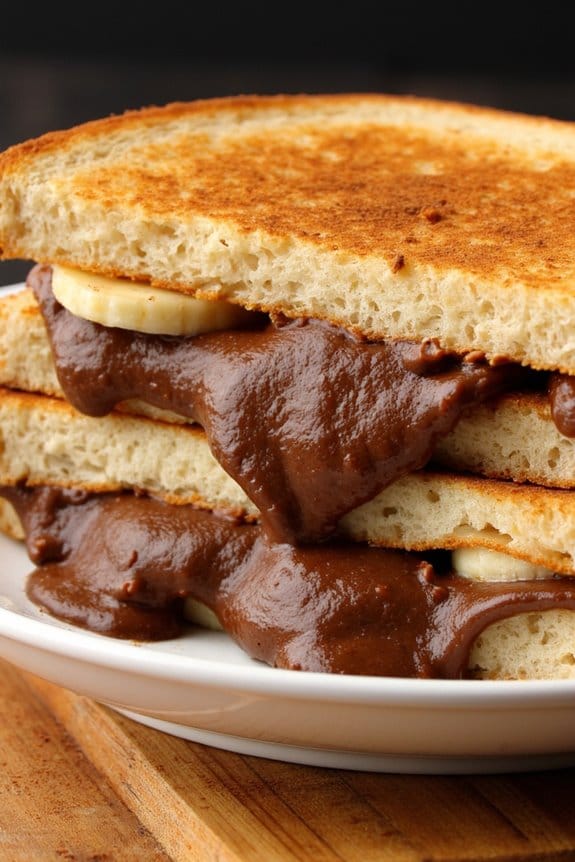
Nutella and Banana Grilled Cheese is a mouthwatering twist on the classic grilled cheese that brings together the creamy sweetness of Nutella with the rich flavor of ripe bananas. Perfect for breakfast, dessert, or a sweet snack, this indulgent treat is sure to be a hit with kids and adults alike.
The combination of gooey Nutella, warm bananas, and crispy, buttery bread creates an irresistible flavor and texture that will leave you wanting more. This recipe is easy to prepare, making it a great option for a quick and delightful meal or snack.
Whether you’re serving it as a fun family breakfast or as a sweet surprise at a gathering, Nutella and Banana Grilled Cheese is sure to impress. With simple ingredients and straightforward steps, you can whip up this delicious dish in no time. This recipe serves 4-6 people, so it’s perfect for sharing with family or friends.
Ingredients:
- 8 slices of bread (preferably brioche or sourdough)
- 1 cup of Nutella
- 4 ripe bananas, sliced
- 4 tablespoons of unsalted butter, softened
- 1 teaspoon of ground cinnamon (optional)
Cooking Instructions:
- Prepare the Ingredients: Begin by slicing the bananas into thin rounds. Make sure your butter is softened to make spreading easier.
- Assemble the Sandwiches: Lay out the slices of bread on a clean surface. Spread a generous amount of Nutella on one side of each slice. Place banana slices evenly over the Nutella on half of the slices. Sprinkle a pinch of ground cinnamon over the bananas if desired. Top each banana-covered slice with a plain Nutella-covered slice to form a sandwich.
- Butter the Bread: Spread softened butter on the outside of each sandwich, guaranteeing an even coat. This will help achieve a golden, crispy crust when grilled.
- Heat the Pan: Preheat a non-stick skillet or griddle over medium heat. Allow the pan to warm up for a few minutes to guarantee even cooking.
- Grill the Sandwiches: Place the sandwiches in the heated skillet, buttered side down. Cook for about 3-4 minutes on each side, or until the bread is golden brown and the Nutella is melted and gooey. Press down gently with a spatula to guarantee even cooking.
- Serve: Once cooked, remove the sandwiches from the skillet and let them cool for a minute or two. Cut each sandwich in half diagonally and serve warm.
Extra Tips:
For an added crunch, consider adding a sprinkle of chopped nuts such as hazelnuts or almonds inside the sandwich. If you want to make it even more indulgent, consider adding a layer of cream cheese or mascarpone alongside the Nutella.
To prevent the bananas from making the bread soggy, make sure they’re fresh and not overripe. Finally, if you’re making these in advance, you can assemble the sandwiches and refrigerate them, then grill them just before serving for ideal crispness.
Sourdough and Swiss Grilled Cheese
Sourdough and Swiss Grilled Cheese is a delicious twist on the classic comfort food, combining the tangy flavor of sourdough bread with the rich, nutty taste of Swiss cheese. This recipe elevates the traditional grilled cheese sandwich to a gourmet level, perfect for a cozy lunch or a satisfying dinner.
The sourdough bread provides a sturdy base that crisps up beautifully, while the Swiss cheese melts to create a gooey, flavorful filling. Adding a touch of Dijon mustard or a sprinkle of fresh herbs can enhance the savory depth of this dish, though the classic version is always a crowd-pleaser on its own.
Perfect for a gathering or a family meal, this Sourdough and Swiss Grilled Cheese recipe serves 4-6 people, making it an ideal choice for sharing. The key to achieving the perfect balance of crispy bread and melty cheese lies in the cooking method, which guarantees that each bite is a delightful combination of textures and flavors.
Whether you’re a seasoned cook or a beginner in the kitchen, this recipe is straightforward and satisfying, assured to please both kids and adults alike.
Ingredients (Serves 4-6):
- 8 slices of sourdough bread
- 12 slices of Swiss cheese
- 4 tablespoons of unsalted butter, softened
- Optional: 2 tablespoons of Dijon mustard
- Optional: Fresh herbs such as thyme or parsley, finely chopped
Cooking Instructions:
- Prepare the Ingredients: Lay out the slices of sourdough bread on a flat surface. If using, spread a thin layer of Dijon mustard on one side of half of the slices.
- Assemble the Sandwiches: Place 2-3 slices of Swiss cheese on each slice of bread with mustard. Top with remaining slices of bread to form sandwiches. If desired, sprinkle some fresh herbs on the cheese before closing the sandwiches.
- Butter the Bread: Spread softened butter evenly on the outside of each sandwich. Make sure the butter covers the entire surface to guarantee an even golden crust.
- Preheat the Pan: Heat a large skillet or griddle over medium heat. Allow the pan to warm up for a few minutes to ensure even cooking.
- Cook the Sandwiches: Place the sandwiches in the skillet, buttered side down. Cook for about 3-4 minutes on each side, pressing gently with a spatula, until the bread is golden brown and the cheese has fully melted. Adjust the heat as necessary to avoid burning.
- Serve and Enjoy: Remove the sandwiches from the skillet and let them cool for a minute before slicing. Serve warm with your choice of side, such as tomato soup or a fresh salad.
Extra Tips:
For the best results, use freshly baked sourdough bread, which will provide a better texture and flavor. If you prefer a bit of a kick, consider adding a pinch of black pepper or a few slices of jalapeño inside the sandwich.
When cooking, keep an eye on the heat to prevent the bread from burning before the cheese melts. Finally, for an extra-crispy crust, try sprinkling a little grated Parmesan cheese on the buttered side of the bread before grilling.