

Grilling isn’t just for burgers and hot dogs anymore! I’ve discovered some unexpected items that can really make your BBQ stand out. Picture your guests’ reactions when you serve smoky grilled watermelon or honey-drizzled peaches. You won’t believe how many delicious surprises you can create on the grill. I’m thrilled to share these unique grilling ideas with you.
Fruit On The Grill: Sweet And Smoky Watermelon
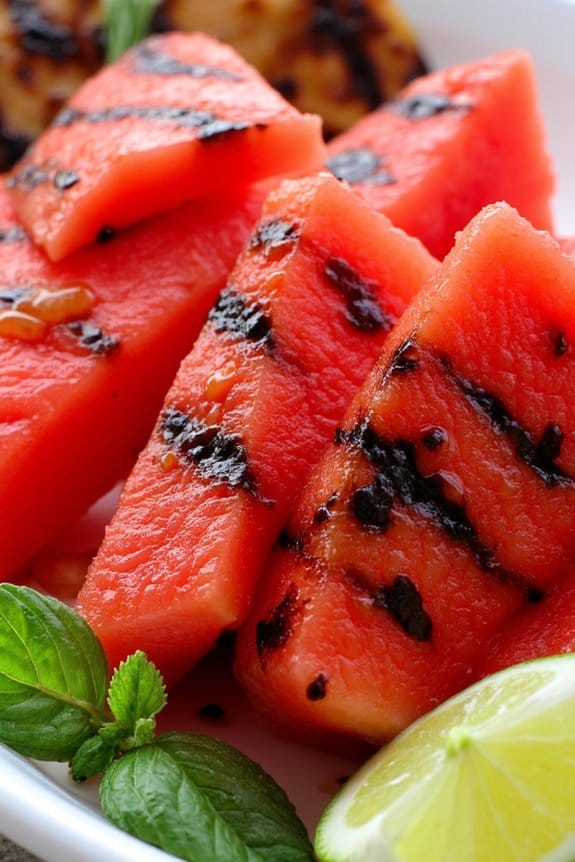
Grilling fruit mightn’t be the first thing that comes to mind when planning a barbecue, but it can lead to some deliciously unexpected results. One such treat is Sweet and Smoky Grilled Watermelon. This dish combines the natural sweetness of watermelon with savory and smoky undertones, creating a delightful contrast that will surprise and delight your taste buds.
Grilled watermelon is perfect as an invigorating appetizer or a unique side dish for your summer cookout. The process of grilling watermelon is straightforward, and the results are worth the minimal effort. When grilled, watermelon takes on a slightly caramelized flavor and an intriguing smoky aroma that enhances its natural juiciness.
This dish isn’t only visually appealing with its beautiful grill marks but also a conversation starter for any gathering. Whether you’re new to grilling fruit or a seasoned griller, this recipe is a must-try for a serving size of 4-6 people.
Ingredients:
- 1 seedless watermelon, cut into 1-inch thick slices
- 2 tablespoons olive oil
- 1 tablespoon honey
- 1 teaspoon smoked paprika
- 1 teaspoon salt
- 1 teaspoon black pepper
- Fresh mint leaves, for garnish
- Lime wedges, for serving
Cooking Instructions:
- Prepare the Watermelon: Begin by cutting the watermelon into 1-inch thick slices. Remove the rind and any seeds, making sure each slice is uniform for even grilling.
- Preheat the Grill: Heat your grill to medium-high heat, about 400°F (200°C). It’s important to make sure the grill is hot enough to create nice grill marks.
- Mix the Glaze: In a small bowl, combine the olive oil, honey, smoked paprika, salt, and black pepper. Mix until well blended. This glaze will add a sweet and smoky flavor to the watermelon.
- Brush the Watermelon: Using a pastry brush, generously coat each slice of watermelon with the glaze mixture on both sides. Make sure each piece is well covered for maximum flavor.
- Grill the Watermelon: Place the watermelon slices on the preheated grill. Grill for about 3-4 minutes on each side, or until grill marks appear and the watermelon is slightly softened.
- Serve: Once grilled, remove the watermelon from the grill and transfer it to a serving plate. Garnish with fresh mint leaves and serve with lime wedges for an extra zing.
Extra Tips:
To achieve the best results, choose a seedless watermelon that’s firm and ripe. This will make it easier to cut and handle on the grill.
If you want to add an extra layer of flavor, consider sprinkling a little feta cheese over the grilled watermelon before serving. This dish pairs wonderfully with grilled meats or can be enjoyed on its own as an invigorating summer treat.
Juicy Grilled Peaches With Honey Drizzle
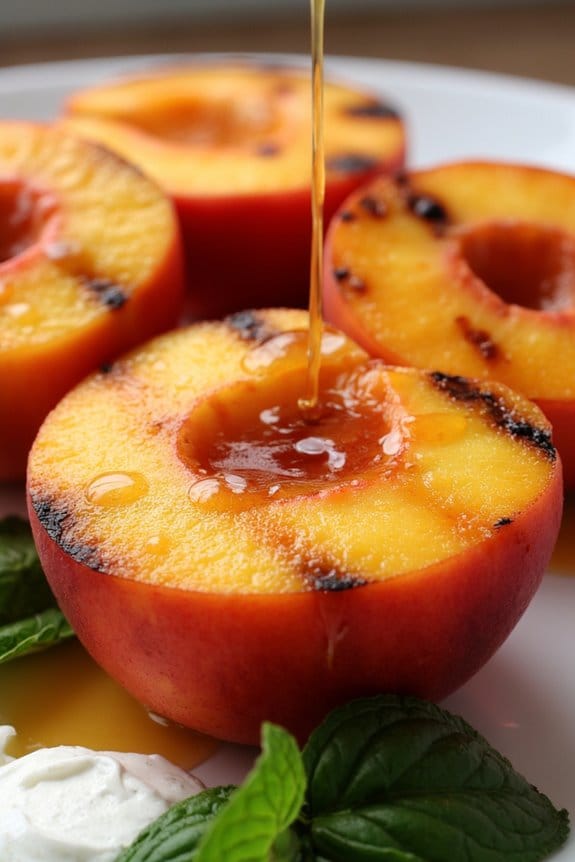
Grilling isn’t just for savory meats and vegetables; it can also transform fruits into delightful, caramelized treats. Juicy Grilled Peaches with Honey Drizzle is a perfect example of how grilling can elevate the natural sweetness of fruit, creating a mouth-watering dessert or side dish. The heat from the grill intensifies the flavor of the peaches, creating a soft and juicy texture that pairs beautifully with a drizzle of honey. This dish isn’t only delicious but also incredibly easy to prepare, making it an impressive addition to your grilling repertoire.
The combination of warm, grilled peaches and sweet honey is beautifully complemented by optional toppings like fresh mint leaves or a dollop of mascarpone cheese. This simple yet elegant dish is sure to impress guests at your next barbecue or dinner party. Whether you serve it as a standalone dessert or as a sweet side to a savory meal, Grilled Peaches with Honey Drizzle is sure to become a summertime favorite.
Ingredients (Serves 4-6)
- 4-6 ripe peaches, halved and pitted
- 2 tablespoons olive oil
- 1/4 cup honey
- 1 teaspoon vanilla extract
- Optional toppings: fresh mint leaves, mascarpone cheese, or vanilla ice cream
Cooking Instructions
- Prepare the Grill: Preheat your grill to medium-high heat. Make sure the grates are clean to prevent sticking.
- Prepare the Peaches: Cut the peaches in half and remove the pits. Brush the cut sides lightly with olive oil. This will help prevent sticking and will enhance the caramelization process.
- Grill the Peaches: Place the peaches cut-side down directly on the grill grates. Grill for about 4-5 minutes or until grill marks appear and the peaches are slightly softened.
- Flip and Cook: Carefully flip the peaches using tongs. Grill the other side for an additional 3-4 minutes. You want the peaches to be tender but not mushy.
- Prepare the Honey Drizzle: While the peaches are grilling, mix the honey and vanilla extract in a small bowl. You can warm the honey slightly for easier mixing and drizzling.
- Serve: Remove the peaches from the grill and place them on a serving platter. Drizzle the honey-vanilla mixture over the warm peaches. Add any optional toppings like fresh mint, mascarpone cheese, or a scoop of vanilla ice cream.
Extra Tips
For best results, choose peaches that are ripe but still firm. Overripe peaches may become too mushy on the grill. If you find it challenging to keep the peaches from sticking, consider using a grill pan.
Additionally, adjust the amount of honey based on your sweetness preference. For a more decadent version, try experimenting with different types of honey or even infusing it with herbs like rosemary for a unique twist.
Herb Butter Grilled Oysters: A BBQ Treat
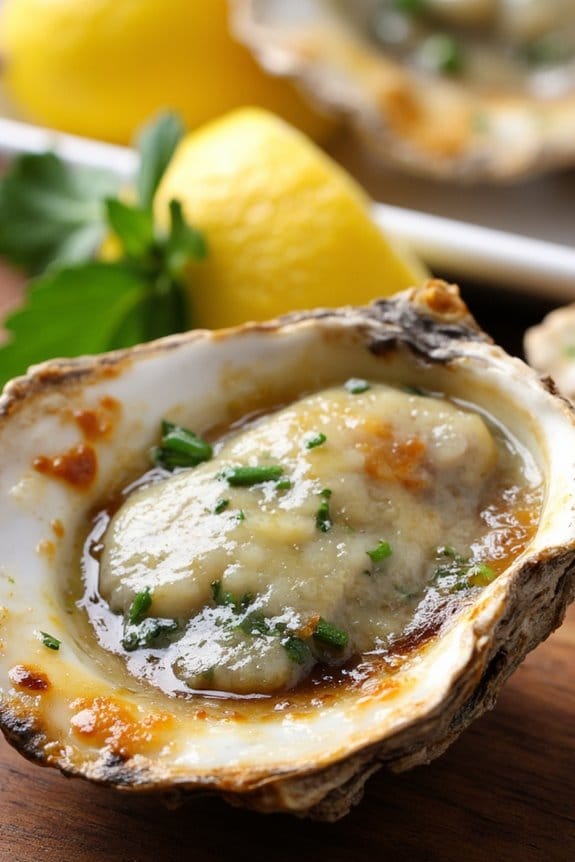
Herb Butter Grilled Oysters are an exquisite BBQ treat that elevate any outdoor gathering. This dish combines the briny sweetness of fresh oysters with the rich, savory flavors of herb-infused butter, creating an indulgent experience for the palate.
Grilling the oysters not only enhances their natural flavor but also adds a delightful smoky aroma that perfectly complements the creamy herb butter. Ideal for a summer cookout or a special dinner, these grilled oysters will impress your guests and make any meal memorable.
The preparation is straightforward, and the cooking process is quick, making these Herb Butter Grilled Oysters a perfect choice for both novice and experienced grillers. The key to this dish is the herb butter, which is generously slathered onto the oysters before they hit the grill, ensuring each bite is bursting with flavor.
Whether you serve them as an appetizer or the main course, these oysters are sure to be a hit. Just make sure to have plenty of napkins on hand, as you’ll want to savor every last drop of that delicious herb butter.
Ingredients for 4-6 servings:
- 24 fresh oysters, scrubbed clean
- 1 cup unsalted butter, softened
- 2 tablespoons fresh parsley, finely chopped
- 1 tablespoon fresh chives, finely chopped
- 1 tablespoon fresh tarragon, finely chopped
- 2 cloves garlic, minced
- 1 tablespoon lemon juice
- Salt and pepper to taste
- Lemon wedges for serving
Cooking Instructions:
- Prepare Herb Butter: In a medium bowl, combine softened butter, parsley, chives, tarragon, garlic, lemon juice, salt, and pepper. Mix thoroughly until the ingredients are well incorporated. Set aside.
- Preheat Grill: Heat your grill to medium-high heat, ensuring it’s clean and well-oiled to prevent sticking.
- Shuck Oysters: Carefully shuck the oysters, leaving the meat on the half shell. Discard the top shells and arrange the oysters on a tray to keep them steady.
- Add Herb Butter: Spoon about a teaspoon of the prepared herb butter onto each oyster, spreading it evenly over the surface.
- Grill Oysters: Place the oysters directly on the grill, shell side down. Close the grill lid and cook for 5-7 minutes, or until the butter is bubbling and the oysters are just cooked through.
- Serve: Remove the oysters from the grill using tongs and transfer them to a serving platter. Serve immediately with lemon wedges on the side.
Extra Tips:
When selecting oysters, make sure they’re fresh and tightly closed. If an oyster is open, give it a tap; it should close on its own. If it remains open, discard it.
To add an extra layer of flavor, consider adding a splash of white wine to the herb butter mixture or a sprinkle of Parmesan cheese over the oysters before grilling. These variations can enhance the overall taste and make the dish even more luxurious.
Crispy Grilled Pizza: A Cheesy Adventure

Crispy Grilled Pizza: A Cheesy Adventure is an exciting twist on traditional pizza, bringing the smoky flavors of the grill straight to your dinner table. By grilling the pizza, you achieve a perfectly crispy crust and a delightful char that complements the gooey cheese and savory toppings. This method is perfect for weekend family gatherings or a casual dinner party, offering a unique way to enjoy a classic favorite.
The key to success lies in preparing your ingredients in advance and maintaining the right temperature on the grill. Grilled pizzas aren’t only delicious but also incredibly versatile. You can customize them with a variety of toppings to cater to different taste preferences, making them ideal for a crowd.
Whether you’re a fan of classic Margherita or prefer more adventurous toppings like prosciutto and arugula, grilling pizza allows you to experiment with flavors and textures. The following recipe serves 4-6 people, providing the perfect amount for sharing with friends and family.
Ingredients for Crispy Grilled Pizza:
- 1 pound pizza dough
- 1 cup pizza sauce
- 2 cups shredded mozzarella cheese
- 1/2 cup grated Parmesan cheese
- 1/2 cup pepperoni slices
- 1/2 cup sliced mushrooms
- 1/2 cup chopped bell peppers
- 1/4 cup sliced black olives
- 2 tablespoons olive oil
- Fresh basil leaves for garnish
- Salt and pepper to taste
Cooking Instructions:
- Prepare the Grill: Preheat your grill to medium-high heat, approximately 450°F. If using a charcoal grill, ascertain the coals are evenly distributed for consistent heat.
- Roll Out the Dough: Lightly flour a clean surface and roll out the pizza dough into a thin, even circle or rectangle, depending on your grill’s shape. Aim for a thickness of about 1/4 inch to guarantee a crispy crust.
- Oil the Dough: Brush one side of the dough with olive oil to prevent sticking and to promote a crispy texture.
- Grill the Dough: Carefully place the oiled side of the dough directly onto the grill grates. Close the lid and grill for 2-3 minutes until the bottom is crispy and has grill marks.
- Flip and Add Toppings: Use tongs or a spatula to flip the dough. Quickly brush the top with olive oil, spread the pizza sauce evenly, and sprinkle with mozzarella and Parmesan cheeses. Add pepperoni, mushrooms, bell peppers, and olives.
- Finish Grilling: Close the grill lid and cook for an additional 4-5 minutes or until the cheese is melted and bubbly, and the crust is golden brown.
- Garnish and Serve: Remove the pizza from the grill and let it rest for a minute. Sprinkle with fresh basil leaves, season with salt and pepper, slice, and serve hot.
Extra Tips: To guarantee even cooking, rotate the pizza halfway through the grilling process if your grill tends to have hot spots. You can also experiment with different cheese blends for added flavor complexity.
If you’re using a gas grill, lower the heat to medium after placing the pizza to prevent the crust from burning before the cheese melts. For a smokier flavor, consider adding wood chips to your charcoal grill or using a smoker box on your gas grill.
Grilled Halloumi Cheese: A Grill-Friendly Option
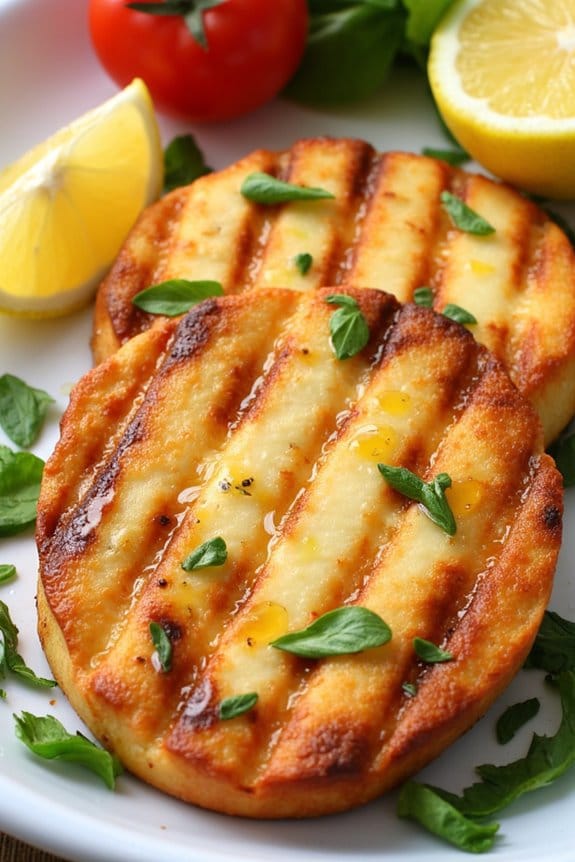
Grilled Halloumi Cheese is a delicious and unique option for your next dinner gathering. Known for its high melting point, Halloumi is perfect for grilling, offering a crispy exterior and a soft, creamy interior.
Originating from Cyprus, this semi-hard cheese is made from a mixture of goat’s and sheep’s milk, and sometimes cow’s milk. It’s naturally salty and slightly tangy flavor makes it a delightful addition to any meal, especially when enhanced with a touch of grilling magic. Pair it with fresh vegetables or a tangy dressing, and you’ll have a memorable dish that stands out from the usual barbecue fare.
Grilling Halloumi isn’t only simple but also quick, making it an ideal choice for those who want to whip up something tasty in no time. The cheese slices develop beautiful grill marks that add an appetizing visual appeal to the dish.
While Halloumi is fantastic on its own, you can also serve it with a variety of accompaniments such as lemon wedges, fresh herbs, or a side of grilled vegetables to enhance its flavors. This recipe is designed to serve 4-6 people, guaranteeing that everyone at your gathering gets to enjoy this delightful cheesy experience.
Ingredients:
- 2 blocks of Halloumi cheese (approximately 8 ounces each)
- 2 tablespoons olive oil
- Freshly ground black pepper
- Lemon wedges, for serving
- Fresh herbs (such as mint or basil), for garnish
Cooking Instructions:
- Prepare the Grill: Preheat your grill to medium-high heat. You can use a gas grill or a charcoal grill, depending on your preference. Confirm the grates are clean and lightly oiled to prevent sticking.
- Slice the Halloumi: Cut each block of Halloumi cheese into slices approximately 1/3 inch thick. This thickness allows the cheese to cook evenly without falling apart.
- Season the Cheese: Brush both sides of each Halloumi slice with olive oil to promote browning and prevent sticking. Sprinkle freshly ground black pepper over the slices to taste.
- Grill the Halloumi: Place the Halloumi slices directly on the grill grates. Grill for about 2-3 minutes on each side until the cheese has distinct grill marks and a golden-brown crust forms.
- Serve: Remove the cheese from the grill and transfer it to a serving platter. Serve immediately with lemon wedges and garnish with fresh herbs. The lemon juice adds an invigorating zest to the Halloumi, while the herbs provide an aromatic touch.
Extra Tips:
When grilling Halloumi, it’s important to monitor the cheese closely as it cooks quickly. Make sure to use a spatula to gently flip the slices to avoid breaking them.
If you’re using a charcoal grill, wait until the flames have subsided and the coals are glowing for a more even cooking temperature. Don’t hesitate to experiment with different herbs and spices to tailor the flavor to your liking.
Additionally, consider serving the grilled Halloumi over a salad or alongside roasted vegetables for a more complete meal.
Grilled Avocado: Achieve Creamy, Charred Perfection
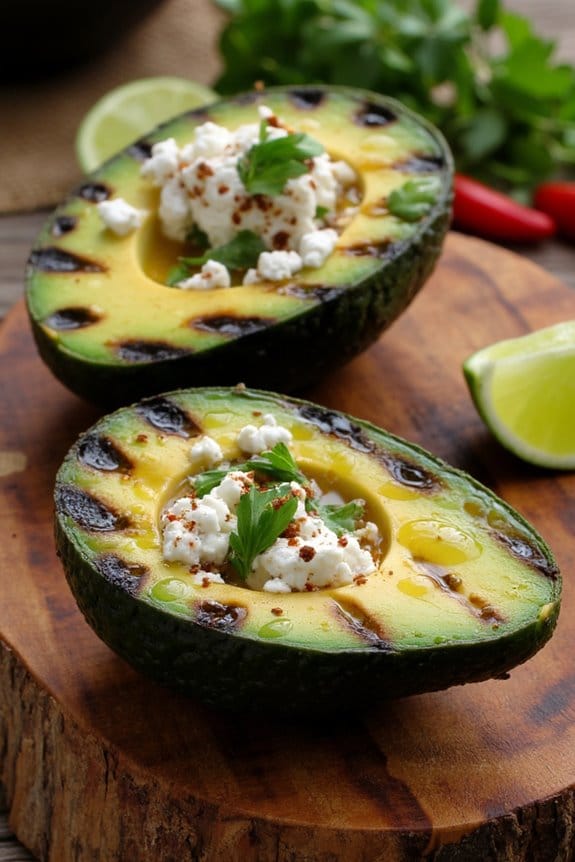
Grilled avocado is a delightful twist on the classic fruit, bringing out its natural richness with a smoky, charred flavor that elevates any meal. This unique grilling option is perfect as a stand-alone side dish or an addition to salads and tacos.
The grilling process enhances the creamy texture of the avocado while imparting a subtle smokiness, creating a delicious contrast between the soft interior and the slightly crispy exterior. With just a few simple ingredients and a grill, you can transform ordinary avocados into a gourmet experience that’s bound to impress your family and friends.
This recipe is designed to serve 4-6 people, making it ideal for small gatherings or family dinners. The preparation is straightforward, requiring minimal ingredients and effort. The key to achieving grilled avocado perfection is to use ripe but firm avocados, guaranteeing they hold up well on the grill without becoming mushy.
With the right technique, you’ll be able to enjoy the creamy, rich flavors of avocado with a delicious charred finish that pairs beautifully with a variety of dishes.
Ingredients:
- 3 ripe but firm avocados
- 2 tablespoons olive oil
- 1 lime, juiced
- Salt, to taste
- Black pepper, to taste
- Optional toppings: chopped cilantro, crumbled feta cheese, diced tomatoes, or chili flakes
Cooking Instructions:
- Prep the Grill: Preheat your grill to medium-high heat, around 400°F (200°C). Confirm the grill grates are clean to prevent sticking.
- Prepare the Avocados: Slice the avocados in half lengthwise and remove the pits. Gently peel the skins off the avocado halves.
- Season the Avocados: In a small bowl, mix the olive oil with lime juice, salt, and pepper. Brush this mixture generously over the cut sides of the avocados.
- Grill the Avocados: Place the avocado halves cut side down on the preheated grill. Close the grill lid and cook for 4-5 minutes, or until grill marks appear and the avocados are slightly charred.
- Remove and Serve: Carefully remove the avocados from the grill using a spatula. Place them on a serving platter and, if desired, sprinkle with optional toppings like chopped cilantro, crumbled feta cheese, diced tomatoes, or chili flakes.
Extra Tips:
For the best results, choose avocados that are just ripe; they should yield to gentle pressure but not be overripe or mushy. If you find that the avocados are difficult to handle due to their smooth surface, consider leaving the skins on while grilling and removing them afterward.
Additionally, feel free to experiment with different toppings and seasonings to suit your taste preferences. Grilled avocados can also be served as a base for other dishes, such as filling them with fresh salsa or your favorite protein for a hearty meal.
Vegetarian Options: Grilled Cauliflower Steaks
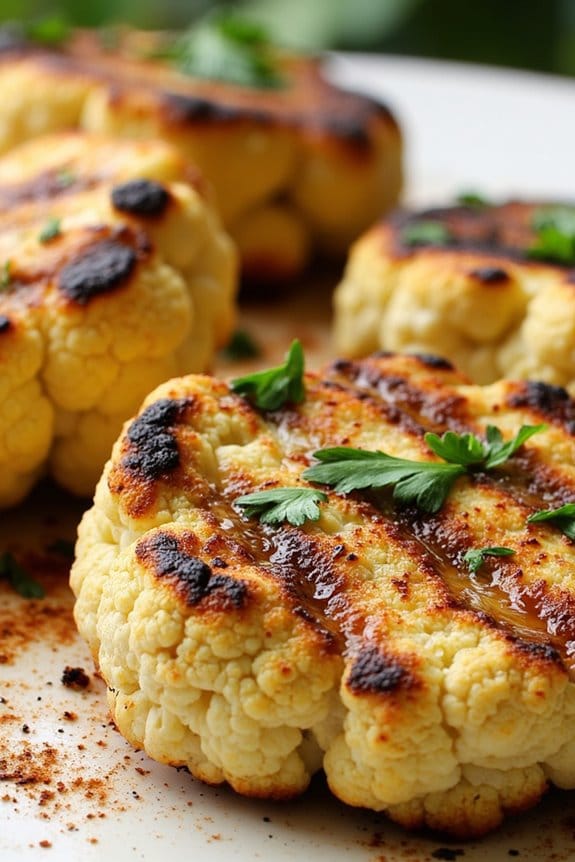
Grilled Cauliflower Steaks are a delightful vegetarian option that brings a robust, smoky flavor to your dinner table. This dish features thick slices of cauliflower, seasoned and grilled to perfection, offering a satisfying texture and a burst of taste with every bite. The grilling process imparts a charred, caramelized exterior while keeping the inside tender and moist.
Whether you’re hosting a barbecue or simply looking for a healthy yet indulgent meatless dinner, these cauliflower steaks are guaranteed to impress.
The versatility of cauliflower makes it an excellent canvas for a variety of seasonings and toppings. In this recipe, we’ll be using a simple but flavorful marinade that enhances the natural nuttiness of the cauliflower. This dish can be served as a main course or as a hearty side dish, accompanied by a vibrant chimichurri sauce or a sprinkle of grated parmesan for added flair.
Perfect for serving 4-6 people, this recipe is both easy to prepare and deliciously satisfying.
Ingredients (for 4-6 servings):
- 2 large heads of cauliflower
- 1/4 cup olive oil
- 2 tablespoons lemon juice
- 1 teaspoon smoked paprika
- 1 teaspoon garlic powder
- 1 teaspoon onion powder
- Salt and pepper to taste
- Fresh parsley for garnish
Cooking Instructions:
- Prepare the Cauliflower: Remove the leaves and trim the stem of each cauliflower head, leaving the core intact. Cut each head into 1 to 1.5-inch thick slices. You should get about 2-3 steaks from each head, with some florets falling off; these can be grilled separately.
- Make the Marinade: In a small bowl, whisk together the olive oil, lemon juice, smoked paprika, garlic powder, onion powder, salt, and pepper. This mixture will enhance the flavor of the cauliflower and aid in achieving a nice grill char.
- Marinate the Cauliflower: Brush the marinade generously on both sides of the cauliflower steaks. Allow them to sit for at least 10 minutes to absorb the flavors; you can also marinate them for up to an hour if you have the time.
- Preheat the Grill: Preheat your grill to medium-high heat. Clean and oil the grill grates to prevent the cauliflower from sticking.
- Grill the Steaks: Place the cauliflower steaks on the grill. Cook for about 5-7 minutes on each side, or until they develop a nice char and are tender when pierced with a fork. Be cautious not to overcook, as they should remain slightly firm.
- Serve: Remove the grilled cauliflower steaks from the grill and transfer them to a platter. Garnish with chopped fresh parsley before serving to add a touch of color and freshness.
Extra Tips:
For best results, confirm your grill is properly preheated to avoid sticking and achieve the perfect caramelization.
If you’re using a gas grill, keep the lid closed as much as possible to maintain heat. For added flavor, consider experimenting with different spices such as cumin or coriander, or add a splash of balsamic glaze before serving.
If you prefer a little heat, a pinch of cayenne pepper in the marinade can add a nice kick. These cauliflower steaks pair excellently with a variety of sauces, so feel free to serve them with your favorite dressing or dip.
Charred Romaine Lettuce For A Smoky Salad
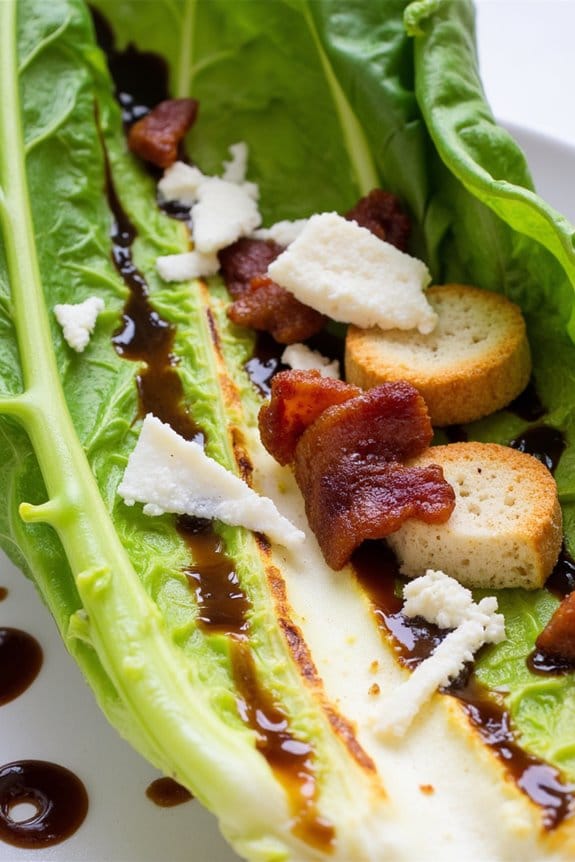
Grilling romaine lettuce is an innovative way to enhance the flavor profile of your salads, adding a smoky dimension that pairs beautifully with fresh ingredients. This simple yet sophisticated dish transforms ordinary romaine hearts into a charred, flavorful base that can be topped with your favorite salad ingredients. The slight bitterness of the romaine is mellowed by the heat of the grill, and the resulting dish is both visually appealing and deliciously complex.
Perfect for a light dinner or as an impressive starter, Charred Romaine Lettuce is a great addition to your grilling repertoire. It’s quick to prepare and cook, making it an excellent choice for those summer evenings when you want something invigorating yet satisfying. Pair it with a tangy vinaigrette and sprinkle with flavorful toppings like parmesan or crumbled bacon for added depth.
Ingredients (serving size: 4-6 people):
- 3 heads of romaine lettuce
- 2 tablespoons olive oil
- Salt, to taste
- Black pepper, to taste
- 1 lemon, halved
- 1/2 cup shaved parmesan cheese
- 1/4 cup crumbled bacon (optional)
- 1/4 cup croutons
- Balsamic glaze or vinaigrette for drizzling
Instructions:
- Prepare the Grill: Preheat your grill to medium-high heat. Confirm the grates are clean and lightly oiled to prevent sticking.
- Prepare the Romaine: Remove any wilted outer leaves from the romaine and cut each head in half lengthwise, keeping the core intact to hold the leaves together. Rinse under cold water and pat dry completely with paper towels.
- Season the Lettuce: Brush each romaine half with olive oil and season generously with salt and black pepper. The oil helps to create a nice char and prevents sticking.
- Grill the Romaine: Place the romaine halves cut-side down on the grill. Grill for 2-3 minutes until you see grill marks and the leaves begin to wilt slightly. Flip and grill the other side for another 1-2 minutes.
- Add Lemon Juice: While the romaine is still on the grill, squeeze the lemon halves over them to add a bright, acidic flavor that complements the smokiness.
- Assemble the Salad: Remove the romaine from the grill and place on a serving platter. Sprinkle with shaved parmesan, crumbled bacon, and croutons. Drizzle with balsamic glaze or your choice of vinaigrette just before serving.
Extra Tips:
When grilling the romaine, be attentive to the timing to avoid burning the leaves; you want them charred, not burnt.
Experiment with different dressings and toppings, like nuts or seeds, to customize the salad to your taste. If you prefer a more traditional Caesar salad, you can swap the balsamic glaze with a creamy Caesar dressing.
Additionally, for a more nutritious option, consider using whole grain croutons or omitting them entirely.
Grilled Pineapple With A Cinnamon Kick
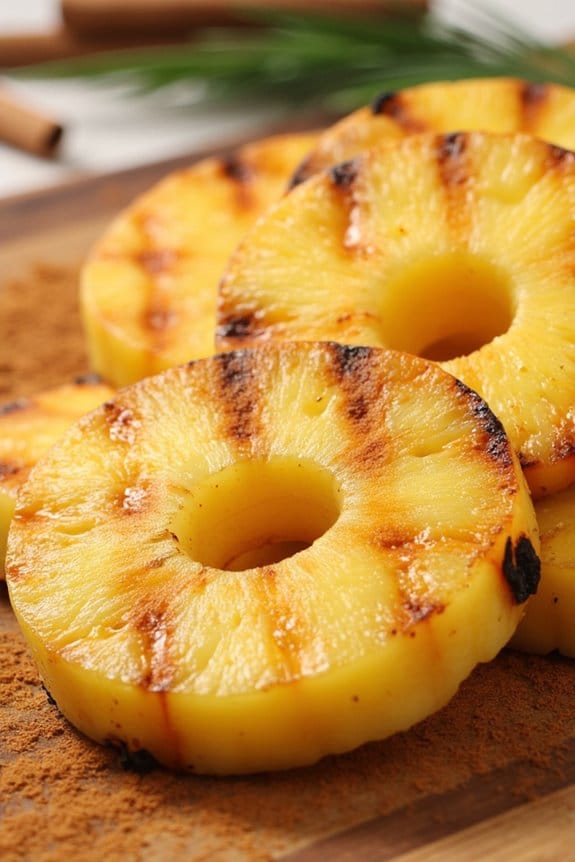
Grilled Pineapple With A Cinnamon Kick is a delightful and surprising dish that can transform any barbecue into a tropical feast. This unique recipe takes the natural sweetness of fresh pineapple and enhances it with a warm, spicy cinnamon coating. The grilling process caramelizes the sugars in the pineapple, giving it a slightly charred and smoky flavor that contrasts beautifully with the aromatic spices.
Whether you’re looking for a sweet side to accompany your grilled meats or a standalone dessert that will wow your guests, this recipe is bound to impress.
The key to this dish lies in the balance of flavors and the grilling technique. By choosing ripe pineapples, you ascertain that the fruit is juicy and naturally sweet. The addition of cinnamon adds an unexpected twist that complements the pineapple’s acidity. Grilling the fruit over medium heat allows the slices to cook evenly while developing grill marks that add visual appeal.
Serve this dish warm, and you have a crowd-pleaser that’s both healthy and indulgent, making it perfect for any summer gathering.
Ingredients (Serves 4-6 people):
- 1 fresh pineapple
- 1/4 cup brown sugar
- 1 tablespoon ground cinnamon
- 1/2 teaspoon ground nutmeg
- 1/4 teaspoon ground allspice
- 1/4 teaspoon salt
- 2 tablespoons unsalted butter, melted
- Optional: vanilla ice cream or whipped cream for serving
Cooking Instructions:
- Prepare the Pineapple: Begin by cutting off the top and bottom of the pineapple. Stand the pineapple upright and carefully slice off the skin, removing any remaining “eyes” with a small paring knife. Cut the pineapple into 1/2-inch thick rings and remove the core from each slice using a small round cutter or knife.
- Mix the Cinnamon Coating: In a small bowl, combine the brown sugar, ground cinnamon, nutmeg, allspice, and salt. Mix well until the spices are evenly distributed within the sugar.
- Coat the Pineapple: Brush each pineapple slice lightly with melted butter. Then, sprinkle both sides of each slice generously with the cinnamon sugar mixture, ensuring an even coating.
- Preheat the Grill: Heat your grill to medium heat, around 350°F (175°C). Make sure the grill grates are clean and lightly oiled to prevent sticking.
- Grill the Pineapple: Place the coated pineapple slices on the grill. Cook for about 3-4 minutes on each side, or until the slices are tender and have nice grill marks. Be careful not to overcook them, as they can become mushy.
- Serve: Remove the grilled pineapple slices from the grill and allow them to cool slightly. Serve warm with a scoop of vanilla ice cream or a dollop of whipped cream, if desired.
Extra Tips: For the best results, choose a pineapple that’s slightly soft to the touch and has a sweet aroma at the base, indicating ripeness. If you’re looking to add more depth of flavor, consider soaking the pineapple slices in a splash of rum or coconut milk for 15 minutes before applying the cinnamon sugar coating.
This dish can also be made using a grill pan on the stovetop if outdoor grilling isn’t an option. Remember to adjust the grilling time based on the thickness of the pineapple slices to ascertain they cook evenly without burning.
Smoky Grilled Artichokes With Lemon Dip
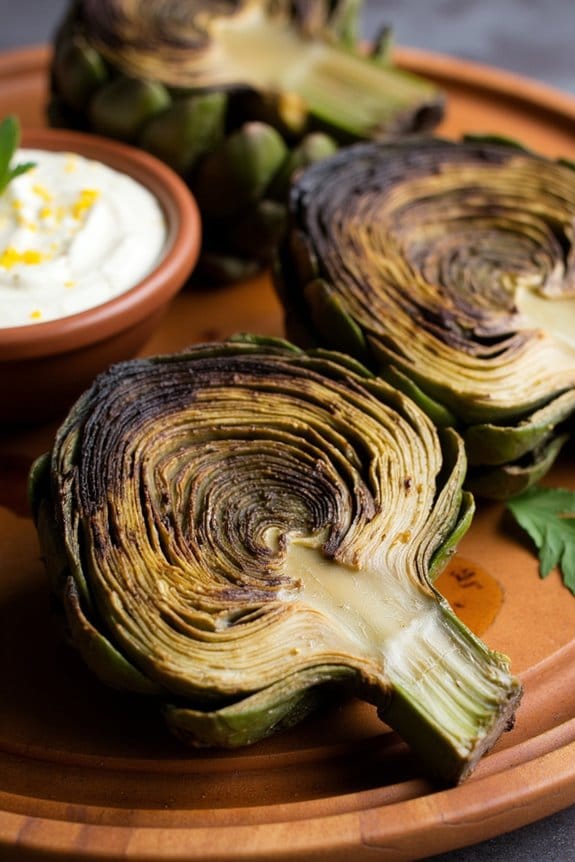
Smoky Grilled Artichokes With Lemon Dip is a delightful and unique addition to your grill menu, offering a blend of smoky flavors with a revitalizing citrusy dip that elevates the humble artichoke to a gourmet delight. Grilling artichokes not only enhances their natural flavors but also imparts a rich, charred taste that pairs beautifully with the creamy lemon dip. This dish is perfect as an appetizer or a side, and it’s a great way to impress your guests with something unusual yet incredibly tasty.
The key to making perfect smoky grilled artichokes is in the preparation and the dip. Start by selecting fresh, firm artichokes with tightly packed leaves. The lemon dip complements the smoky artichokes excellently, providing a bright, zesty contrast that makes each bite irresistible. This recipe serves 4-6 people and involves simple steps that guarantee the artichokes remain tender and flavorful. Let’s plunge into the ingredients needed and the steps to create this delicious dish.
Ingredients for Smoky Grilled Artichokes With Lemon Dip (Serves 4-6):
- 4 large artichokes
- 1 lemon, halved
- 1/4 cup olive oil
- Salt and pepper, to taste
- 1/2 cup mayonnaise
- 2 tablespoons fresh lemon juice
- 1 teaspoon lemon zest
- 1 teaspoon garlic powder
- 1 tablespoon chopped fresh parsley
Cooking Instructions:
- Prepare the Artichokes: Start by trimming the artichokes. Cut off the top inch of the artichoke and trim the stem to about an inch. Remove the outer tough leaves until you reach the softer, lighter-colored leaves. Use kitchen scissors to snip off the sharp tips of the remaining leaves. Rub the cut surfaces with lemon halves to prevent browning.
- Boil the Artichokes: Fill a large pot with water and bring it to a boil. Add the prepared artichokes and a squeeze of lemon juice from the lemon halves. Reduce the heat to a simmer and cook the artichokes for about 15-20 minutes, until they’re tender but not falling apart. Drain and let them cool slightly.
- Season and Grill: Preheat your grill to medium-high heat. Cut the boiled artichokes in half lengthwise. Drizzle the artichokes with olive oil and season them with salt and pepper. Place them cut side down on the grill and cook for about 5-7 minutes, until they’ve nice grill marks and a smoky aroma. Turn them over and grill for another 5 minutes.
- Prepare the Lemon Dip: While the artichokes are grilling, mix the mayonnaise, fresh lemon juice, lemon zest, garlic powder, and chopped parsley in a bowl. Stir until well combined and adjust the seasoning with salt and pepper to taste.
- Serve: Arrange the grilled artichokes on a serving platter and serve them warm with the lemon dip on the side.
Extra Tips:
When selecting artichokes, opt for ones that feel heavy for their size, as they tend to have more flesh. If you prefer a spicier dip, add a pinch of cayenne pepper or a dash of hot sauce to the lemon dip.
To get the best grill marks, make certain the grill grates are clean and oiled before placing the artichokes on them. This dish pairs well with grilled meats or seafood, making it a versatile addition to any barbecue menu. Enjoy experimenting with different herbs in the dip, such as dill or basil, to add more layers of flavor.